
It never entered my head, keeping that coupling with arduino via USB, it prevented me to explore remote area with sensors, also that the api JSSC de Alexey Sokolov is no longer maintained, only a fork that I see quite active people and it is here jSerialComm.
| An Elegant solution for guindow and linux Installation ESP8285H05 in Ubuntu 18.04.3 LTS |
We need a serial to usb port converter, but the arduino does not provide them already, so there is no need to buy one.
It is flashed because the esp8266 comes to be used with the boring AT commands, which we save flashing because it would support arduino commands, being programmable with the IDE as such, or for example PlataformIO a plugin for VSCode.
We’ll use
-
If there is no confidence in the above link nodemcu-flasher
-
We start by removing the atmega 328p micro.
-
Make a jumper from reset pin to gnd (Optional)
-
TX to TX , and RX to RX from arduino to esp8266
-
The GPIO0 and GND pin of the ESP8266 to the GND of the arduino (PROGRAMMING MODE) bootloader mode.
-
Pull down resistor from the RX to the RX of the ESP8266 to reduce voltage from 5v to 3.3v, or use an adjustable source.
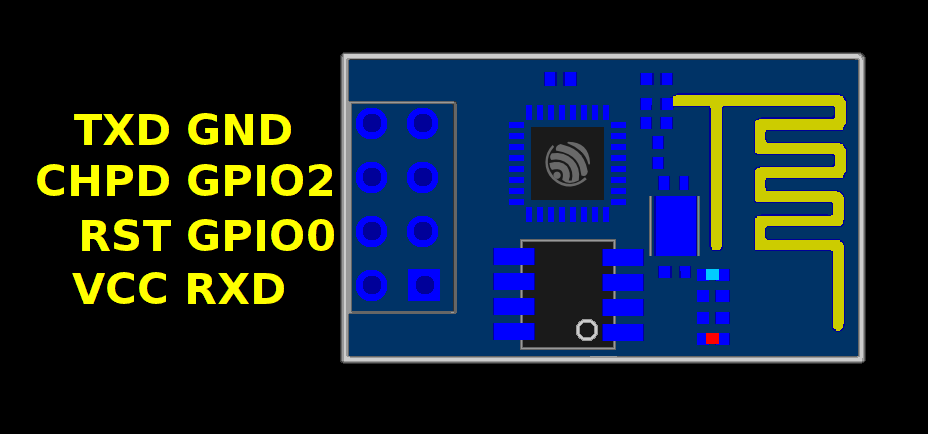
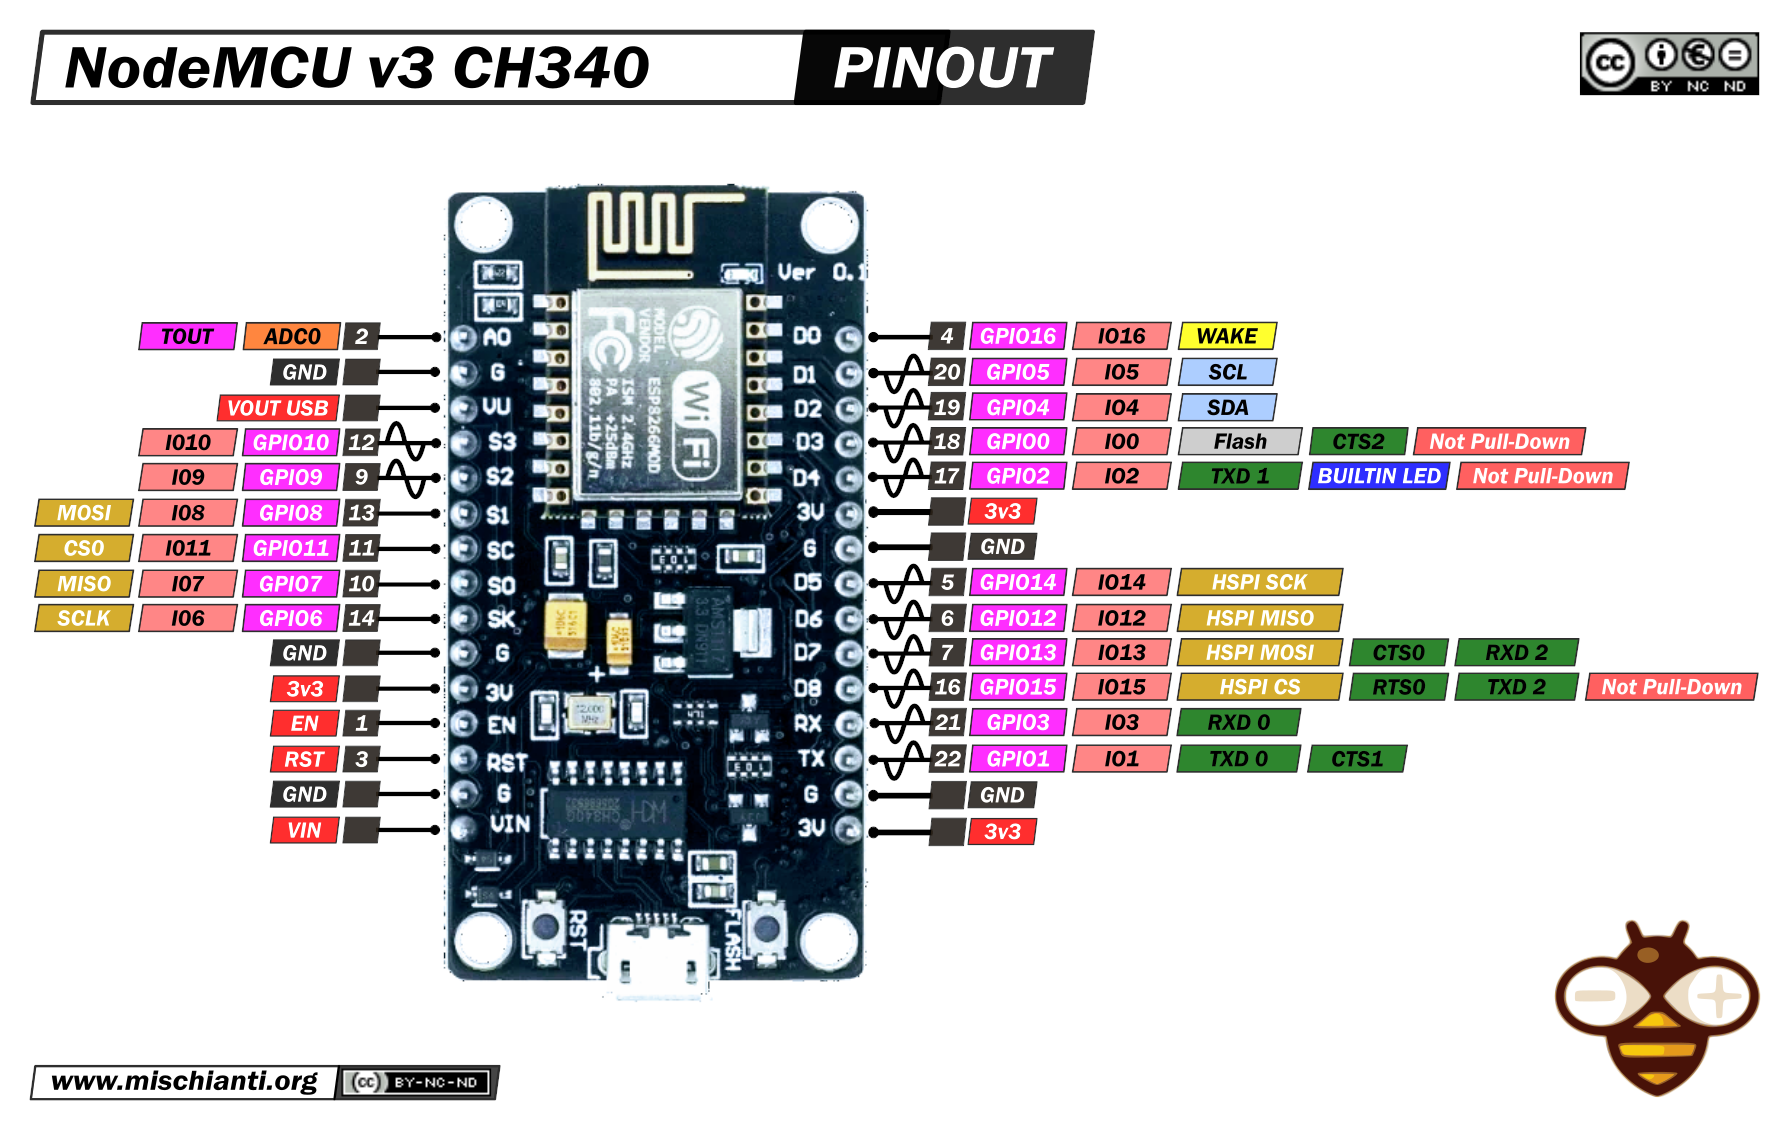
Esp8266 pinout
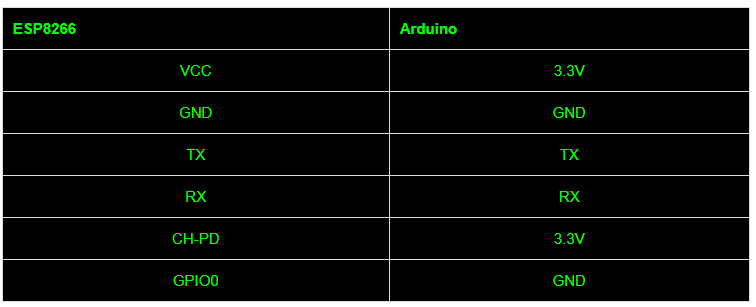
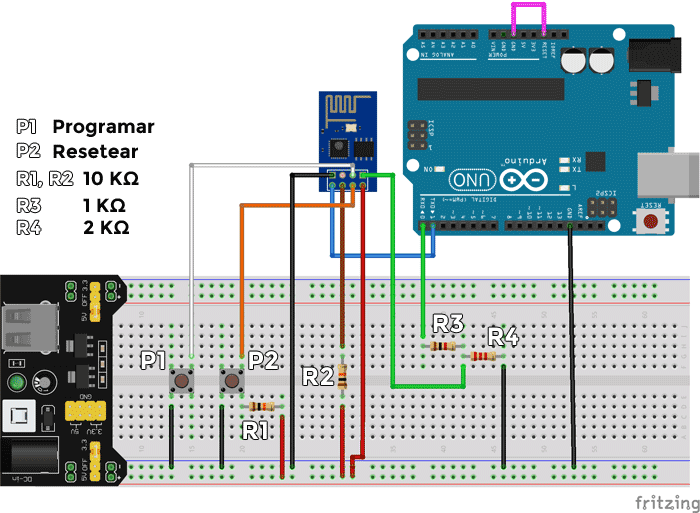
Connection with arduino and adjustable power supply from 3.3v to 5v
NODEMCU FIRMWARE PROGRAMMER
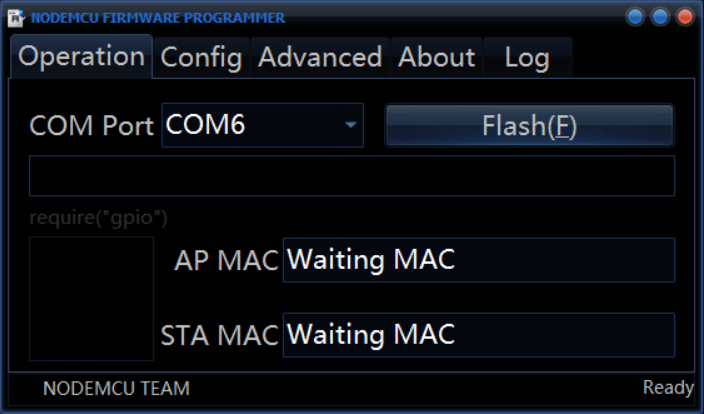
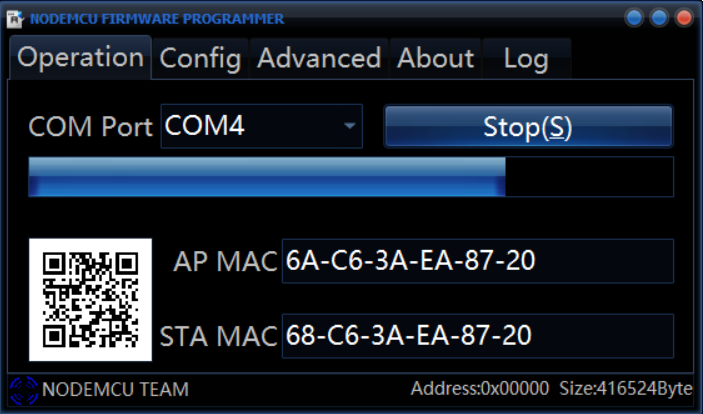
The first time you run the application and give it flash, it seems to be looking for the com port of the arduino, we must give it flash, and reconnect the usb port, i.e. unplug, and thus begin the flashing process.
Log with bad flashing
Here we see that it gives a certain problem when connecting to the com
Note:Begin find ESP8266.
Note:Serial port disconnected.
Warning:Serial port closed by user.
Note:Detect serial port changed.
Note:Auto MAP serial port.Port-->COM3
Note:Serial port connected.
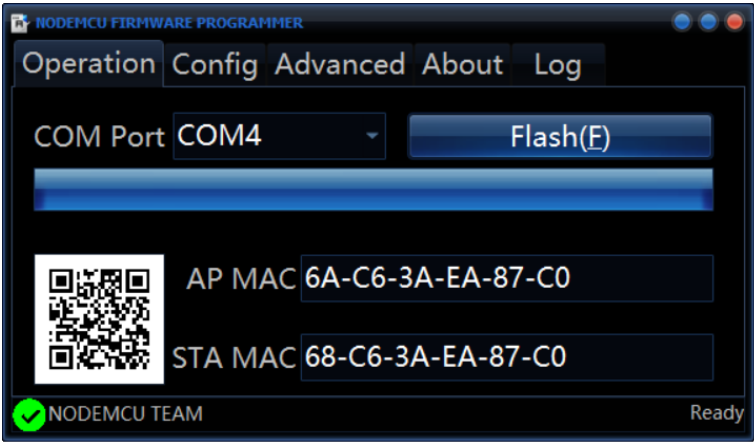
Note:Begin find ESP8266.
Note:Detect serial port changed.
Note:Auto MAP serial port.Port-->COM4Correct log
flashing with NodemcuFirmwareProgrammer
Note:Detect serial port changed.
Note:Auto MAP serial port.Port-->COM4

Note:Serial port connected.
Note:Begin find ESP8266.
Note:ESP8266 ACK success.
Note:ESP8266 ACK success.
Note:Set base address success.
Note:Program flash success.
Flashing successfully completed
Configuration of the arduino with esp8266 repository
The repository is the following Esp8266 we must add the following URL in the Preferences window:
-
Gestor de URLs Adicionales de Tarjetas
https://arduino.esp8266.com/stable/package_esp8266com_index.json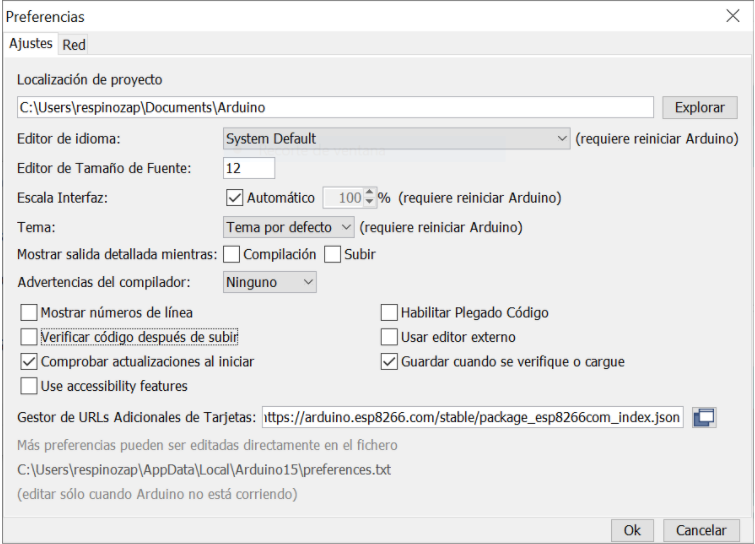
Now thanks to that we can go to Herramientas/Placa/Gestor de tarjetas, search for ESP8266 and install it to download the api.

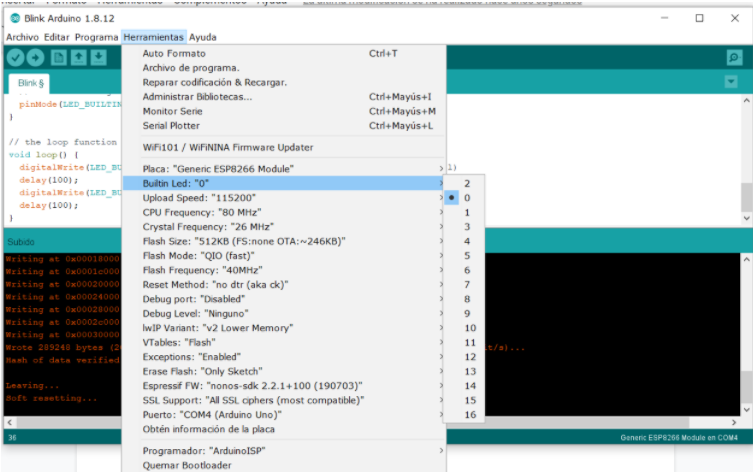
After installation you should see in Herramientas/Placa the new Espxxx boards added to the list.
Select Generic ESP8266 Module
Flashing ESP8266 with basic led blink example
Also the default led to use, will be GPIO0 the pinDigital
-
1 Place the GPIO0 pin to ground without the 3.3v voltage coming from the arduino, or the source,0
-
2 Press (subir/upload)
-
3 In the sketch when the following appears.
-
4 Connecting……. just place the 3.3v (IMMEDIATELY)
| You can also have the ground disconnected and then connect the USB cable, the flashing mode will start normally. |
Connecting.......
El Sketch usa 257220 bytes (26%) del espacio de almacenamiento del programa. El máximo es 958448 bytes.
Las variables Globales usan 26816 bytes (32%) de la memoria dinámica, dejando 55104 bytes para las variables locales. El máximo es 81920 bytes.
esptool.py v2.8
Serial port COM4
Connecting........____
Chip is ESP8266EX
Features: WiFi
Crystal is 26MHz
MAC: 68:c6:3a:ea:87:1c
Uploading stub...
Running stub...
Stub running...
Configuring flash size...
Auto-detected Flash size: 1MB
Compressed 261376 bytes to 192973...
Writing at 0x00000000... (8 %)
Writing at 0x00004000... (16 %)
Writing at 0x00008000... (25 %)
Writing at 0x0000c000... (33 %)
Writing at 0x00010000... (41 %)
Writing at 0x00014000... (50 %)
Writing at 0x00018000... (58 %)
Writing at 0x0001c000... (66 %)
Writing at 0x00020000... (75 %)
Writing at 0x00024000... (83 %)
Writing at 0x00028000... (91 %)
Writing at 0x0002c000... (100 %)
Wrote 261376 bytes (192973 compressed) at 0x00000000 in 20.3 seconds (effective 103.2 kbit/s)...
Hash of data verified.
Leaving...
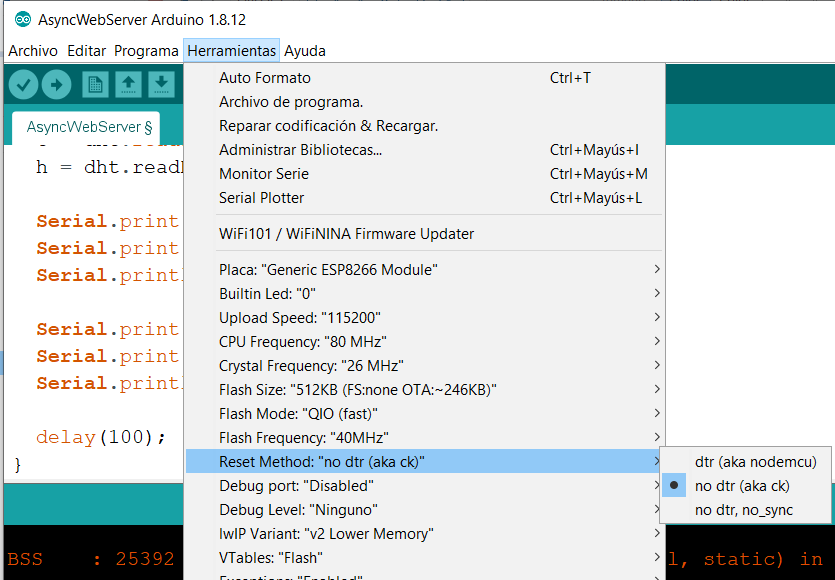
Hard resetting vía RTS pin...The above is not a mistake. If it happens to us then it is time to go to:
Tools > Reset Method > "no dtr (aka ck)".
esptool.py v2.8
Serial port COM4
Connecting.....
Chip is ESP8266EX
Features: WiFi
Crystal is 26MHz
MAC: 68:c6:3a:ea:87:1c
Uploading stub...
Running stub...
Stub running...
Configuring flash size...
Auto-detected Flash size: 1MB
Compressed 261376 bytes to 192973...
Writing at 0x00000000... (8 %)
Writing at 0x00004000... (16 %)
Writing at 0x00008000... (25 %)
Writing at 0x0000c000... (33 %)
Writing at 0x00010000... (41 %)
Writing at 0x00014000... (50 %)
Writing at 0x00018000... (58 %)
Writing at 0x0001c000... (66 %)
Writing at 0x00020000... (75 %)
Writing at 0x00024000... (83 %)
Writing at 0x00028000... (91 %)
Writing at 0x0002c000... (100 %)
Wrote 261376 bytes (192973 compressed) at 0x00000000 in 20.3 seconds (effective 103.2 kbit/s)...
Hash of data verified.
Leaving...
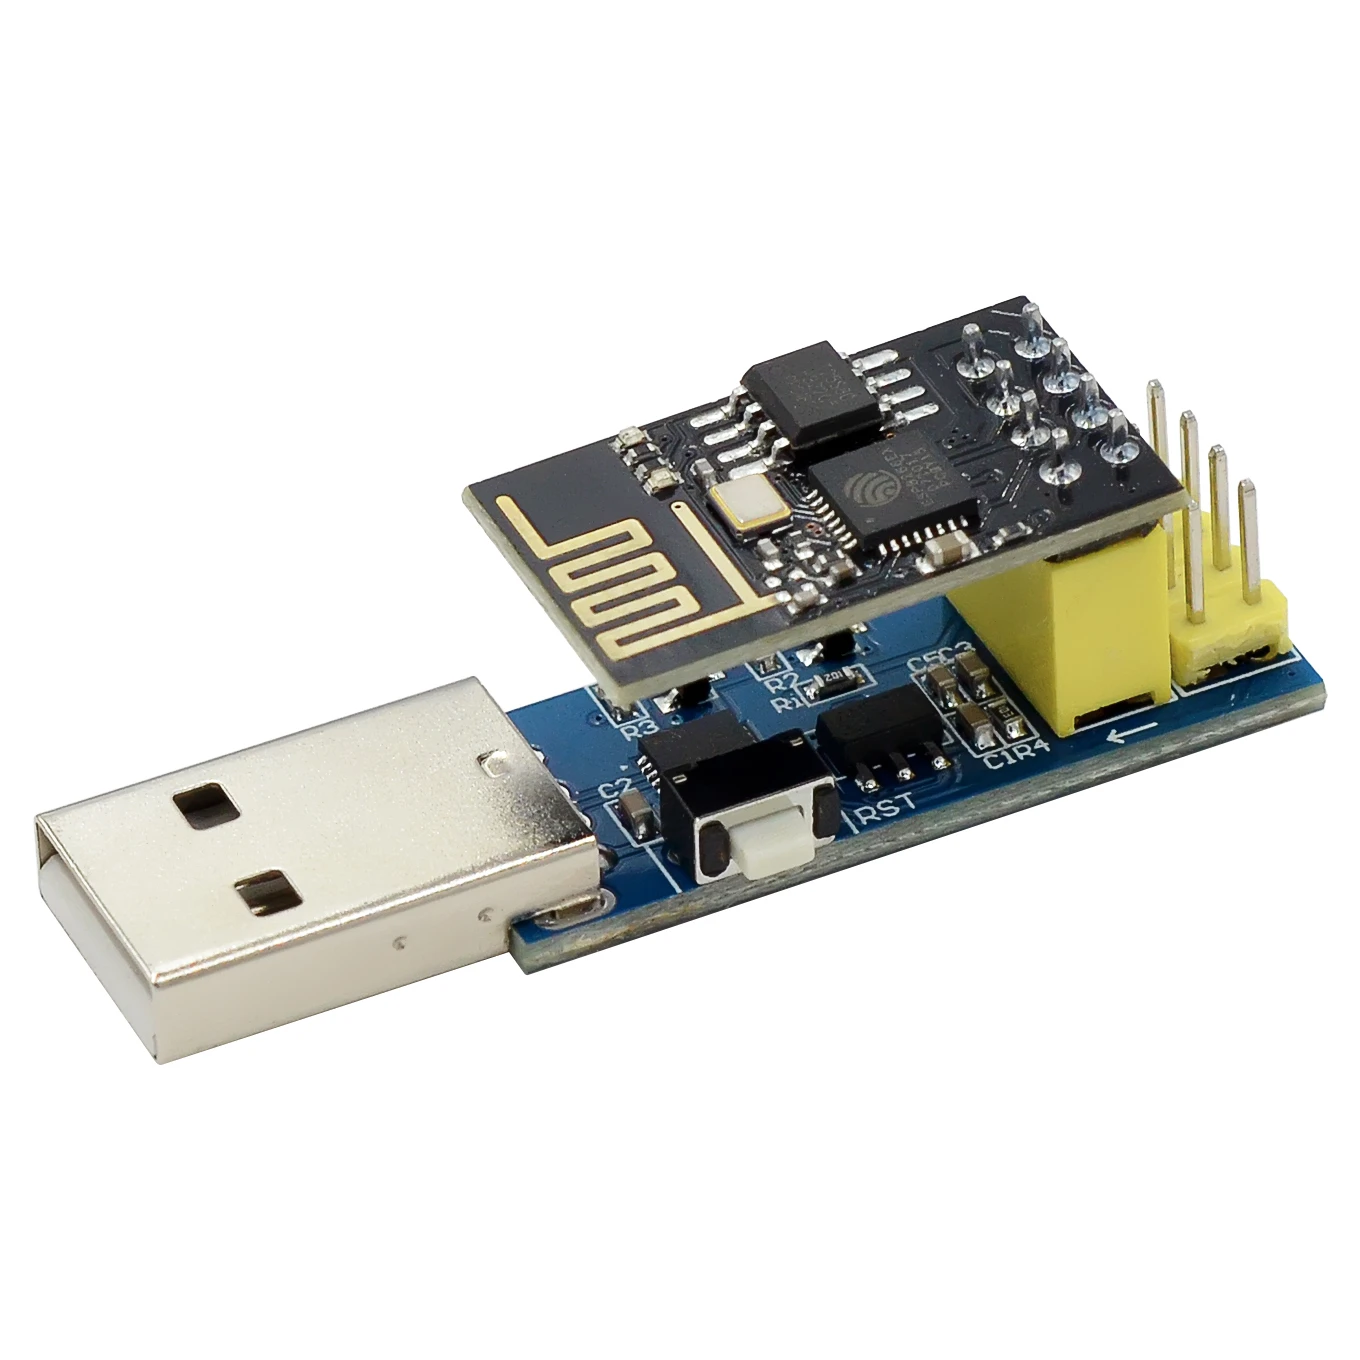
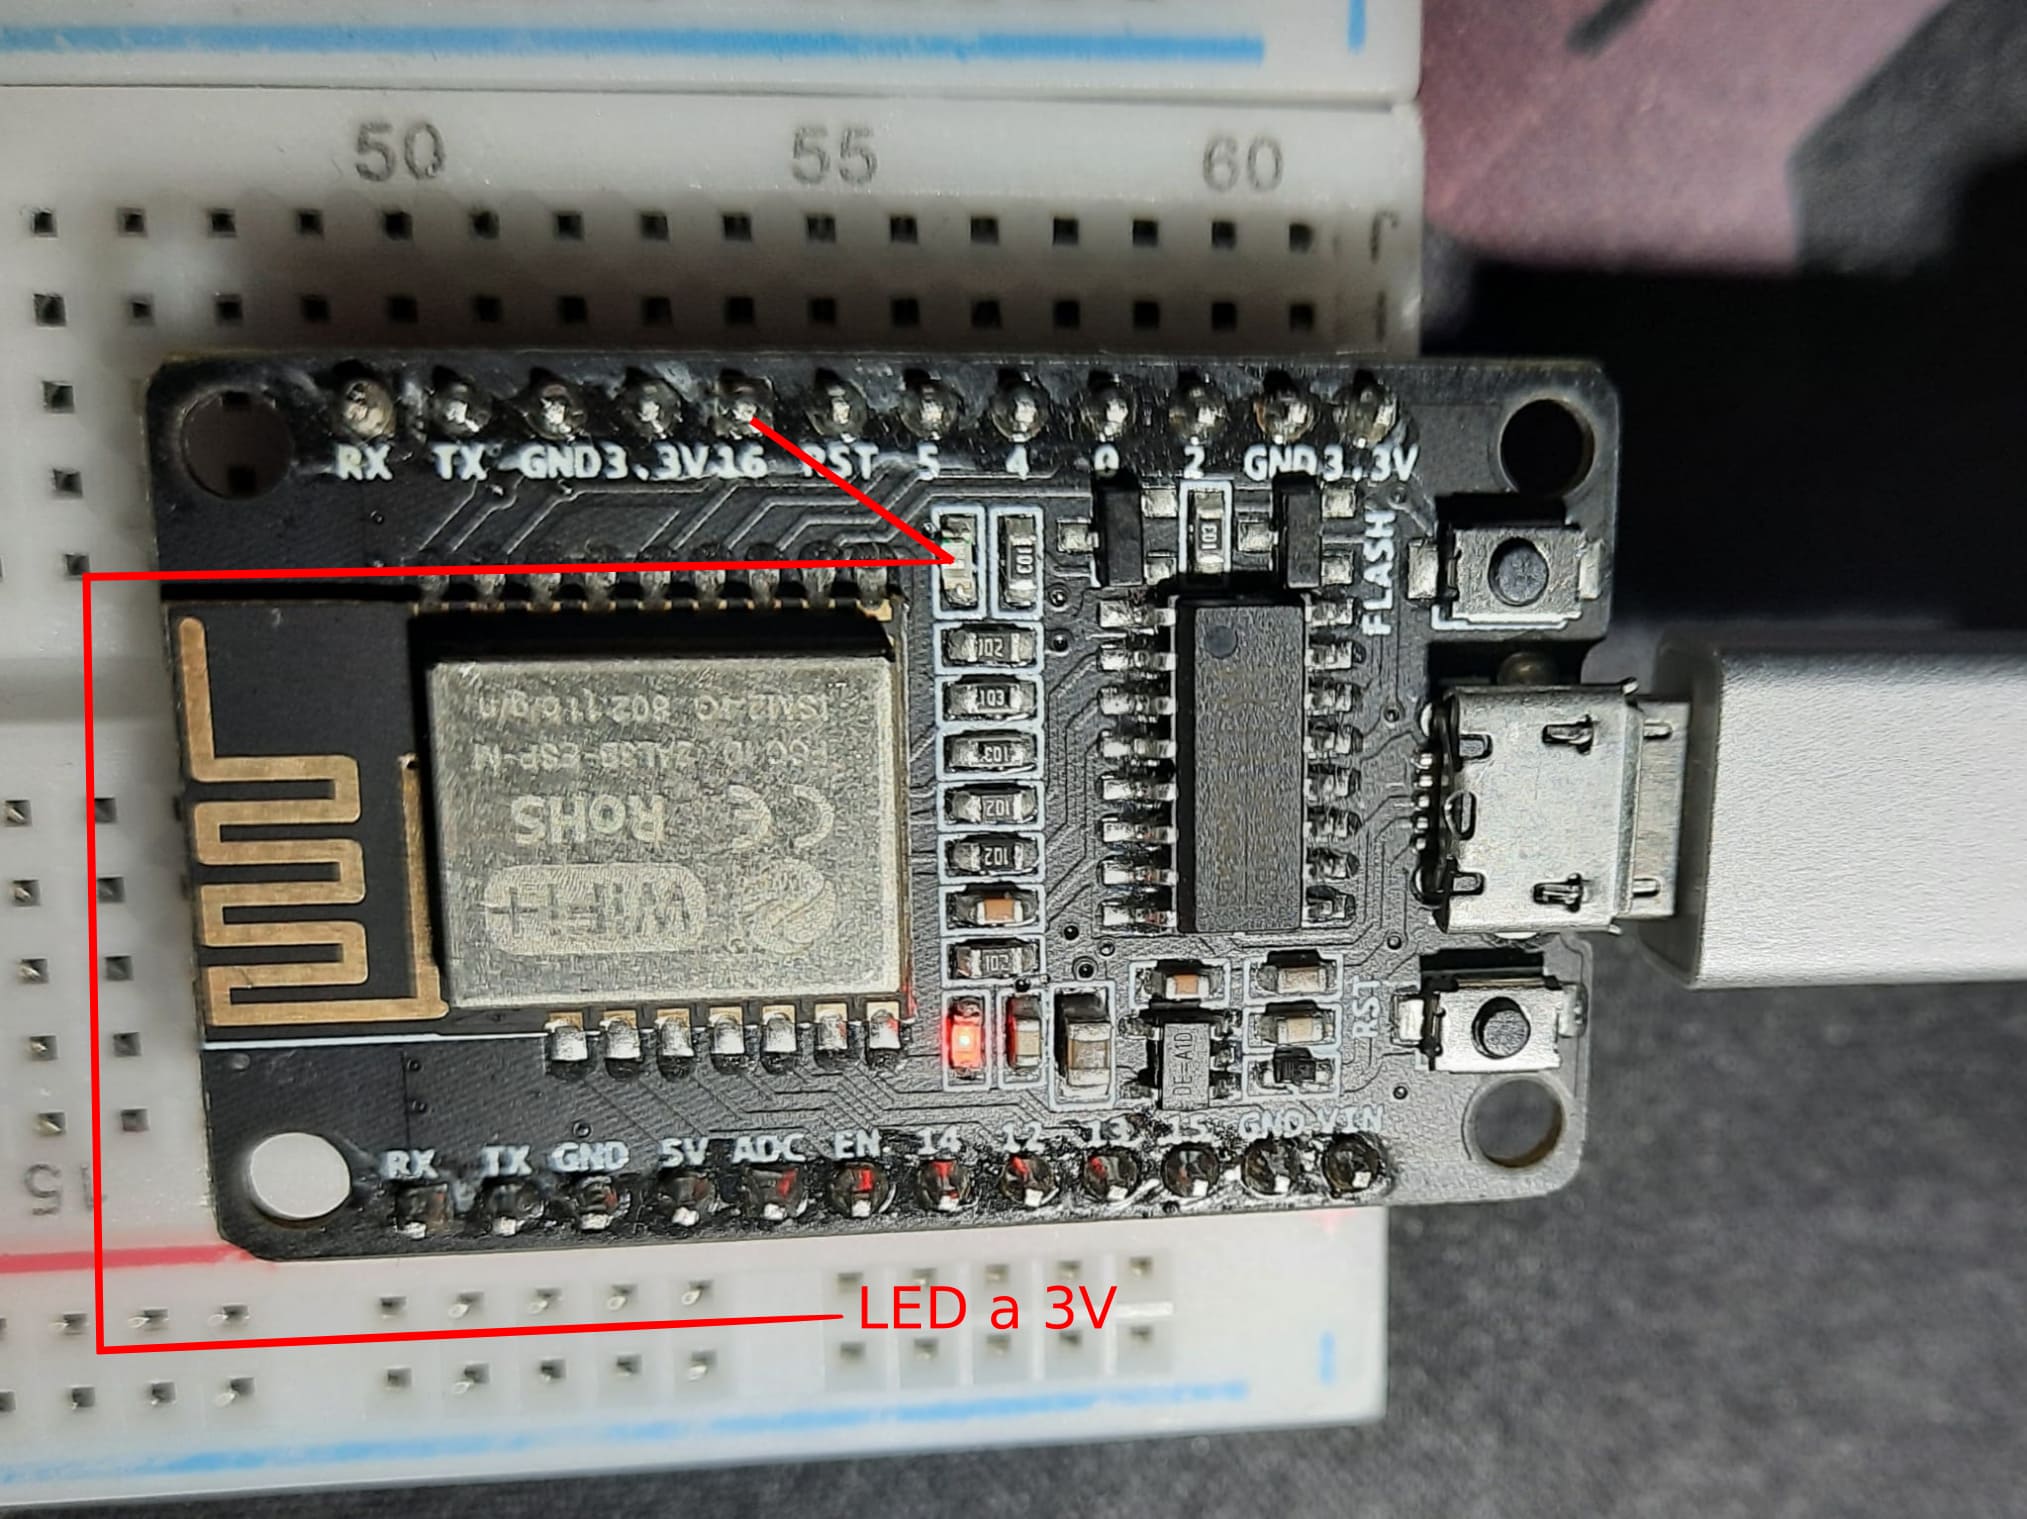
Soft resetting...ESP-01s with converter usb/ttl
To save previous steps when wiring, we can use this converter, here the LED_BUILTIN will be in the GPI02 of this esp-01s version.
In my case it uses a converter of the cp210x series.
rubn ⲁƛ ▸ sudo dmesg | grep tty
[954377.573038] usb 1-4.4.4.2: cp210x converter now attached to ttyUSB0
We execute esptool.py
rubn ⲁƛ ▸ esptool.py flash_id
esptool.py v4.2.1
Found 1 serial ports
Serial port /dev/ttyUSB0
Connecting....
Detecting chip type... Unsupported detection protocol, switching and trying again...
Connecting....
Detecting chip type... ESP8266
Chip is ESP8266EX
Features: WiFi
Crystal is 26MHz
MAC: 2c:f4:32:10:1d:bf
Uploading stub...
Running stub...
Stub running...
Manufacturer: 85
Device: 6014
Detected flash size: 1MB (1)
Hard resetting via RTS pin...| 1 | 1MB of memory corresponding to version esp-01s |
We make a small blink delay of half a second.
#define LED_BUILTIN 2 (1)
//const int PIN = ;// pin digital
// the setup function runs once when you press reset or power the board
void setup() {
  // initialize digital pin LED_BUILTIN as an output.
  Serial.begin(115200);
  //pinMode(PIN, INPUT_PULLUP);
  pinMode(LED_BUILTIN, OUTPUT);
}

void loop() {
  digitalWrite(LED_BUILTIN, HIGH);
  delay(500);
  digitalWrite(LED_BUILTIN, LOW);
  delay(500);
}| 1 | esp led pin |
As we can see in aliexpress this board is very cheap, and also the converter, click on the picture
Installation ESP8285H05 in Ubuntu 18.04.3 LTS
The turn is for the NodeMCU ESP8285H08 with 2MB of flash, half that of the lolin v3.
Error loading driver
For some reason many times in linux (Ubuntu 24.04.1 LTS) the CH341x driver is not loaded correctly, which prevents reading the serial port.
The lmod command in this case does not tell us anything.
lsmod | grep ch341But if we run modprobe, things change.
rubn ⲁƛ ▸  sudo modprobe ch341 (1)
rubn ⲁƛ ▸  lsmod | grep ch341
ch341                  24576  0 (2)
usbserial 69632 1 ch341 (3)| 1 | With this we force the module to load. |
| 2 | The module ch341 is loaded (occupying 24576 bytes). |
| 3 | The "1" indicates that ch341 is using usbserial as a dependency. |
Using dmesg or lsusb with linux to scan ports
| It is ideal to have a usb cable with data, so that the microcontroller is recognized, and we have a console output like the following, with both commands. |
rubn ⲁƛ ▸ sudo dmesg | grep tty
[87120.442984] ch341-uart ttyUSB0: ch341-uart converter now disconnected from ttyUSB0
[87124.729474] usb 1-4.3: ch341-uart converter now attached to ttyUSB0 (1)| 1 | The bug has been recognized. |
With lsusb
rubn ⲁƛ ▸ lsusb
Bus 002 Device 009: ID 0480:0900 Toshiba America Inc MQ04UBF100
Bus 002 Device 008: ID 2109:0817 VIA Labs, Inc. USB3.0 Hub
Bus 002 Device 007: ID 2109:0817 VIA Labs, Inc. USB3.0 Hub
Bus 002 Device 006: ID 2109:0817 VIA Labs, Inc. USB3.0 Hub
Bus 002 Device 001: ID 1d6b:0003 Linux Foundation 3.0 root hub
Bus 001 Device 004: ID 0bda:0129 Realtek Semiconductor Corp. RTS5129 Card Reader Controller
Bus 001 Device 012: ID 2109:2817 VIA Labs, Inc. USB2.0 Hub
Bus 001 Device 016: ID 10c4:ea60 Silicon Labs CP210x UART Bridge (1)
Bus 001 Device 011: ID 2109:2817 VIA Labs, Inc. USB2.0 Hub
Bus 001 Device 010: ID 2109:2817 VIA Labs, Inc. USB2.0 Hub
Bus 001 Device 009: ID 1ea7:0064 SHARKOON Technologies GmbH 2.4G Mouse
Bus 001 Device 007: ID 8087:0aaa Intel Corp.
Bus 001 Device 005: ID 5986:211b Acer, Inc HD Webcam
Bus 001 Device 001: ID 1d6b:0002 Linux Foundation 2.0 root hub
Bus 004 Device 001: ID 1d6b:0003 Linux Foundation 3.0 root hub
Bus 003 Device 001: ID 1d6b:0002 Linux Foundation 2.0 root hub| 1 | This is the micro that interests us at the moment. |
This is the current permissions error with the version of the Arduino IDE 1.8.15
arduino ide PermissionError: [Errno 13] Permission denied: '/dev/ttyUSB0'In case you don’t have permissions on that port, it had already happened to us years ago here Arduino-IDE-Error.
-
Change from ttyACM0 to ttyUSB0
sudo chmod a+rw /dev/ttyUSB0¿Well, what we’ll do with it ?
Flashing our nodeMCU in two ways by console or GUI, but this is less tedious than the ESP8266 as it is a more complete KIT, we have two steps:
All the above works for Guindow$ in case of linux are other steps, in the following URL we have the more detailed explanation.
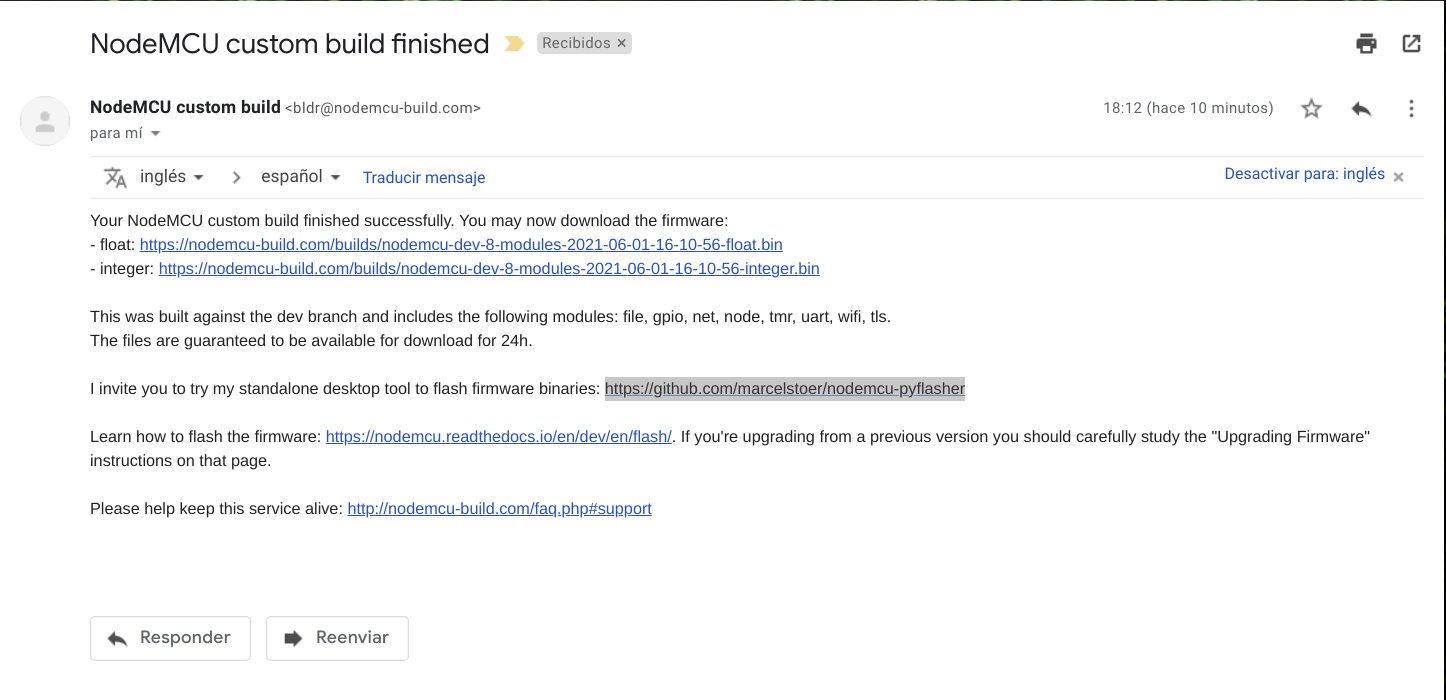
According to the website above there is already a nube where we can build the latest firmware versions, I in this case use the default configuration and in a few minutes they send me an email with the url to download the firmware.
Flash with nodemcu-pyflasher
The same team that created this application also have a GUI to perform the flashing called nodemcu-pyflasher in the README.md indicate certain steps for a correct execution.
Here is a correct flashing, just by connecting the usb and giving permissions in console
| This wx library does not allow to open the NODEMCUPY flasher interface, the error is occurring on ubuntu 20.04 and some GTK3 as in the log below |
*** Could not run GTK+ test program, checking why...
    *** The test program failed to compile or link. See the file config.log for the
    *** exact error that occurred. This usually means GTK+ is incorrectly installed.
    configure: error:
    The development files for GTK+ were not found. For GTK+ 2, please
    ensure that pkg-config is in the path and that gtk+-2.0.pc is
    installed. For GTK+ 1.2 please check that gtk-config is in the path,
    and that the version is 1.2.3 or above. Also check that the
    libraries returned by 'pkg-config gtk+-2.0 --libs' or 'gtk-config
    --libs' are in the LD_LIBRARY_PATH or equivalent.
With this we were able to do a WX installation.
pip install https://extras.wxpython.org/wxPython4/extras/linux/gtk3/ubuntu-20.04/wxPython-4.1.1-cp38-cp38-linux_x86_64.whlrubn ⲁƛ ▸ python
Python 3.8.10 (default, Mar 15 2022, 12:22:08)
[GCC 9.4.0] on linux
Type "help", "copyright", "credits" or "license" for more information.
>>> import wx
>>> wx.__version__
'4.1.1' (1)
>>>| 1 | current version of wx |
sudo python nodemcu-pyflasher.py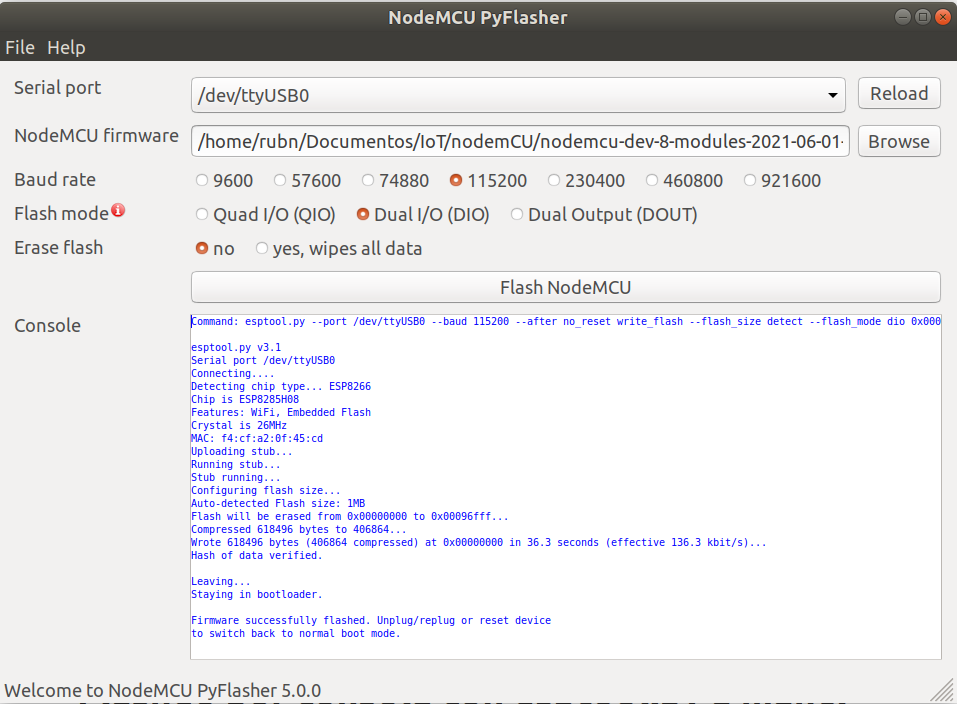
Flash by console with esptool.py
With this python console app from the people at Espressif we do the same as nodemcu-pyflasher but without GUI.
The esptool.py can be installed with python pip to use the latest version
|
Installation directories of theesptool.py
|
It also works in case of briking the ESP8285 as in Unbrick-Esp8266-Blinking-led-blue
sudo esptool.py --port /dev/ttyUSB0 write_flash -fm dio -fs 32m 0x00000 dev8firmware.bin (1)| 1 | 32m is already deprecated, use 4MB, no need to set the --b (baud rate), as it uses the default baud rate of 115200. |
Console output
rubn ⲁƛ ▸ sudo esptool.py --port /dev/ttyUSB0 write_flash -fm dio -fs 32m 0x00000 dev8firmware.bin (1)
[sudo] contraseña para rubn:
WARNING: Flash size arguments in megabits like '32m' are deprecated.
Please use the equivalent size '4MB'. (2)
Megabit arguments may be removed in a future release.
esptool.py v3.1
Serial port /dev/ttyUSB0 (3)
Connecting....
Detecting chip type... ESP8266
Chip is ESP8285H08
Features: WiFi, Embedded Flash
Crystal is 26MHz
MAC: f4:cf:a2:0f:45:cd (4)
Uploading stub...
Running stub...
Stub running...
Configuring flash size...
Flash will be erased from 0x00000000 to 0x00094fff...
Flash params set to 0x0240
Compressed 610304 bytes to 402075...
Wrote 610304 bytes (402075 compressed) at 0x00000000 in 35.8 seconds (effective 136.5 kbit/s)...
Hash of data verified.

Leaving...
Hard resetting via RTS pin...| 1 | Used 32m default value |
| 2 | Use as indicated in the log, 4MB |
| 3 | Port devttyUSB0 |
| 4 | mac address |
The other steps are the same as above, where we flash with the example of the Blink led but with pin 16 as our Arduino code would be:
const int LED = 16;

// the setup function runs once when you press reset or power the board
void setup() {
  // initialize digital pin LED_BUILTIN as an output.

  pinMode(LED, OUTPUT);
}

// the loop function runs over and over again forever
void loop() {
  digitalWrite(LED, HIGH);   // turn the LED on (HIGH is the voltage level)
  delay(1000);               // wait for a second
  digitalWrite(LED, LOW);    // turn the LED off by making the voltage LOW
  delay(1000);               // wait for a second
}Connecting…
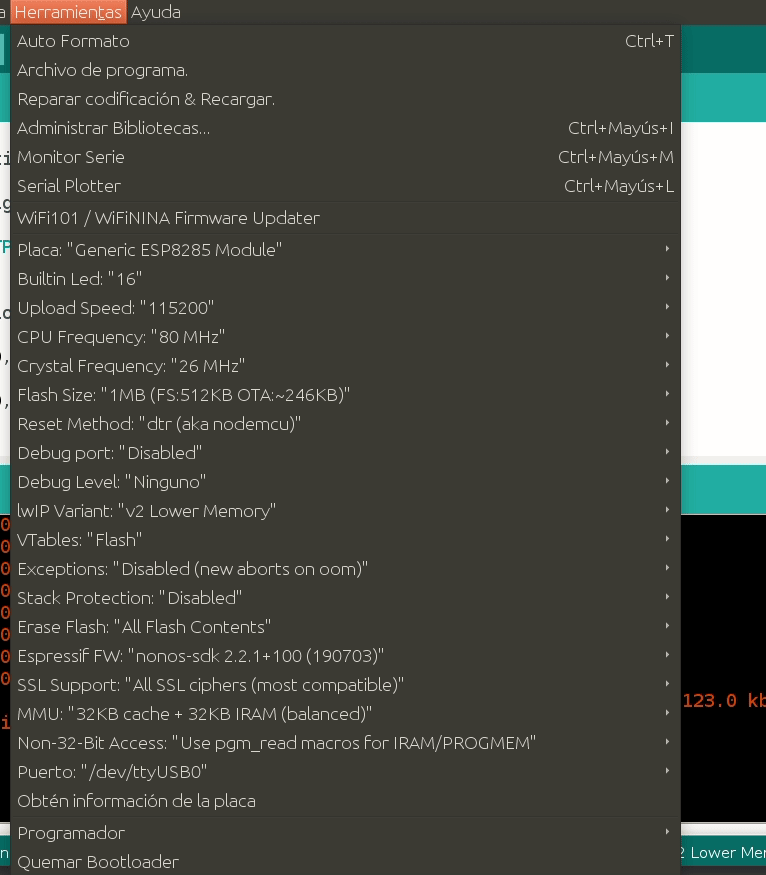
The nodeMCU with the arduino IDE we set several parameters such as
⚙️ Uploading the source to nodeMCU
Executable segment sizes:
ICACHE : 32768           - flash instruction cache
IROM   : 269228          - code in flash         (default or ICACHE_FLASH_ATTR)
IRAM   : 27473   / 32768 - code in IRAM          (IRAM_ATTR, ISRs...)
DATA   : 1540  )         - initialized variables (global, static) in RAM/HEAP
RODATA : 2980  ) / 81920 - constants             (global, static) in RAM/HEAP
BSS    : 25912 )         - zeroed variables      (global, static) in RAM/HEAP
El Sketch usa 301221 bytes (60%) del espacio de almacenamiento de programa. El máximo es 499696 bytes.
Las variables Globales usan 30432 bytes (37%) de la memoria dinámica, dejando 51488 bytes para las variables locales. El máximo es 81920 bytes.
esptool.py v3.0
Serial port /dev/ttyUSB0
Connecting....
Chip is ESP8285
Features: WiFi, Embedded Flash
Crystal is 26MHz
MAC: f4:cf:a2:0f:45:cd
Uploading stub...
Running stub...
Stub running...
Configuring flash size...
Auto-detected Flash size: 1MB
Erasing flash (this may take a while)...
Chip erase completed successfully in 1.5s
Compressed 305376 bytes to 221397...
Writing at 0x00000000... (7 %)
Writing at 0x00004000... (14 %)
Writing at 0x00008000... (21 %)
Writing at 0x0000c000... (28 %)
Writing at 0x00010000... (35 %)
Writing at 0x00014000... (42 %)
Writing at 0x00018000... (50 %)
Writing at 0x0001c000... (57 %)
Writing at 0x00020000... (64 %)
Writing at 0x00024000... (71 %)
Writing at 0x00028000... (78 %)
Writing at 0x0002c000... (85 %)
Writing at 0x00030000... (92 %)
Writing at 0x00034000... (100 %)
Wrote 305376 bytes (221397 compressed) at 0x00000000 in 19.7 seconds (effective 124.3 kbit/s)...
Hash of data verified.

Leaving...
Hard resetting via RTS pin...
We should already have our microphone active 🔥
Esp8266 lolin V3
A beauty also in good price at amazon, cheap thanks to the uart CH340 converter, this 4 megabyte version we can quickly flash the firmware blink_led.bin that I extracted with the Arduino IDE.
#define LED_BUILTIN 2 (1)

// the setup function runs once when you press reset or power the board
void setup() {
  // initialize digital pin LED_BUILTIN as an output.

  pinMode(LED_BUILTIN, OUTPUT);
}

// the loop function runs over and over again forever
void loop() {
  digitalWrite(LED_BUILTIN, HIGH);   // turn the LED on (HIGH is the voltage level)
  delay(1000);               // wait for a second
  digitalWrite(LED_BUILTIN, LOW);    // turn the LED off by making the voltage LOW
  delay(1000);               // wait for a second
}| 1 | LED_BUILTIN del lolin v3 |
We flash through the console with the following command
esptool.py --port /dev/ttyUSB0 -b 460800 write_flash 0x00000 blink_led.binrubn ⲁƛ ▸ esptool.py --port /dev/ttyUSB0 -b 460800 write_flash 0x00000 blink_led.bin
esptool.py v4.2.1
Serial port /dev/ttyUSB0
Connecting....
Detecting chip type... Unsupported detection protocol, switching and trying again...
Connecting....
Detecting chip type... ESP8266
Chip is ESP8266EX
Features: WiFi
Crystal is 26MHz
MAC: c8:c9:a3:52:ee:c7
Uploading stub...
Running stub...
Stub running...
Changing baud rate to 460800
Changed.
Configuring flash size...
Flash will be erased from 0x00000000 to 0x00041fff...
Compressed 266928 bytes to 196322...
Wrote 266928 bytes (196322 compressed) at 0x00000000 in 4.6 seconds (effective 467.1 kbit/s)...
Hash of data verified.
Leaving...
Hard resetting via RTS pin...These are the firmware I used