
The central theme will be Jellyfin, but several points need to be touched on first.
|
To be taken into account.
|
|
The idea of using miniDLNA falls very, very short.
|
It turns out that freeBSD has something very powerful, being native to it called jails to containerize our applications, much like docker, but more mature, giving a lightweight containerization method, sometimes called OS-level virtualization, a jail usually contains a complete operating system in a userland running on top of the FreeBSD System.
Jails do not have their own kernel, but run on a portion of the host kernel, the host can control the jail, by means of certain commands without entering the jail, or run processes inside the jail if preferred.
The jail root account can control everything inside the jail, but not outside the jail, each of them has a dedicated ip address.
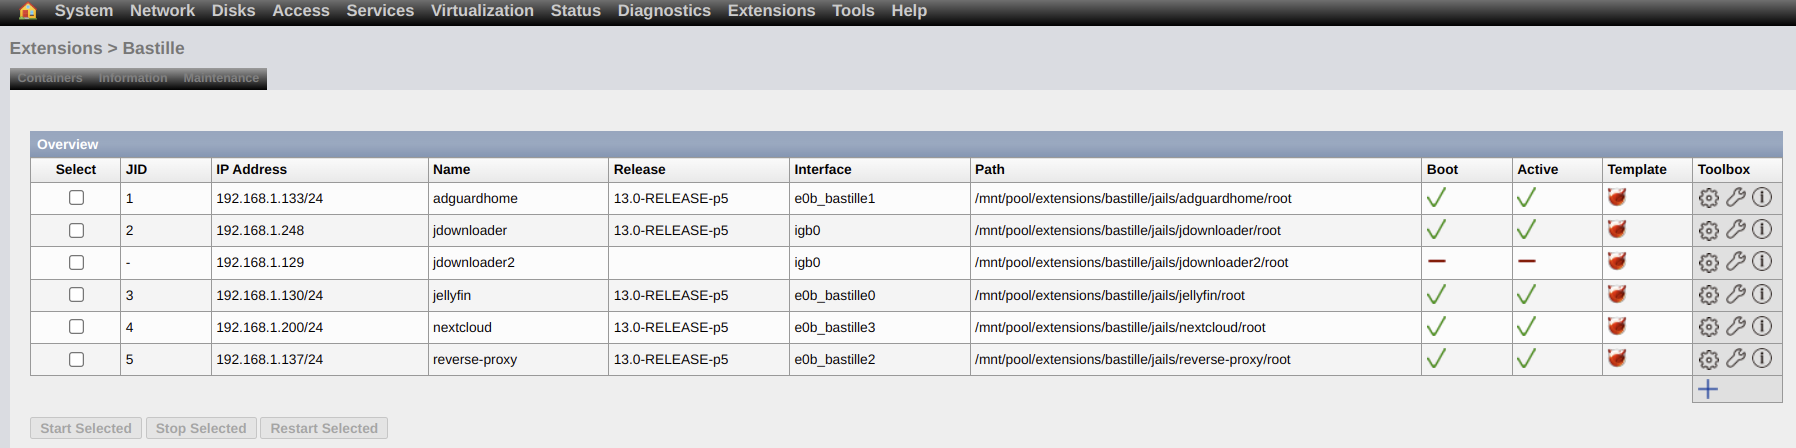
Jail or JID processes
xigmanas: ~# jls (1)
   JID  IP Address      Hostname                      Path
     1                  adguardhome                   /mnt/pool/extensions/bastille/jails/adguardhome/root
     2  192.168.1.248   jdownloader                   /mnt/pool/extensions/bastille/jails/jdownloader/root
     4                  nextcloud                     /mnt/pool/extensions/bastille/jails/nextcloud/root
     5                  reverse-proxy                 /mnt/pool/extensions/bastille/jails/reverse-proxy/root
6 jellyfin /mnt/pool/extensions/bastille/jails/jellyfin/root| 1 | With the jls command we visualize our jails, the JID is like a process ID, each JID changes once the jail starts. |
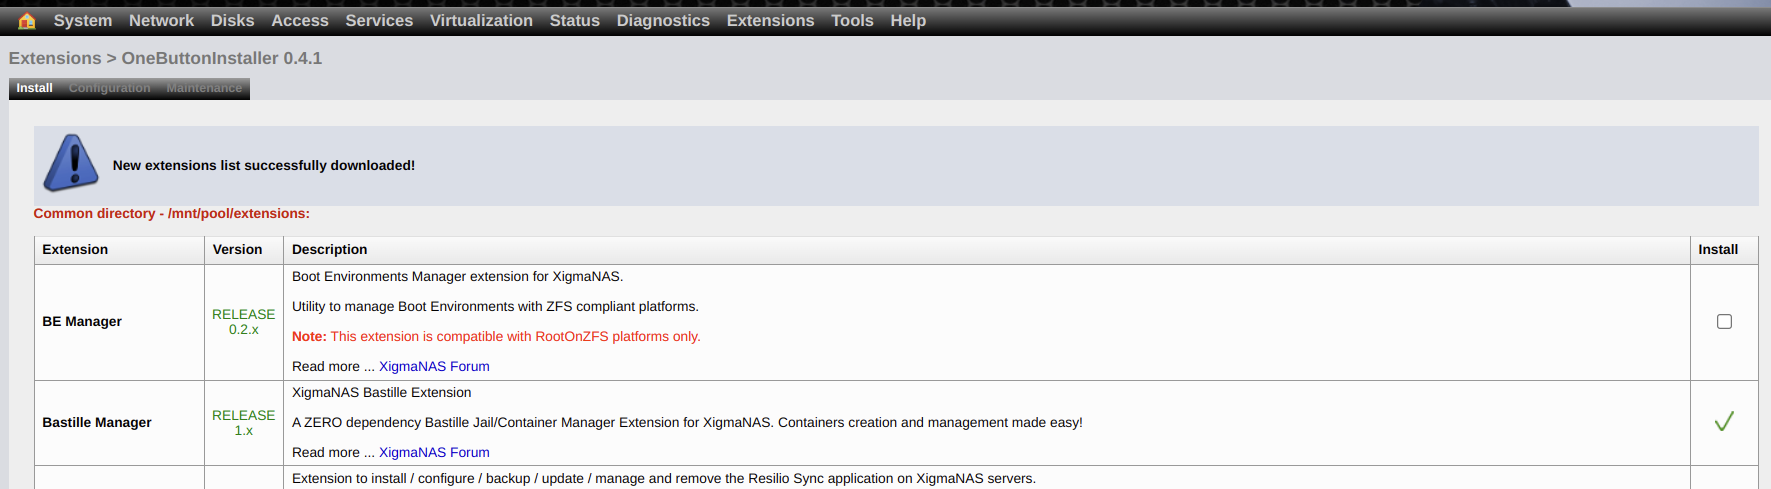
Using Bastille

Bastille to manage our jails with simple commands, I installed this one from the xigmanas interface, I didn’t have to try it from the console, but it was necessary to first have OBI(one button installer). to install it from that plugin.
Create jail with bastille from console
bastille create -V jail-test 13.3-RELEASE SYNCDHCP lagg0bastille create \
-V \ (1)
jail-test \ (2)
13.3-RELEASE \ (3)
SYNCDHCP \ (4)
lagg0 \ (5)| 1 | For vnet. |
| 2 | Name of jail without - _ . |
| 3 | Release version. |
| 4 | SYNCDHCP o 0.0.0.0 for dynamic ip on the local network. |
| 5 | Interface, in my case. |
If we execute with the wrong jail name, we would have:
user@servernas > bastille create -V jail-test 13.3-RELEASE SYNCDHCP lagg0

Attempting to create jail: jail-test
[ERROR]: VNET jail names may not contain (-|_) characters.
Subcommands
| The list of bastille commands is a bit varied subcommands. |
We can install all our jails via web or console.
Jails.conf, fstab
Each Jail has 2 important files, for example:
-
jail.conf
-
fstab
| More info jail-config |
The paths of both files, are in the dataset where bastille is, in my case named pool
/mnt/pool/extensions/bastille/jails/jdownloader/jail.conf
/mnt/pool/extensions/bastille/jails/jdownloader/fstab
If we want to enter a jail we would use the following command.
bastille console Jdownloader (1)| 1 | Command to enter the jail called Jdownloader |
Jail ip address
If we want to assign an ip address to our jail, be it static or dynamic, we go to the etc/rc.conf
Where we have the following path to this file
/mnt/pool/extensions/bastille/jails/jellyfin-clone/root/etc/rc.conf| One of the two lines will be used, static or dynamic. |
syslogd_flags="-ss"
sendmail_enable="NO"
sendmail_submit_enable="NO"
sendmail_outbound_enable="NO"
sendmail_msp_queue_enable="NO"
cron_flags="-J 60"
ifconfig_e0b_bastille4_name="vnet0"
ifconfig_vnet0="inet 192.168.1.247/24" (1)
#ifconfig_vnet0="SYNCDHCP" (2)
defaultrouter="192.168.1.1"
jellyfinserver_enable="TRUE"
jellyfinserver_user="jellyfin"
jellyfinserver_group="jellyfin"| 1 | This jail is assigned a static ip address within the DHCP pool of my local network, with subnet /24. |
| 2 | SYNCDHCP is used and this will assign a dynamic ip address, just as discussed here source code |
The code in the above link.
# If 0.0.0.0 set DHCP, else set static IP address
if [ "${IP}" == "0.0.0.0" ]; then
    sysrc -f "${bastille_jail_rc_conf}" ifconfig_vnet0="SYNCDHCP"
else
    sysrc -f "${bastille_jail_rc_conf}" ifconfig_vnet0="inet ${IP}"
fi
Bug when cloning jail with bastille
The bug is nothing complex to solve, just fix the vnet correctly, just change it, because when cloning, it copies the interface of the original jail without writing the new interface of the cloned jail:
In our jails.conf
jellyfin-clone {
  devfs_ruleset = 13;
  enforce_statfs = 2;
  exec.clean;
  exec.consolelog = /mnt/pool/extensions/bastille/logs/jellyfin-clone_console.log;
  exec.start = '/bin/sh /etc/rc';
  exec.stop = '/bin/sh /etc/rc.shutdown';
  host.hostname = jellyfin-clone;
  mount.devfs;
  mount.fstab = /mnt/pool/extensions/bastille/jails/jellyfin-clone/fstab;
  path = /mnt/pool/extensions/bastille/jails/jellyfin-clone/root;
  securelevel = 2;

  vnet;
  vnet.interface = e0b_bastille5; (1)
  exec.prestart += "jib addm bastille5 igb0"; (2)
  exec.prestart += "ifconfig e0a_bastille5 description \"vnet host interface for Bastille jail jellyfin-clone\""; (3)
  exec.poststop += "jib destroy bastille5"; (4)
  allow.mlock;
  allow.raw_sockets;
}| 1 | Our inteface is e0b_bastille5, and it should also be in the following lines. |
| 2 | I changed this line because before it was the bastille1 interface of the original jail |
| 3 | Bastille5 is used |
| 4 | Bastille5 is used as well. |
Jail does’nt start ?
| When cloning, apparently the fstab has to update the correct names to the new jail name. |
xigmanas: ~# bastille start jellyfin-clone (1)
[jellyfin-clone]:
(2)
mount_nullfs: /mnt/pool/extensions/bastille/jails/jellyfin/root/mnt/series: Resource deadlock avoided
jail: jellyfin-clone: /sbin/mount -t nullfs -o rw /mnt/pool_2/series /mnt/pool/extensions/bastille/jails/jellyfin/root/mnt/series: failed

xigmanas: ~# bastille start jellyfin-clone (3)
[jellyfin-clone]:
e0a_bastille5
e0b_bastille5
jellyfin-clone: created

xigmanas: ~# bastille console jellyfin-clone
[jellyfin-clone]:
root@jellyfin-clone:~ # ping google.com
PING google.com (142.250.201.78): 56 data bytes
64 bytes from 142.250.201.78: icmp_seq=0 ttl=116 time=5.877 ms
64 bytes from 142.250.201.78: icmp_seq=1 ttl=116 time=8.838 ms
64 bytes from 142.250.201.78: icmp_seq=2 ttl=116 time=8.711 ms
^C
--- google.com ping statistics ---
3 packets transmitted, 3 packets received, 0.0% packet loss
round-trip min/avg/max/stddev = 5.877/7.809/8.838/1.367 ms| 1 | We start our jail and we see that in the console throws an error just in the fstab. |
| 2 | The cloned jail has an incorrect name pointing to the original jellyfin, so we change it to the new name which is jellyfin-clone and ready. |
| 3 | After correcting the fstab everything is fine. |
Problems deleting a Jail 🔨
Many times for some reason and the permissions of the user root prevent to delete the directory where the jail has been installed, either by the schg flag that is present in that directory, or file, making them immutable (anti-deletable in quotes), for that there is a useful command for example:
chflags -R 0 deleteDirectory (1)
rm -rf deleteDirectory (2)| 1 | This removes the schg flag and with -R recursively within the dir. |
| 2 | We can then delete the dir with ease. |
The above steps should be enough to delete the directory and solve the problem.
But we have another scenario, as we are working on a zfs file system, we included in the bastille source code the -f parameter to use it together with destroy
servernas: jails# rm -rf mongodb
rm: mongodb/root: Device busy (1)
rm: mongodb: Device busy| 1 | Cannot be deleted, as the unit is occupied. |
servernas: /# cd /mnt/pool/extensions/bastille/jails
servernas: jails# ls
adguardhome   apps-java     jdownloader   jellyfin      mongodb       reverse-proxy
servernas: jails# bastille destroy -f mongodb (1)
Deleting Jail: mongodb.

servernas: jails# ls (2)
adguardhome apps-java jdownloader jellyfin reverse-proxy| 1 | This also allows us to erase the anti-erasable jail 🤣. |
| 2 | The jail no longer exists inside the dataset that was mongodb, because we deleted it. |
| Information on this matter. |
Install Jdownloader
![]()
For many years, I have been using Jdownloader and it always came in handy for automatic reconnection, resuming/downloads, automatic decompression, connecting to other servers such as mega etc…
Install jdk
A good option is the openjdk11
xigmanas: ~# bastille console jdownloader (1)
root@jdownloader:~ # pkg install openjdk11 (2)| 1 | We entered al jail jdownloader |
| 2 | We install the open jdk. |
root@jdownloader:~ # java -version (1)
openjdk version "11.0.12" 2021-07-20
OpenJDK Runtime Environment (build 11.0.12+7-1)
OpenJDK 64-Bit Server VM (build 11.0.12+7-1, mixed mode)| 1 | We show the current java version. |
Download megatools and start Jdownloader
|
Megatools y url del .jar de Jdownloader
|
root@jdownloader:~ # pkg install megatools (1)
root@jdownloader:~/java # megadl https://mega.nz/file/2EkgUSga#Pjau9db2bBDES-ih4iWYlHfwC0t-444eFfm0SQegqRA (2)
Downloaded JDownloader.jar
root@jdownloader:~/java # ls -la
total 4134
drwxr-xr-x   2 root  wheel        3 Jul  4 16:32 .
drwxr-x---  19 root  wheel       37 Jul  4 16:32 ..
-rw-r--r-- 1 root wheel 4411735 Jul 4 16:32 JDownloader.jar| 1 | We install megatools |
| 2 | megadl command to download from mega |
java -jar JDownloader.jar -norestart (1)| 1 | This command allows to start Jdownloader but without graphical interface, that is to say console mode, and many times, it requires to execute it again if we get the image below. |
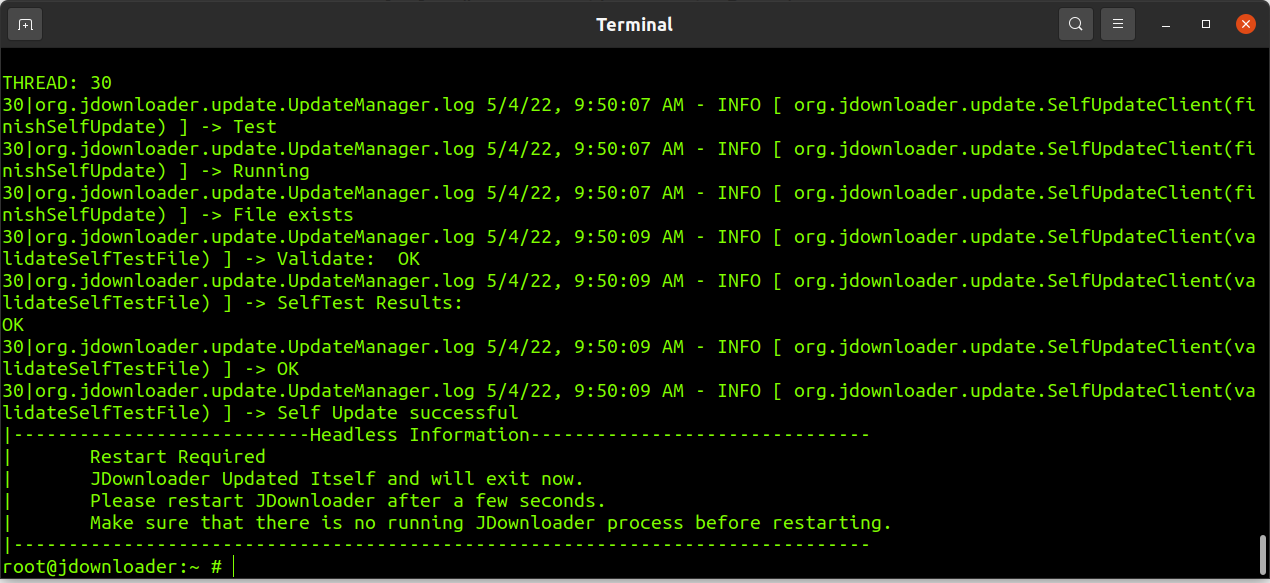
In the end to connect to it, we would do it through MyJDownloader this exists in app version for Android, IOs I do not know, and a plugin for Google Chrome MyJDownloader Browser Extension.
Jdownloader with autoboot
| This process of autoboot, we can do it with another application, as well as git does automatically that also creates its own daemon, with adguardhome apply the same procedure. |
The previous step with the -norestart parameter, is not worthwhile, since sometimes, the jdownloader with some pending update requires it to run again.
Also if our NAS is turned off, our jail will not start the Jdownloader because of the above mentioned, so, in our Jdownloader jail we create a small configuration file.
Creating a file in etc/rc.d
The content of the file that will allow our Jdownloader to start at each startup is this:
root@jdownloader:/etc/rc.d # touch jdownloader (1)
root@jdownloader:/etc/rc.d # chmod +x jdownloader (2)
root@jdownloader:/etc/rc.d # nano jdownloader (3)| 1 | Create a file named jdownloader in that path |
| 2 | Set run permissions |
| 3 | Edit with nano or whatever 😆. |
#!/bin/sh

. /etc/rc.subr

name=jd2
rcvar=jd2_enable (1)

start_cmd="${name}_start"
stop_cmd="${name}_stop"

load_rc_config $name

jd2_start()
{
#!/bin/bash
echo "starting JDownloader2..."
umask 000
cd /jdownloader/
/usr/local/bin/java -Djava.awt.headless=true -jar /root/jdownloader/JDownloader.jar >/dev/null 2>/dev/null & (2)
}

jd2_stop()
{
#!/bin/bash
echo "killing java (and JDownloader2)..."
pgrep java | xargs kill
}

jd2_restart()
{
#!/bin/bash
echo "killing java (and JDownloader2)..."
pgrep java | xargs kill
umask 000
cd /jdownloader/
echo "starting JDownloader2..."
/usr/local/bin/java -Djava.awt.headless=true -jar /root/jdownloader/JDownloader.jar >/dev/null 2>/dev/null &
}

run_rc_command "$1"| 1 | It is the name of our j2d daemon we can call it whatever we want |
| 2 | This starts our .jar and creates a PID of the proceso daemon |
Path to file /etc/rc.conf
Now we need to go to the etc/rc.conf of our jail and add the following lines, to enable our JDownloader daemon at every jail startup.
syslogd_flags="-ss"
sendmail_enable="NO"
sendmail_submit_enable="NO"
sendmail_outbound_enable="NO"
sendmail_msp_queue_enable="NO"
cron_flags="-J 60"
ifconfig_e0b_bastille4_name="vnet0"
ifconfig_vnet0="inet 192.168.1.248/24"
defaultrouter="192.168.1.1"
jd2_enable="YES" (1)| 1 | Enabling the daemon on the jail boot |
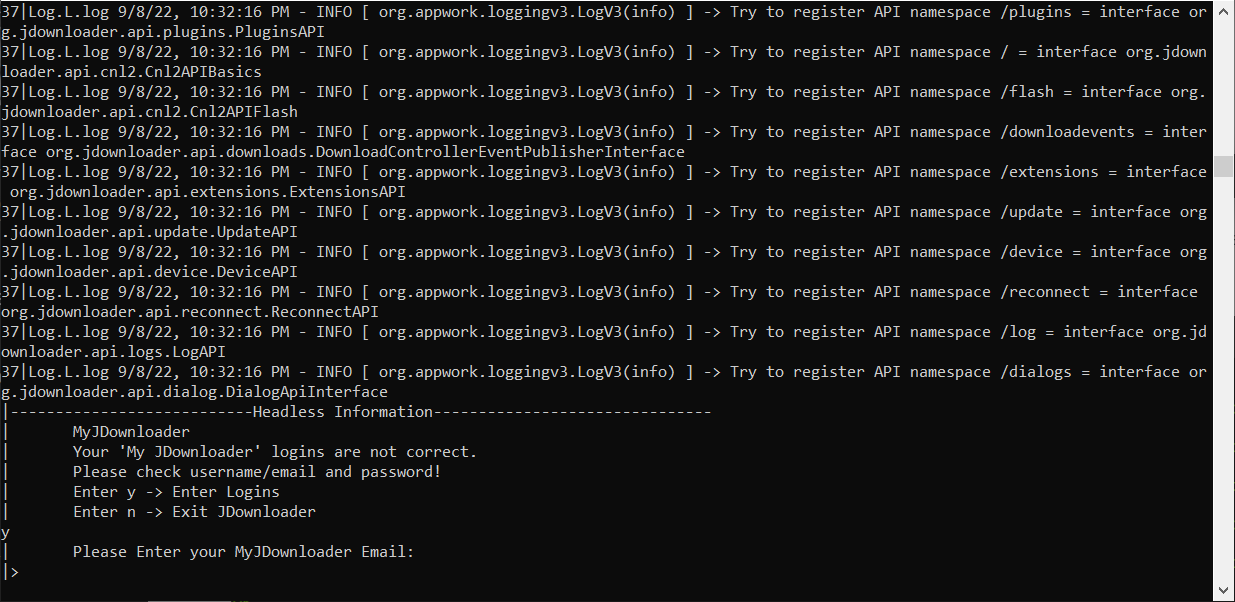
| It is important to run again the .jar to add our authentication with email and password as in the image below. |
Verifying JDownloader update
63|Log.L.log 12/2/23, 2:57:50 PM - INFO [ org.appwork.storage.JsonKeyValueStorage(<init>) ] -> Prefer (merged) JSon Storage from File: /root/jdownloader/cfg/org.jdownloader.captcha.v2.solver.solver9kw.Captcha9kwSettings.json
63|Log.L.log 12/2/23, 2:57:50 PM - INFO [ org.appwork.loggingv3.LogV3(info) ] -> Overridden Config Key found public abstract boolean org.jdownloader.captcha.v2.solver.solver9kw.Captcha9kwSettings.isEnabled()<-->public abstract boolean org.jdownloader.captcha.v2.ChallengeSolverConfig.isEnabled()
Start Update
Update Message: Check for updates
Update Progress: 3%
Update Progress: -1%
Update Message: Contact Server...
Update Message: Check for updates
Update Progress: 100% (1)| 1 | Update list. |
Right now we could go to the website https://my.jdownloader.org/ and log in.
In case of restarting the jail on our part, it would be enough to execute jexec or bastille cmd which is a utility to execute commands inside a jail, without being inside it.
xigmanas: /# bastille restart jdownloader (1)
[jdownloader]:
jdownloader: removed

[jdownloader]:
e0a_bastille4
e0b_bastille4
jdownloader: created

xigmanas: /# jexec -l jdownloader top (2)
last pid: 16487;  load averages:  0.16,  0.10,  0.04
4 processes:   1 running, 3 sleeping
CPU:  0.3% user,  0.0% nice,  0.0% system,  0.0% interrupt, 99.7% idle
Mem: 295M Active, 962M Inact, 8604M Wired, 21G Free
ARC: 5636M Total, 566M MFU, 5007M MRU, 96K Anon, 17M Header, 47M Other
     4611M Compressed, 5333M Uncompressed, 1.16:1 Ratio
Swap: 2048M Total, 2048M Free

  PID USERNAME    THR PRI NICE   SIZE    RES STATE    C   TIME    WCPU COMMAND
16135 root         50  52    0    10G   316M uwait   21   0:24   2.40% java (3)
16487 root          1  20    0    14M  3580K CPU4     4   0:00   0.05% top
16411 root          1  20    0    13M  2772K select  15   0:00   0.00% syslogd
16459 root 1 20 0 13M 2604K nanslp 10 0:00 0.00% cron| 1 | Restarting the jail and all ok |
| 2 | Checking that the java process inside the jail is active |
| 3 | Jdownloader daemon active 🔥 |
xigmanas: ~# bastille cmd jdownloader top
[jdownloader]:

last pid: 56994;  load averages:  0.00,  0.00,  0.00                                                     up 26+10:35:47  19:30:08
6 processes:   1 running, 5 sleeping
CPU:  0.0% user,  0.0% nice,  0.1% system,  0.0% interrupt, 99.9% idle
Mem: 143M Active, 12G Inact, 8208K Laundry, 18G Wired, 1243M Free
ARC: 16G Total, 1615M MFU, 14G MRU, 96K Anon, 120M Header, 299M Other
     14G Compressed, 16G Uncompressed, 1.13:1 Ratio
Swap: 2048M Total, 2048M Free

  PID USERNAME    THR PRI NICE   SIZE    RES STATE    C   TIME    WCPU COMMAND
 5670 root         53  52    0    11G   745M uwait   11  54:58   0.15% java (1)
56974 root          1  20    0    14M  3700K CPU7     7   0:00   0.01% top
 5996 root          1  20    0    13M  2580K nanslp  20   0:07   0.00% cron
 5951 root          1  20    0    13M  2772K select  17   0:05   0.00% syslogd
56975 root          1  20    0    13M  2584K piperd   7   0:00   0.00% cron
56976 root 1 20 0 13M 2584K nanslp 23 0:00 0.00% cron| 1 | Active java process. |
Jdownloader Template
With the template parameter we use a bastillefile in the background that will allow us to automate processes after creating a jail, very useful as a dockerfile does.
The bastillefile file must be inside the bastille/template directory.
bastille template jdownloader test/bastille-jdownloader (1)| 1 | We apply the template to the running jail, called jdownloader. |
We also have 2 optional parameters, to change the version of the jdk and jdownloader that almost always update the mega link.
-
OPEN_JDK_VERSION
-
J2_URL
bastille template jdownloader test/bastille-jdownloader --arg OPEN_JDK_VERSION=17ARG OPEN_JDK_VERSION=11
ARG J2_URL=https://mega.nz/file/fRNwxBza#oTUD5FEuWccnIvHzPdMwdE_ju4HndEDXbaf-VtoBnao
PKG openjdk${OPEN_JDK_VERSION} megatools
CMD mkdir jdownloader
CMD chmod -R 775 jdownloader
CMD cd jdownloader && megadl ${J2_URL}
CMD chmod +x jdownloader/JDownloader.jar
#Copy the etc file from the template to the jdownloader jail etc file
CP etc /
RENDER /etc/rc.d/jdownloader
CMD chmod +x /etc/rc.d/jdownloader
SYSRC jd2_enable="YES"
CONFIG set allow.mlock;
CONFIG set allow.raw_sockets;
CMD java -jar jdownloader/JDownloader.jar
CMD pkill java
CMD java -jar jdownloader/JDownloader.jar -norestart (1)| 1 | The last command will launch a login to Jdownloader, and we will enter our user and password. |
Updating from MyJDownloader
In the web interface, in settings we can update it, but as we have autoboot it will restart automatically.

| This update was done for fun, in fact it is optional, without doing it, it allowed me to use jdownloader without any problems. |
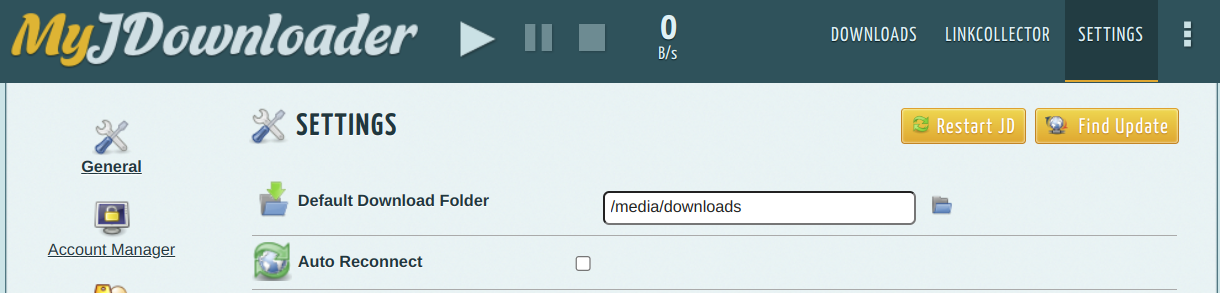
Download path
Here in settings we can also change the download path, the directory must exist in our jail
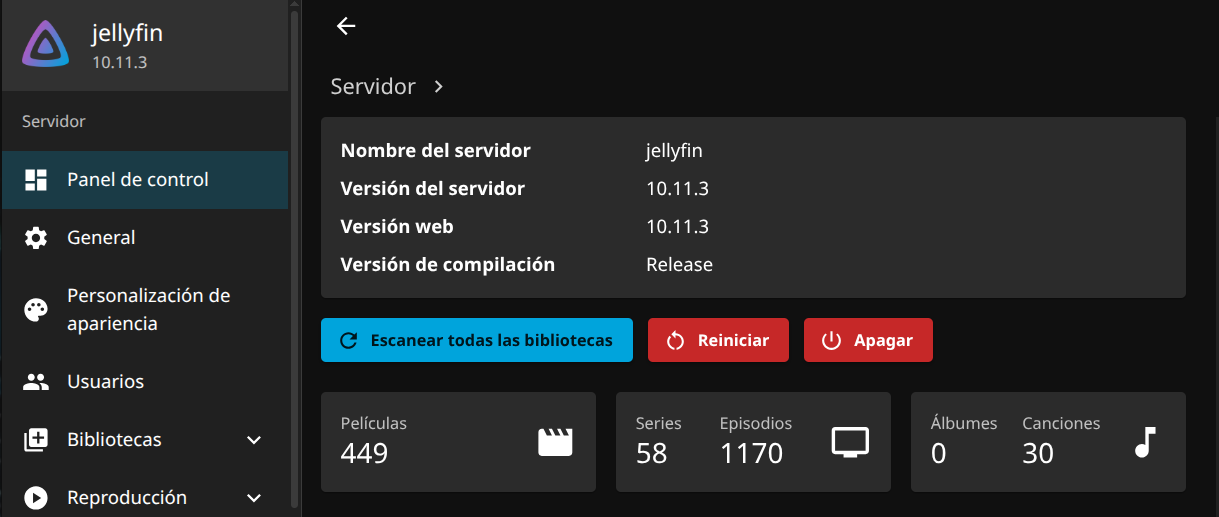
Install Jellyfin
This is not
, it’s up to us to do all the work of saving the movies on our NAS, and from the Jellyfin, accessing that directory, pool/dataset where we have them, so we can watch them 😁

Jellyfin is a fork of emby, like plex, but opensource, as many options to have our movies in our NAS organized, edit subtitles, user control to parental control, add music, has an Api for external applications, extensions, the version I will use is 10.7.7 is a little old, but comes pretty good, far superior to miniDLNA 😅.
|
Basic installation steps plus inspirational repository
|
Configuration of jails.conf
For jellyfin it is important to add the last 2 lines:
jellyfin {
  devfs_ruleset = 13;
  enforce_statfs = 2;
  exec.clean;
  exec.consolelog = /mnt/pool/extensions/bastille/logs/jellyfin_console.log;
  exec.start = '/bin/sh /etc/rc';
  exec.stop = '/bin/sh /etc/rc.shutdown';
  host.hostname = jellyfin;
  mount.devfs;
  mount.fstab = /mnt/pool/extensions/bastille/jails/jellyfin/fstab;
  path = /mnt/pool/extensions/bastille/jails/jellyfin/root;
  securelevel = 2;

  vnet;
  vnet.interface = e0b_bastille0;
  exec.prestart += "jib addm bastille0 igb0";
  exec.prestart += "ifconfig e0a_bastille0 description \"vnet host interface for Bastille jail jellyfin\"";
  exec.poststop += "jib destroy bastille0";
  allow.mlock; (1)
  allow.raw_sockets; (2)
}| 1 | Related to the jail’s memory. |
| 2 | Enables utilities such as ping and traceroute inside the jail. |
| The ip address to use is the one we assign to the jail and default port 8096 |

Error reinstalling Jellyfin
It happened to me many times that when I wanted to reinstall jellyfin, I could not do it because I had a repeated UID, actually by user/groups.
|
The service file uses daemon to restart jellyfinserver if it crashes.
The service file will also change the permissions so that the updater works.
If this behavior is unwanted you will need to edit the RC file manually and
remove the daemon and/or the permissions changes.

If you are running this in a jail please set "allow_mlock=1" or similar
for this jail otherwise the program will fail to start.

dotNET does not work well inside jails that are missing either a) VNET or
one of b) ip6=inherit c) ip6=new. The service file will try workaround any
user misconfiguration but is not perfect.

root@jailvnet2:~ # pw user add jellyfin -c jellyfin -u 710 -d /nonexistent -s /usr/bin/nologin
pw: uid `710' has already been allocated (1)

root@jailvnet2:~ # ln -s /usr/local/lib/libsqlite3.so /usr/local/lib/libe_sqlite3

root@jailvnet2:~ # sysrc jellyfinserver_enable=TRUE
jellyfinserver_enable:  -> TRUE
root@jailvnet2:~ # sysrc jellyfinserver_user=jellyfin
jellyfinserver_user:  -> jellyfin

root@jailvnet2:~ # sysrc jellyfinserver_group=jellyfin
jellyfinserver_group:  -> jellyfin

root@jailvnet2:~ # service jellyfinserver start
install: unknown group jellyfin
install: unknown group jellyfin
Starting jellyfinserver.
su: unknown login: jellyfin
/usr/local/etc/rc.d/jellyfinserver: WARNING: failed to start jellyfinserver (2)
root@jailvnet2:~ #| 1 | The UID 710 was repeated, looking like another user has it, so what we would do is to place another one. |
| 2 | When trying to start the jellyfin server we get this error. |
pw user add jellyfin -c jellyfin -u 715 -d /nonexistent -s /usr/bin/nologin (1)| 1 | We now use UID 715, to fix the error. |
root@jailvnet2:~ # service jellyfinserver start
Starting jellyfinserver. (1)| 1 | With this single message, it indicates that everything is ok, now we can access with the jail ip address plus the 8096 port. |
Updating Jellyfin
| It is a good idea to have a backup or clone jail in cases like these, bastille allows it, via console or web. |
root@jellyfin:~ # service jellyfinserver stop (1)
Stopping jellyfinserver.
root@jellyfin:~ # fetch https://github.com/Thefrank/jellyfin-server-freebsd/releases/download/v10.8.1/jellyfinserver-10.8.1.pkg (2)
jellyfinserver-10.8.1.pkg                               58 MB 7305 kBps    08s
root@jellyfin:~ # ls
.cshrc				.k5login			.shrc
.history			.login				jellyfinserver-10.7.7.pkg
.hushlogin			.profile			jellyfinserver-10.8.1.pkg
root@jellyfin:~ # pkg install jellyfinserver-10.8.1.pkg (3)
Updating FreeBSD repository catalogue...
[jellyfin] Fetching packagesite.pkg: 100%    6 MiB   3.3MB/s    00:02
Processing entries: 100%
FreeBSD repository update completed. 31614 packages processed.
All repositories are up to date.
New version of pkg detected; it needs to be installed first.
The following 1 package(s) will be affected (of 0 checked):

Installed packages to be UPGRADED:
	pkg: 1.17.5 -> 1.18.3 (4)

Number of packages to be upgraded: 1

8 MiB to be downloaded.

Proceed with this action? [y/N]: y (5)
[jellyfin] [1/1] Fetching pkg-1.18.3.pkg: 100%    8 MiB   2.2MB/s    00:04
Checking integrity... done (0 conflicting)
[jellyfin] [1/1] Upgrading pkg from 1.17.5 to 1.18.3...
[jellyfin] [1/1] Extracting pkg-1.18.3: 100%
Updating FreeBSD repository catalogue...
FreeBSD repository is up to date.
All repositories are up to date.
The following 2 package(s) will be affected (of 0 checked):

New packages to be INSTALLED:
	jellyfinserver: 10.8.1
	krb5-120: 1.20

Number of packages to be installed: 2

The process will require 135 MiB more space.
1 MiB to be downloaded.

Proceed with this action? [y/N]: y (6)
[jellyfin] [1/2] Fetching krb5-120-1.20.pkg: 100%    1 MiB   1.2MB/s    00:01
Checking integrity... done (0 conflicting)
[jellyfin] [2/2] Installing jellyfinserver-10.8.1...
===> Creating groups.
Using existing group 'jellyfinserver'.
===> Creating users
Using existing user 'jellyfinserver'.
[jellyfin] Extracting jellyfinserver-10.8.1: 100%
[jellyfin] [1/2] Installing krb5-120-1.20...
[jellyfin] [1/2] Extracting krb5-120-1.20: 100%
=====
Message from jellyfinserver-10.8.1:

--
jellyfinserver relies on Microsoft dotNET5+ SDK to be built
Microsoft does not have an official version of dotNET for FreeBSD

This package was built with an UNOFFICIAL UNSUPPORTED version of dotNET
If this is something that you do not want, remove this package with
"pkg remove jellyfinserver"

This package installs a service file.
Enable it with "sysrc jellyfinserver_enable=TRUE"
Start it with "service jellyfinserver start".

The service file uses daemon to restart jellyfinserver if it crashes.
The service file will also change the permissions so that the updater works.
If this behavior is unwanted you will need to edit the RC file manually and
remove the daemon and/or the permissions changes.

If you are running this in a jail please set "allow_mlock=1" or similar
for this jail otherwise the program will fail to start.

dotNET does not work well inside jails that are missing either a) VNET or
b) ip6=inherit. The service file will try workaround any user misconfiguration
but is not perfect.
root@jellyfin:~ # service jellyfinserver start (7)
Starting jellyfinserver.| 1 | Stop the jellyfin server |
| 2 | fetch the new version of jellyfin |
| 3 | Install the .pkg version 10.8.1 of jellyfin |
| 4 | Display the version to be upgraded. |
| 5 | Yes |
| 6 | Yes |
| 7 | Start the jellyfin server. |
We have the update ready
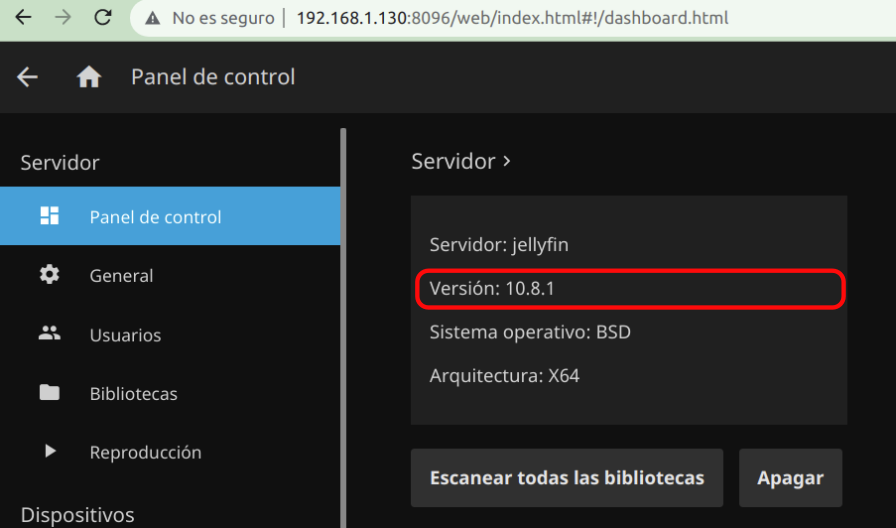
Logs
This part allows us to visualize our logs, very useful.
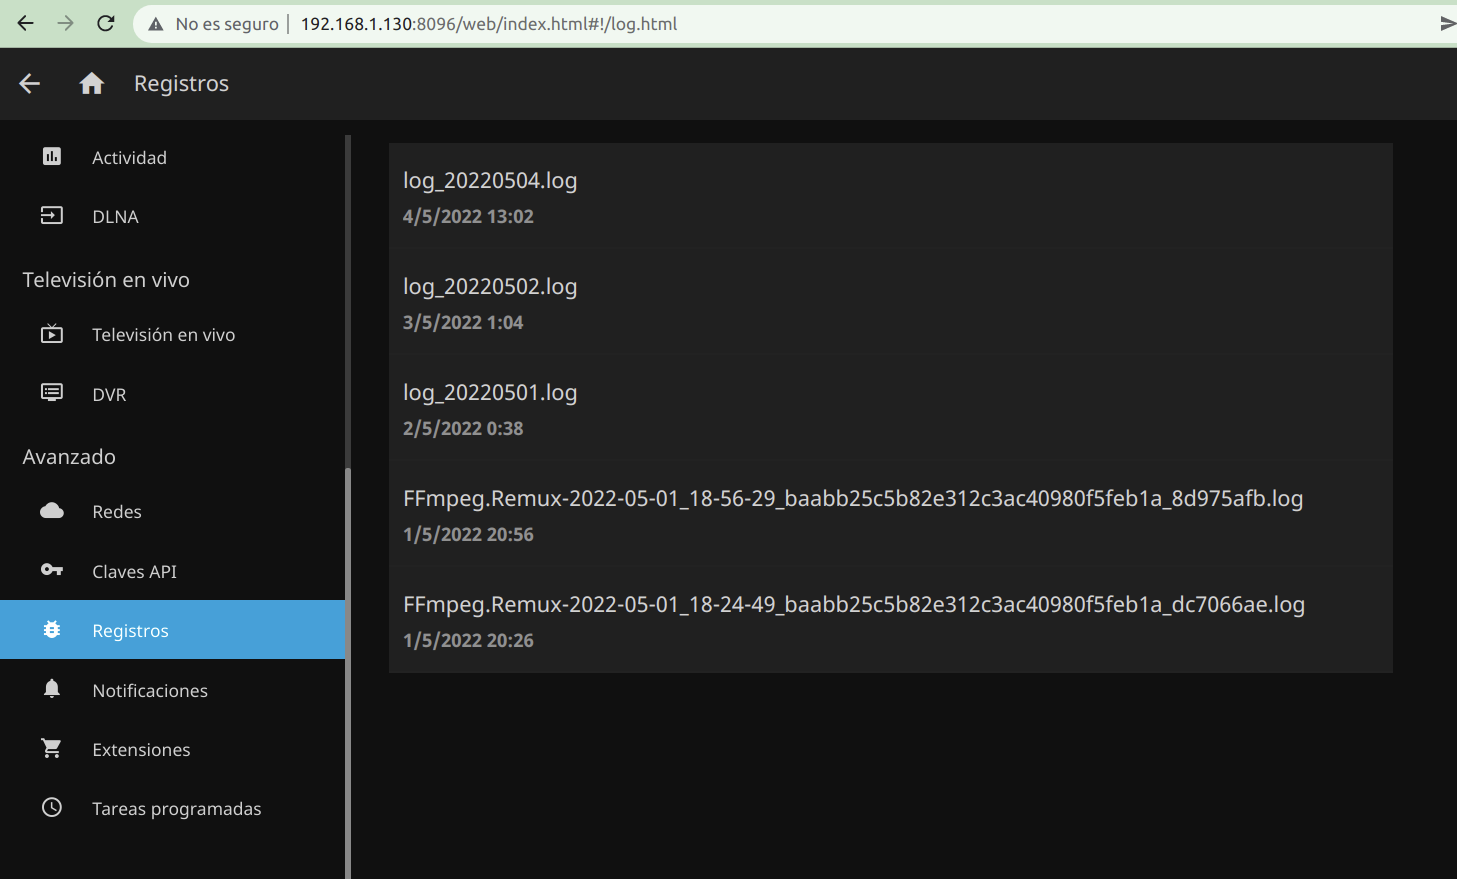
| It can happen, that the images of the movies are not correct, but also can not be changed correctly from the web interface, but it may be lack of write permissions on the NAS thanks to the logs you can verify that. |
[2022-05-08 15:57:59.602 +00:00] [ERR] [18] MediaBrowser.Providers.Manager.ProviderManager: UnauthorizedAccessException - Access to path "/mnt/movies_1/Spiderman un nuevo universo (2018)/folder.jpg" is denied. Will retry saving to "/var/db/jellyfinserver/metadata/library/a4/a45b8287c09ccc439897b6158d8d88bd/poster.jpg"
[2022-05-08 15:57:59.828 +00:00] [ERR] [18] MediaBrowser.Providers.Manager.ProviderManager: UnauthorizedAccessException - Access to path "/mnt/movies_1/Spiderman un nuevo universo (2018)/backdrop.jpg" is denied. Will retry saving to "/var/db/jellyfinserver/metadata/library/a4/a45b8287c09ccc439897b6158d8d88bd/backdrop.jpg"
[2022-05-08 15:58:02.249 +00:00] [ERR] [24] MediaBrowser.Providers.Manager.ProviderManager: Error in metadata saver
(1)
System.UnauthorizedAccessException: Access to the path '/mnt/movies_1/Spiderman un nuevo universo (2018)/Spider-Man Un nuevo universo (2018).nfo' is denied.
 ---> System.IO.IOException: Permission denied
   --- End of inner exception stack trace ---
   at Interop.ThrowExceptionForIoErrno(ErrorInfo errorInfo, String path, Boolean isDirectory, Func`2 errorRewriter)
   at Microsoft.Win32.SafeHandles.SafeFileHandle.Open(String path, OpenFlags flags, Int32 mode)
   at System.IO.FileStream..ctor(String path, FileMode mode, FileAccess access, FileShare share, Int32 bufferSize, FileOptions options)
   at System.IO.FileStream..ctor(String path, FileMode mode, FileAccess access, FileShare share)
   at MediaBrowser.XbmcMetadata.Savers.BaseNfoSaver.SaveToFile(Stream stream, String path)
   at MediaBrowser.XbmcMetadata.Savers.BaseNfoSaver.Save(BaseItem item, CancellationToken cancellationToken)
at MediaBrowser.Providers.Manager.ProviderManager.SaveMetadata(BaseItem item, ItemUpdateType updateType, IEnumerable`1 savers)| 1 | Error when writing in the directory, then, it would not be possible to edit the covers and so on. |
| The images even with permissions problems we can change it, but it is annoying. |

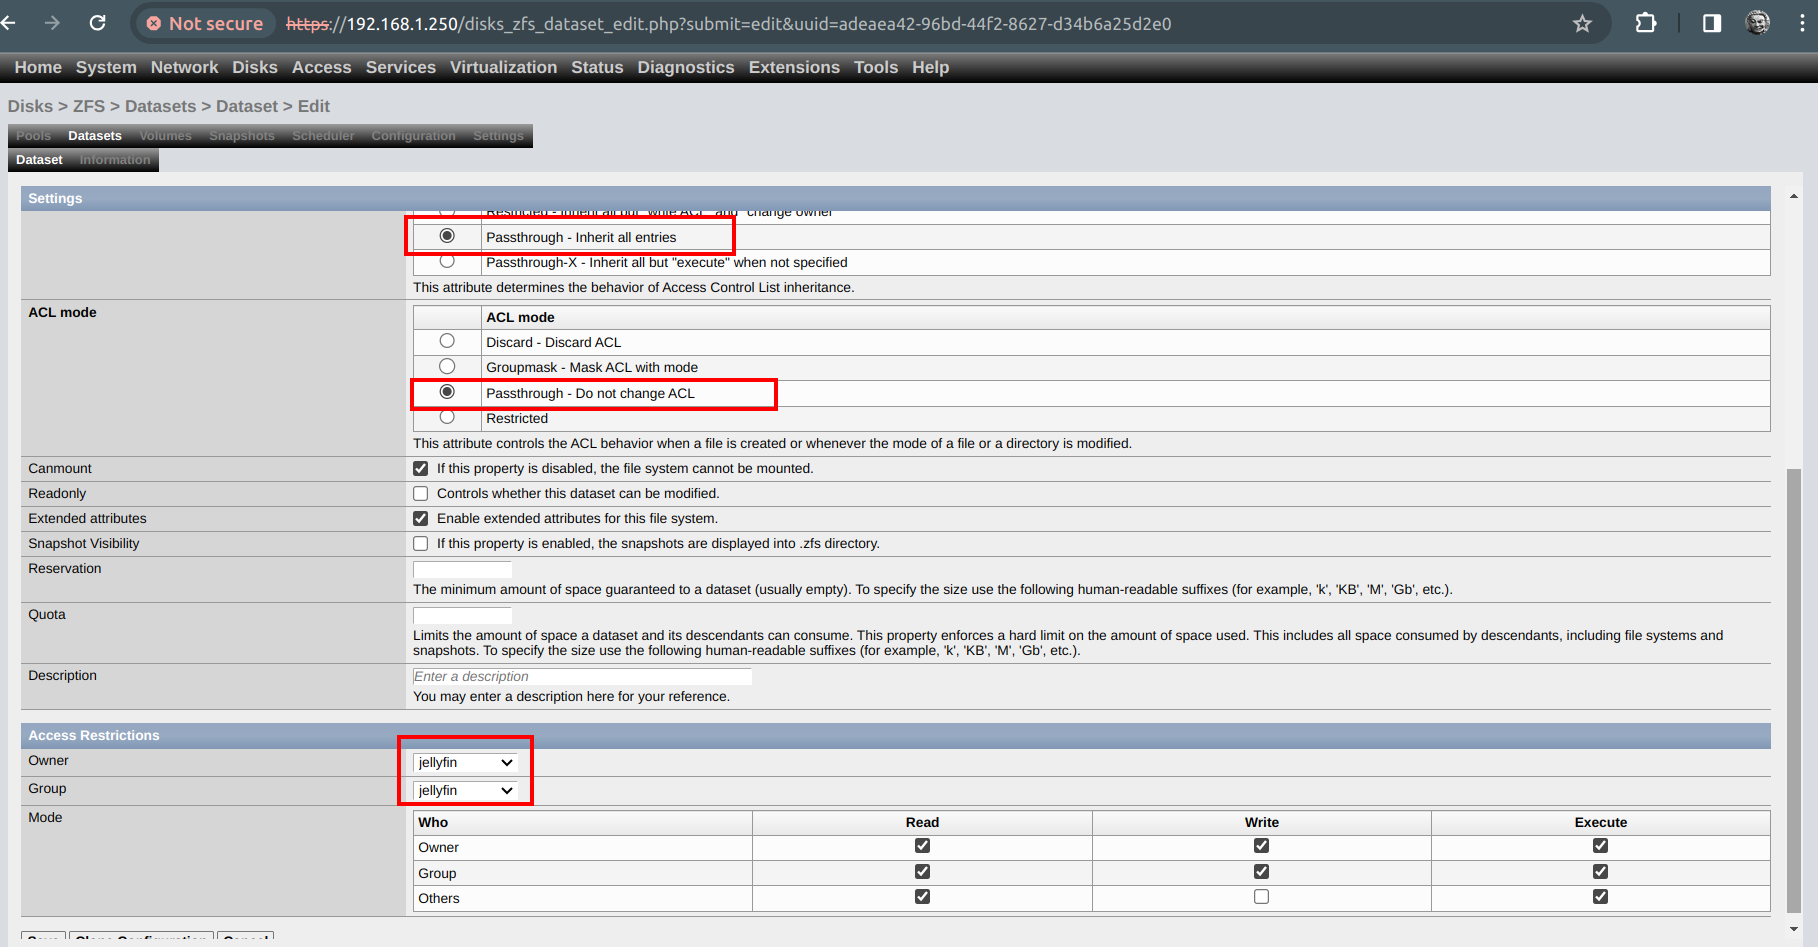
Permission settings in the dataset
The dataset that has the movies must have the user jellyfin and assigned group must also match the user jellyfin of the container how do we do it ? easy, we enter the container jellyfin and run this to know the id of that user:
servernas: /mnt# bastille console jellyfin
[jellyfin]:
root@jellyfin:~ # id jellyfin (1)
uid=868(jellyfin) gid=868(jellyfin) groups=868(jellyfin)
root@jellyfin:~ # id 868 (2)
uid=868(jellyfin) gid=868(jellyfin) groups=868(jellyfin)
root@jellyfin:~ #| 1 | We look for the id of the user jellyfin inside the container. |
| 2 | The same but on the contrary we look for the user of the id 868 inside the container. |
We create the usergroup with the id of the container, so that you have write, read, execute permissions on this dataset.

For the dataset I have this current configuration and well everything works correctly.
| Right in the dataset where I store all the movies. |
| Recall that we can create the user inside the same container as the host with the command above for the permisos. |
pw user add jellyfin -c jellyfin -u 868 \ (1)
-d /nonexistent -s /usr/bin/nologin| 1 | Id 868 as that of the host. |
Creating Watcher with Java
Yes a bit crazy, because you can use a cron job, but since the XigmaNAS UI is a pain in the ass and for some reason doesn’t work, it doesn’t fire correctly either.
Then it usually happens that when you add a movie to the mnt/pool/movies directory the permissions are not the right ones and the jellyfin app can not push the cover of the movie as it should (although it does it because it usually writes in another directory where it has permissions, but it does not justify the same) or write the .nfo, then simply what you want to do is that, if you add data to the directory you set the permissions plus the correct user and ready without so much problem.
We need:
-
The .jar with the necessary code to act as a listener of the changes that occur in a directory
-
Root access to set the correct permissions.
-
The script to add it at startup, in the rc.d
-
Enable the process at startup in
etc/rc.conf.
The Watcher script
#!/bin/sh

. /etc/rc.subr

name=watcher
rcvar=watcher_enable

start_cmd="${name}_start"
stop_cmd="${name}_stop"

load_rc_config $name

: ${watcher_args_movies_pool="-u jellyfin -p /media/downloads/movies -o 775"} (1)
: ${watcher_args_series_pool_3="-u jellyfin -p /media/downloads/series_pool_3 -o 775"}
: ${watcher_args_movies_pool_3="-u jellyfin -p /media/downloads/movies_pool_3 -o 775"}

watcher_start()
{
  #!/bin/bash
  echo "starting Watcher..."
  umask 000                                                 (2)
  /usr/local/bin/java -Djava.awt.headless=true -jar /root/watcher/watcher.jar ${watcher_args_movies_pool} >/dev/null 2>/dev/null &
  /usr/local/bin/java -Djava.awt.headless=true -jar /root/watcher/watcher.jar ${watcher_args_series_pool_3} >/dev/null 2>/dev/null &
  /usr/local/bin/java -Djava.awt.headless=true -jar /root/watcher/watcher.jar ${watcher_args_movies_pool_3} >/dev/null 2>/dev/null &
}

watcher_stop()
{
  #!/bin/bash
  echo "killing java (and Watch)..."
  pgrep java | xargs kill
}

watcher_restart()
{
  #!/bin/bash
  echo "killing java (and Watcher)..."
  pgrep java | xargs kill
  umask 000
  echo "starting watcher..."
  /usr/local/bin/java -Djava.awt.headless=true -jar /root/watcher/watcher.jar ${watcher_args_movies_pool} >/dev/null 2>/dev/null &
  /usr/local/bin/java -Djava.awt.headless=true -jar /root/watcher/watcher.jar ${watcher_args_series_pool_3} >/dev/null 2>/dev/null &
  /usr/local/bin/java -Djava.awt.headless=true -jar /root/watcher/watcher.jar ${watcher_args_movies_pool_3} >/dev/null 2>/dev/null &
}

run_rc_command "$1"| 1 | These are the parameters passed to the watcher
|
| 2 | Important, our .jar must be in the directory root/name-any-directory/watcher.jar in this case we are running this .jar in a jail. |
The Java code
The code already exists to a large extent, but we have to adapt it to our case, because this code only scans directory changes for text files only, we go further than that.
The advantage is that, with cron we have a defined time, 2, 3 minutes or whatever, but if we do not want to wait 2 minutes or 3 ?, and that the changes of the directories are given immediately, or rather in the future only if there are changes ? then we have this way, through events, this service processes 3 types, CREATE, DELETE, and MODIFY.
|
// imports removed for brevity

/**
 * Listening for changes in the <strong>/mnt/pool/movies</strong>  dataset
 * <p>
 * And if there is a creation event we change the owner to <strong>jellyfin</strong> with the octal mode 775
 */
public class WatchDir {

    private static final Logger LOGGER = Logger.getLogger(WatchDir.class.getName());

    /**
     * Octal 775
     */
    private static final String OCTAL_775 = "rwxrwxr-x";
    /**
     * Octal 770
     */
    private static final String OCTAL_770 = "rwxrwx---";
    /**
     * The dataset path to watch, is used with the <strong>-p</strong> parameter
     */
    private final Path path;
    /**
     * The octal mode, is used with the <strong>-o</strong> parameter
     */
    private final String octal;
    /**
     * The user name to apply in this directory, is used with the <strong>-u</strong> parameter
     */
    private final String userName;

    public WatchDir(final String userName, final String path, final String octal) {
        this.userName = userName;
        this.path = Path.of(path);
        this.octal = octal;

        this.watchDirectory();
    }

    @SuppressWarnings("unchecked")
    private void watchDirectory() {
        try {
            WatchService watcher = FileSystems.getDefault().newWatchService(); (1)
            this.registerAll(path, watcher); (2)
            WatchKey key;
            LOGGER.info("Listening in..." + path);
            for (;;) {
                // wait for key to be signaled
                try {
                    key = watcher.take();
                } catch (InterruptedException x) {
                    return;
                }

                for (WatchEvent<?> event : key.pollEvents()) {
                    WatchEvent.Kind<?> kind = event.kind();

                    if (kind == OVERFLOW) {
                        continue;
                    }

                    WatchEvent<Path> ev = (WatchEvent<Path>) event;
                    Path filename = ev.context();

                    if (kind == ENTRY_CREATE) { (3)
                        /*
                         *   Si pasamos el filename solo se procesara el directorio nuevo.
                         *   Si pasamos el path del parametro -p por el filename, procesaremos el directorio completo
                         */
                        LOGGER.info("CREATE: " + filename);
                        changePermissionsAndOwnerRecursively(path); (4)
                    }

                    if (kind == ENTRY_DELETE) {
                        LOGGER.info("DELETE: " + filename);
                        changePermissionsAndOwnerRecursively(path);
                    }

                    if (kind == ENTRY_MODIFY) { (5)
                        LOGGER.info("MODIFY: " + filename);
                        changePermissionsAndOwnerRecursively(path);
                    }

                }

                boolean valid = key.reset();
                if (!valid) {
                    break;
                }
            }
        } catch (IOException x) {
            LOGGER.severe(x.getMessage());
        }

    }

    /**
    * Register the given directory and all its sub-directories with the WatchService.
     */
    private void registerAll(final Path start, final WatchService watchService) throws IOException {
        // register directory and sub-directories
        Files.walkFileTree(start, new SimpleFileVisitor<>() {
            @Override
            public FileVisitResult preVisitDirectory(Path dir, BasicFileAttributes attrs)
                    throws IOException {
                dir.register(watchService, ENTRY_CREATE, ENTRY_DELETE, ENTRY_MODIFY);
                return FileVisitResult.CONTINUE;
            }

        });
    }

    /**
     * Change permissions recursively
     *
     * @param pathParam
     */
    private void changePermissionsAndOwnerRecursively(Path pathParam) {
        try (Stream<Path> stream = Files.walk(pathParam)) { // FOLLOW_LINKS (6)
            stream.forEach(path -> {
                this.setPermissions(path); (7)
                this.changeOwner(path); (8)
            });
            LOGGER.info("Owner changed correctly to " + this.userName);
            LOGGER.info("Permissions changed correctly");
        } catch (IOException e) {
            throw new RuntimeException(e);
        }
    }

    /**
     * Set octal permissions
     *
     * @param path the current dir or a filename
     *
     */
    private void setPermissions(final Path path) {
        try {
            final String octalMode = this.octal.equals("775") ? OCTAL_775 : OCTAL_770;
            Set<PosixFilePermission> permissions = PosixFilePermissions.fromString(octalMode);
            Files.setPosixFilePermissions(path, permissions); (9)
        } catch (IOException e) {
            LOGGER.severe(e.getMessage());
        }
    }

    /**
     * The user to the directory and files is set up, you must have root permissions to run this.
     * <p>
     * The user must exist, otherwise, a <strong>UserPrincipalNotFoundException</strong>
     *
     * @param path
     * @throws IOException
     */
    private void changeOwner(final Path path) {
        try {
            UserPrincipalLookupService lookupService = path.getFileSystem().getUserPrincipalLookupService();
            UserPrincipal userPrincipal = lookupService.lookupPrincipalByName(this.userName);
            Files.setOwner(path, userPrincipal); (10)
        } catch (IOException ex)  {
            LOGGER.severe("The user "+ this.userName + " does not exist");
            LOGGER.severe("leaving now...");
            System.exit(0);
        }

    }

    /**
     *
     * @param args
     */
    public static void main(String... args) {
        System.out.println("");
        System.out.println("rubn");
        System.out.println("https://rubn0x52.com");

        if (args.length == 0) {
            LOGGER.info("No input parameters present");
            System.exit(1);
        } else if (("-h".equals(args[0])
                || "-help".equals(args[0])
                || "--help".equals(args[0])
                || "--h".equals(args[0]))) {
            LOGGER.info("usage: java -jar watcher.jar -u [--user ex: an existing user] -p [--path ex: path,dir,dataset] -o [--octal mode ex: 775, 770]");
            System.exit(1);
        } else {
            if (args.length > 3 && args.length <=5) {// valid path args[3]
                LOGGER.info("Please view usage with --h, -h, -help, --help" );
                System.exit(0);
            } else if(args.length > 3 && args.length <=6) {
                (11)
                new WatchDir(args[1].trim(), args[3].trim(), args[5].trim());
            } else {
                LOGGER.info("Please view usage with --h, -h, -help, --help" );
                System.exit(0);
            }
        }
    }

}| 1 | The WatchService is pure magic. |
| 2 | This line is passed the events that we want to process recursively through the child directories, the walkFileTree method is used, making the code cleaner than using the walk method. |
| 3 | When we have an event of type CREATE, that is, a new directory. |
| 4 | Here is our logic, we use the walk method to do a recursive walk through that directory. |
| 5 | It is necessary to process MODIFY type events because there is the case where a directory is added in another existing directory counting as a modification. |
| 6 | The method walk that does the magic too, it can traverse symbolic links but it is not our case, the number 3 is for the depth of the path, that is, if we add a directory that contains more than 3 folders, it only searches until the third folder the others will ignore them, at the beginning I leave it, but not anymore, better to remove it and that’s it. |
| 7 | We change permissions to the directory recursively. |
| 8 | Change the owner of the directory recursively as well. |
| 9 | Set the permissions in octal mode. |
| 10 | This changes the owner. |
| 11 | Here we instantiate only if we have the 3 correct parameters. |
| The gist |
Check if the script has been executed
To verify that our .jar has been started correctly we use
root@jdownloader:~ # ps -aux | grep -e jar
root 7211  0.7  0.1 27799236  94264  0  IJ   11:55   0:01.94 /usr/local/openjdk11/bin/java -Djava.awt.headless=true -jar /root/watcher/watcher.jar -u jellyfin -p /me (1)
root 7209  0.2  0.7 28413212 696620  0  IJ   11:55   0:35.96 /usr/local/openjdk11/bin/java -Djava.awt.headless=true -jar /root/jdownloader/JDownloader.jar
root 7591 0.0 0.0 12812 2360 0 S+J 11:56 0:00.00 grep -e jar| 1 | Correct execution. |
In case of disabling the Script we can do it in the etc/rc.conf and mark it to "NO"
|
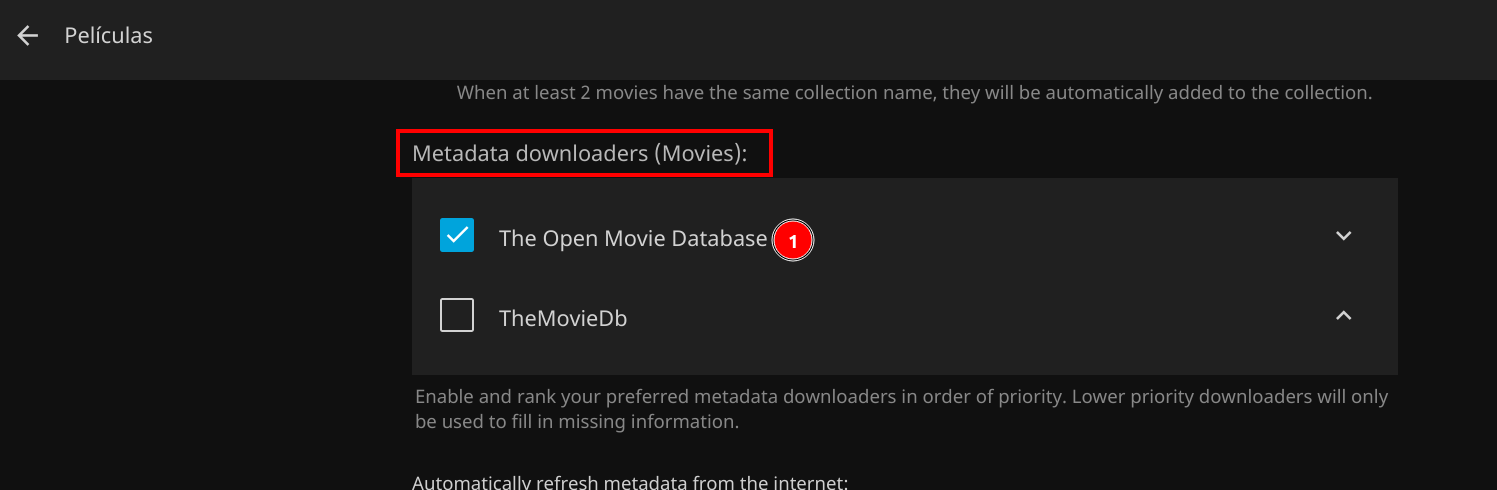
Use imdb as default for cover pages
We have to go to manage the library
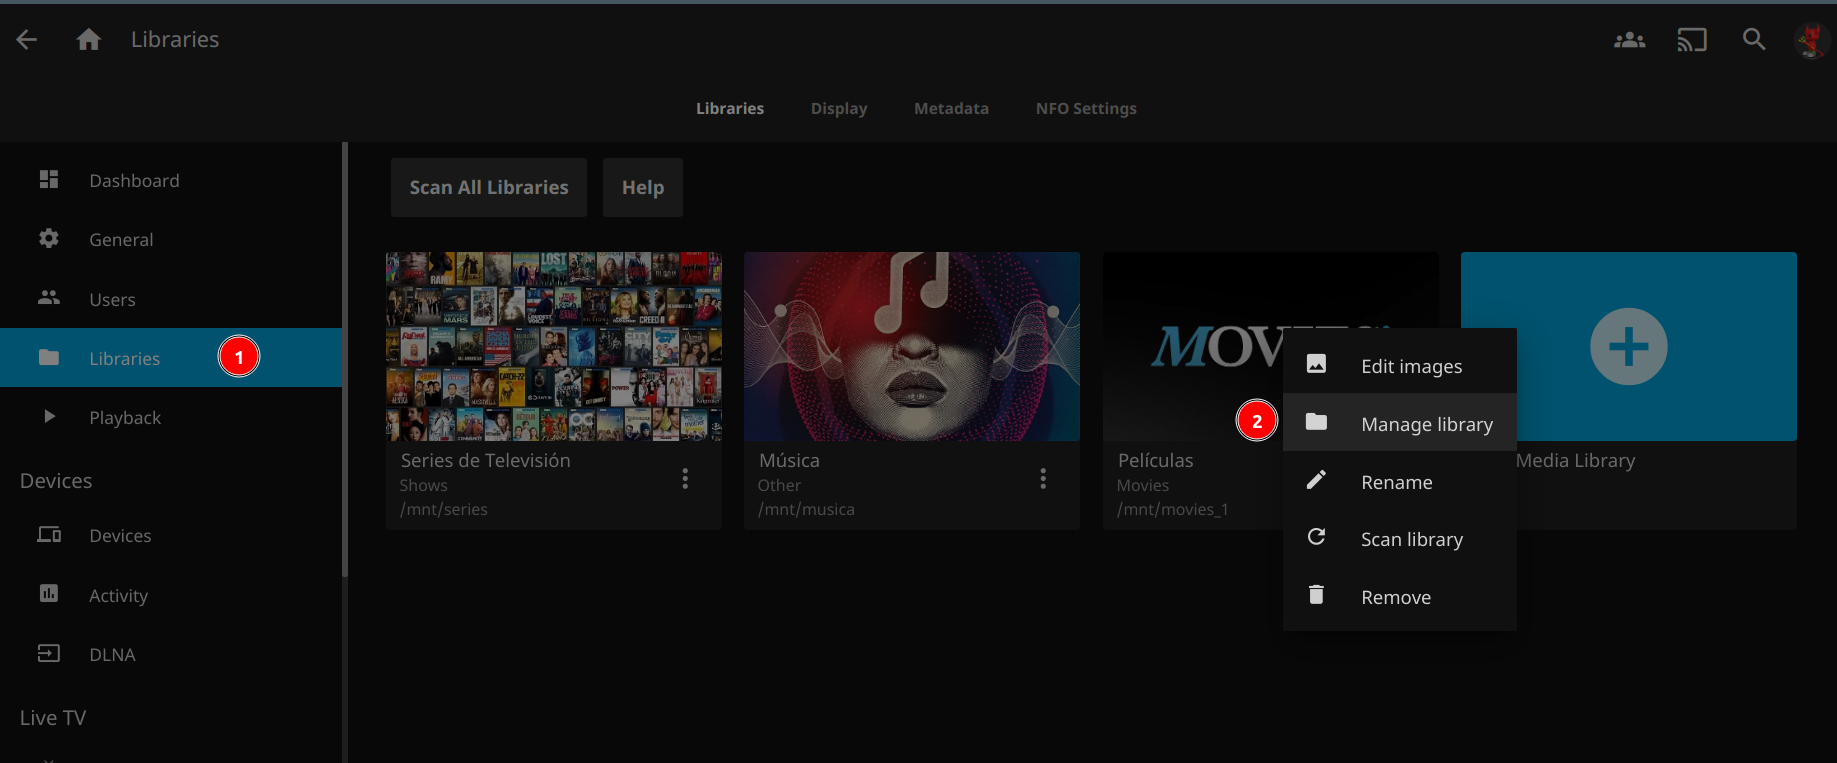
With this we will achieve that each cover uses by default the one that is in imdb one of the most reliable and old ones.
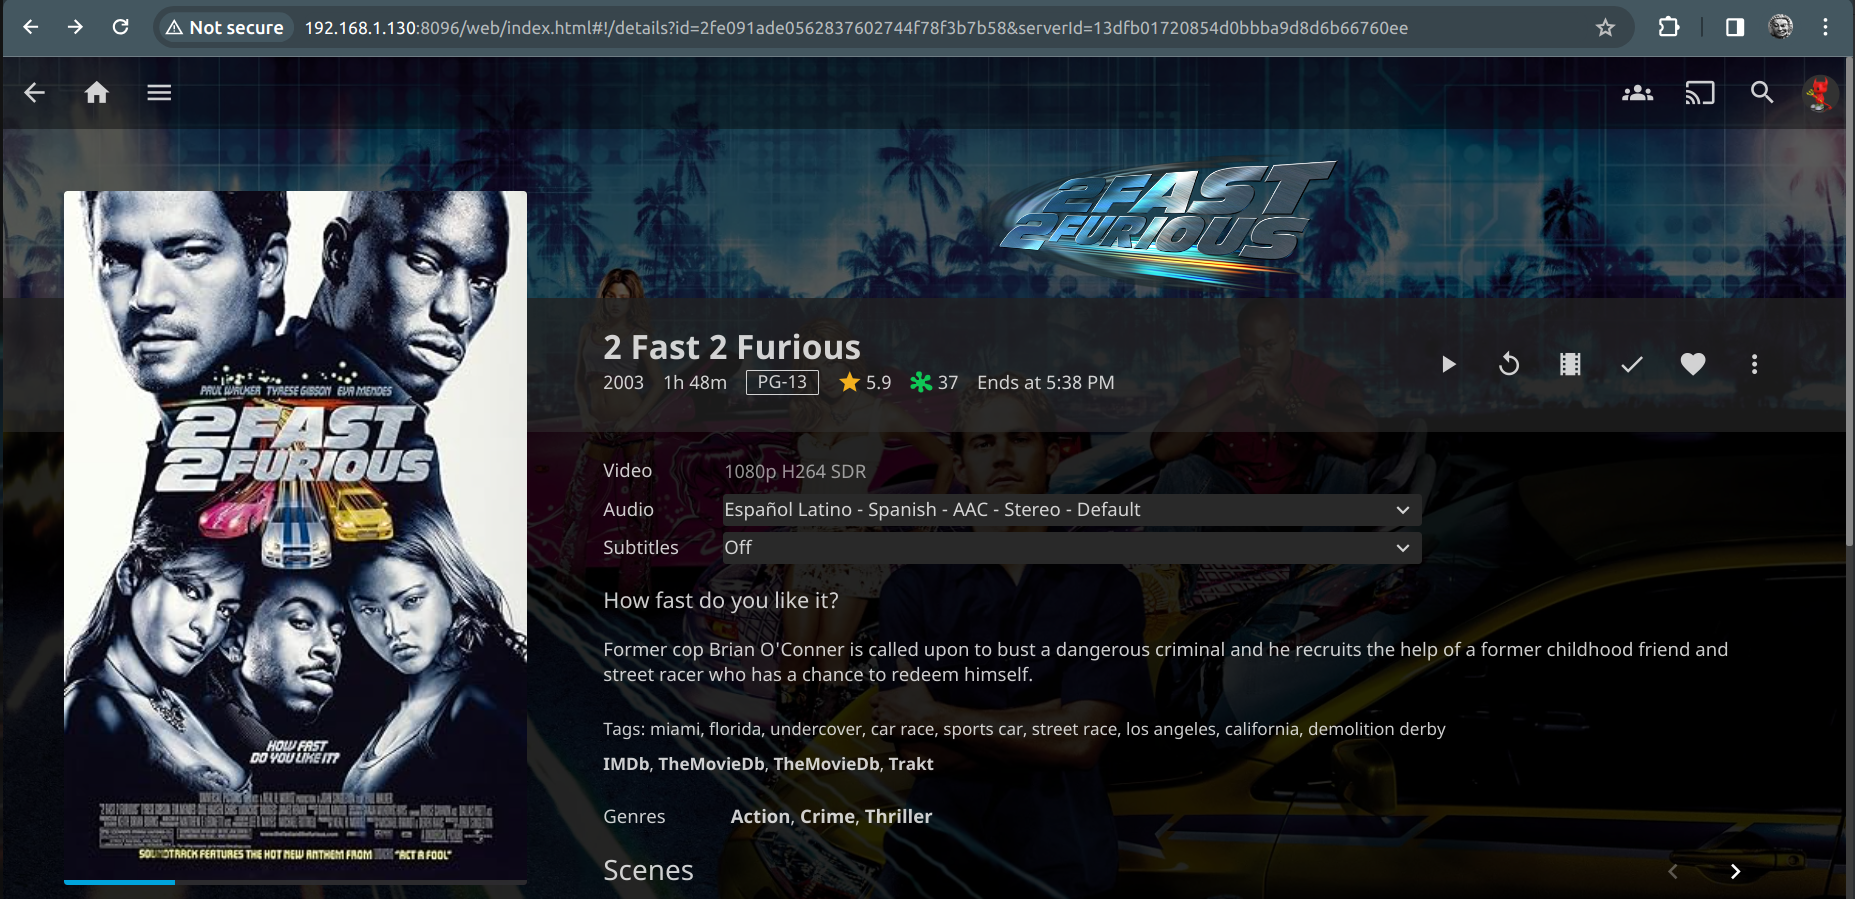
| Here we see that the images are the same, i.e. everything is fine. |

OpenSubtitles
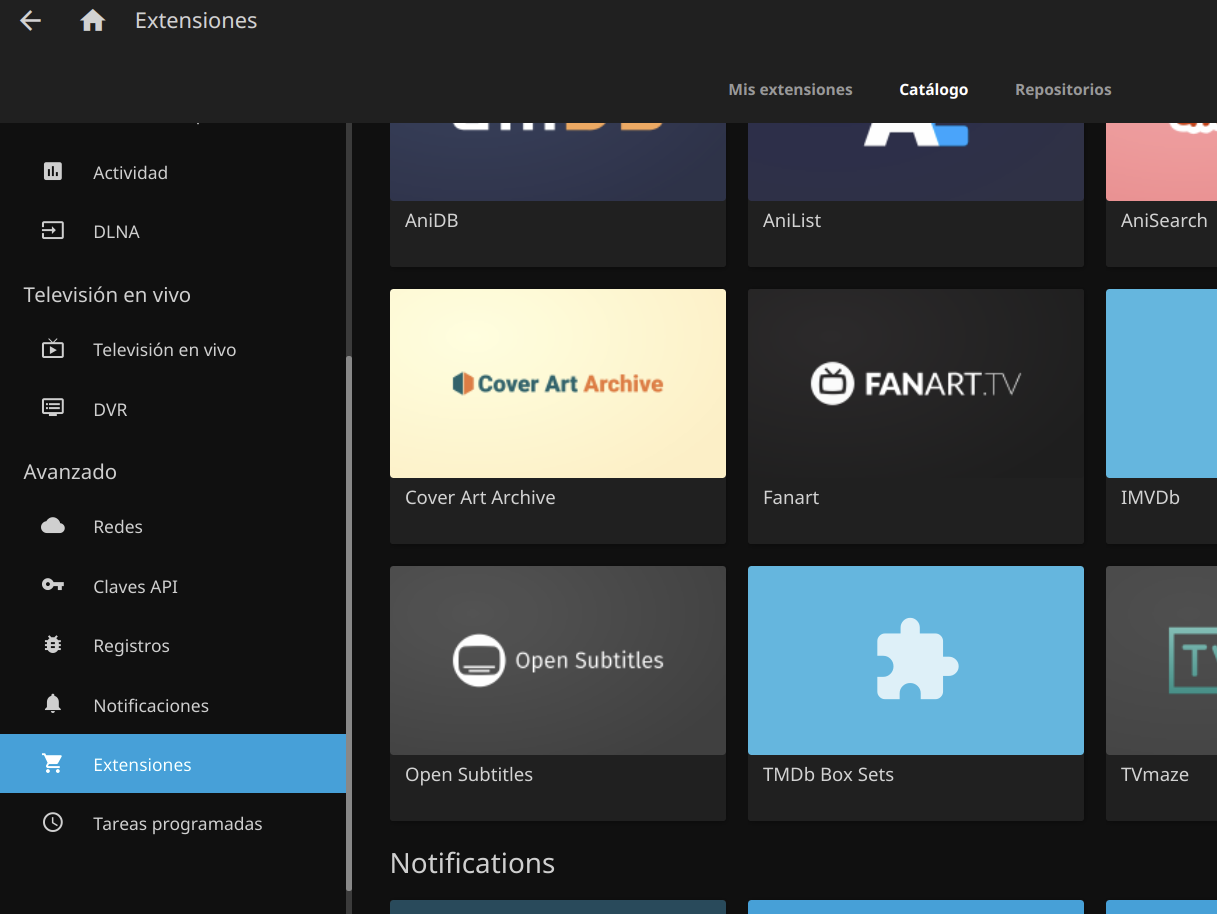
This is a very useful plugin for subtitles, in case you have a movie with strange characters in the translations.
We need to create a user to have access to the api, this user will be introduced in our jellyfin server.
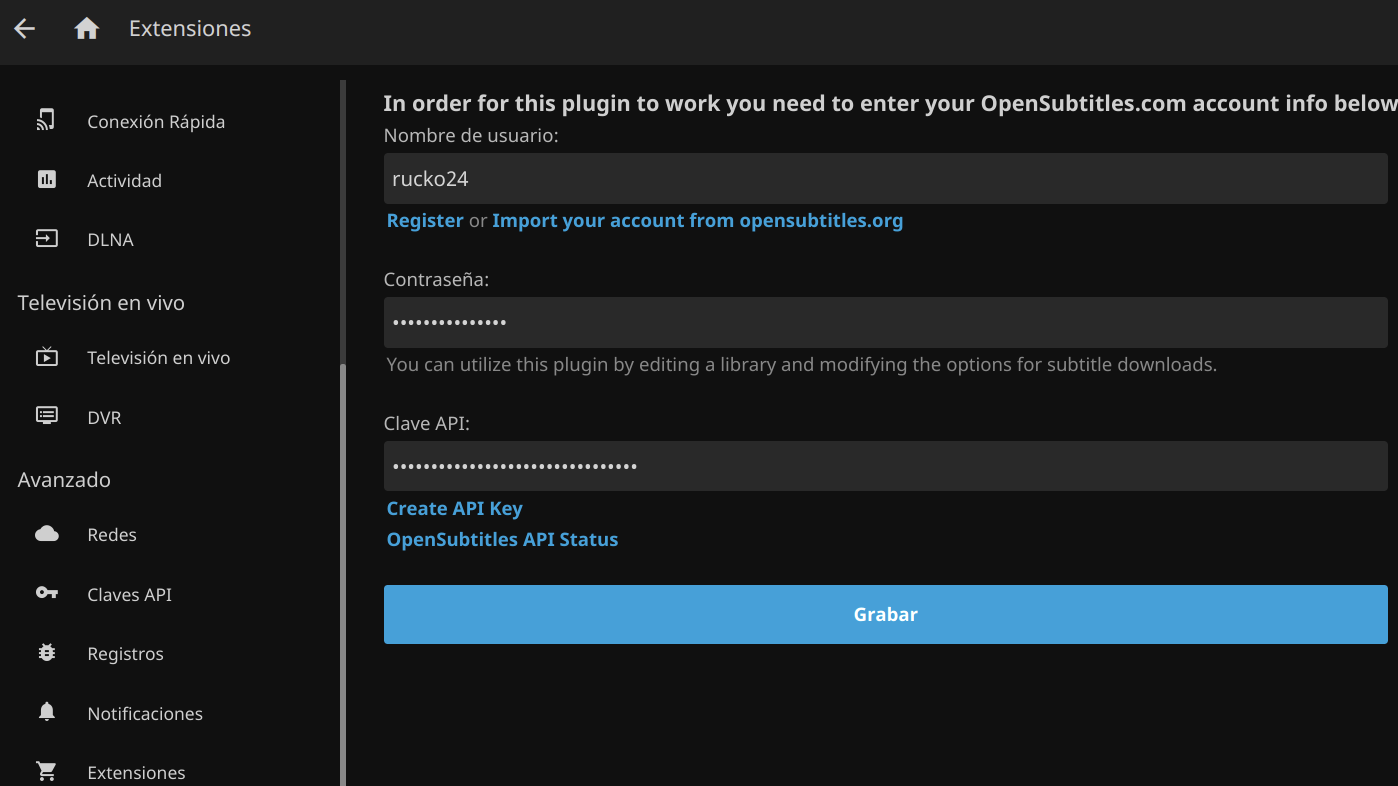
Status of the OpenSubtitles api
This url allows you to see the status of the OpenSubtitles api with small metrics.
Searching for subtitles
In case of an old movie, and we want subtitles, in the right corner, we have 3 vertical dots, then in "Edit subtitles", that will show us the following modal:
By default we have
-
Latin Subtitles - Es
-
But we want English for example

Metadata with MKVToolNix
![]()
Many files out there (.mp4 .mkv etc), will have metadata, and even become a bit annoying.
In the case of .mkv files, the MKVToolNix via GUI is very fast, we import our movie and edit the metadata we want…
It is best to edit the file locally, if we edit the video directly in the NAS directory, it would take too long (even in LAN), we can download the movie from the same jellyfin to our pc edit and then upload it.
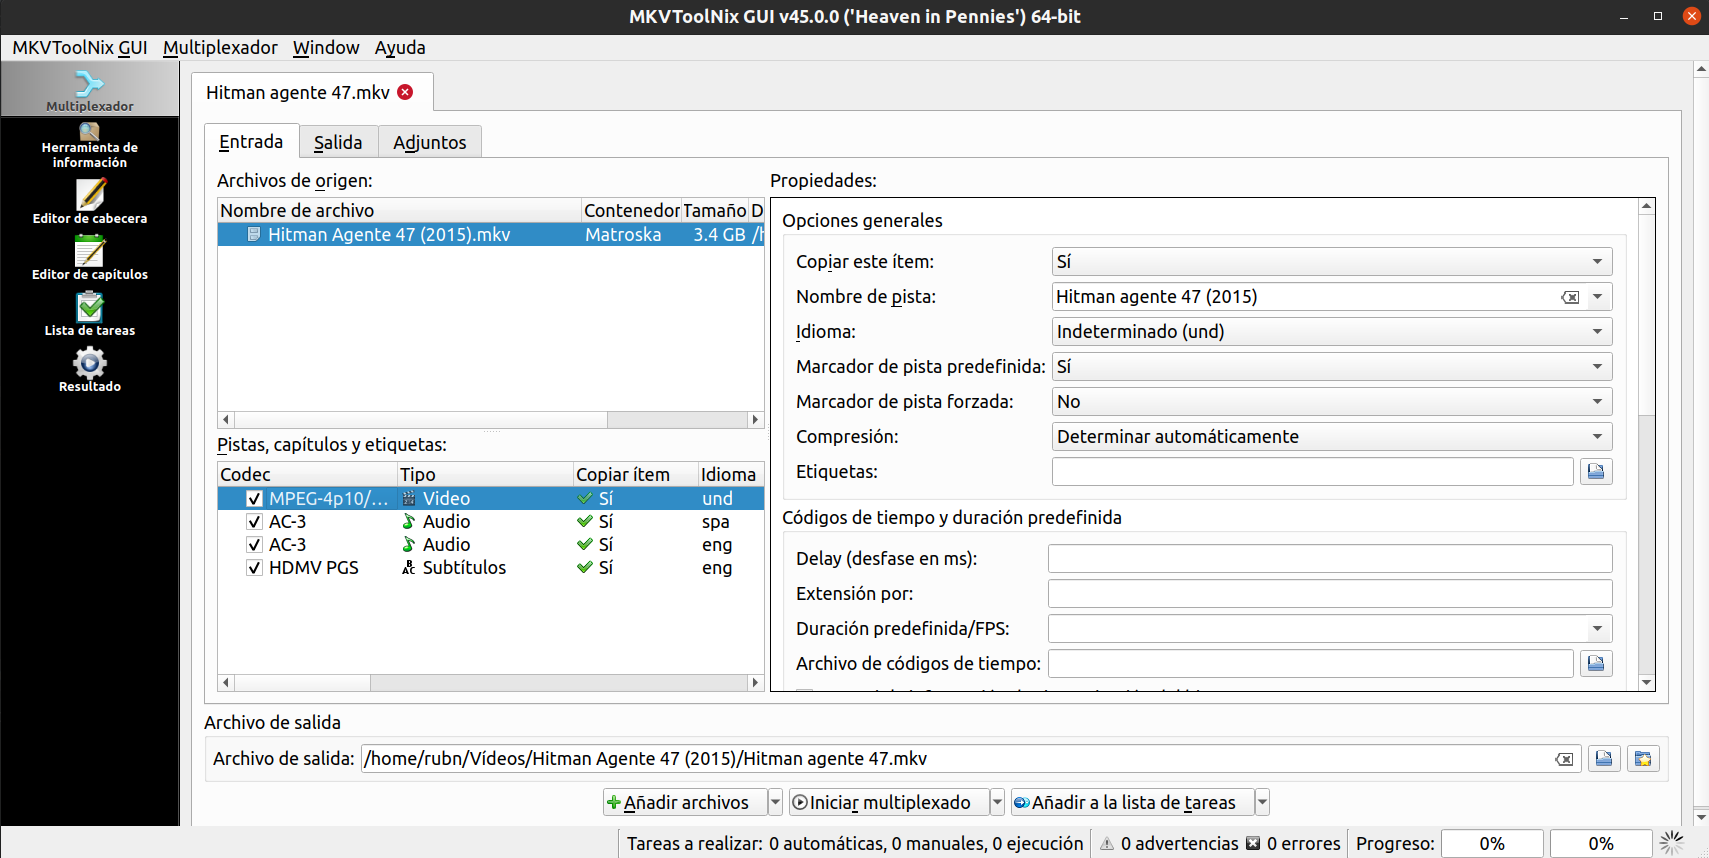
In the "multiplexer" menu we have several things:
-
Codec
-
Each item corresponds to a part that we can edit.
-
-
Propiedades
-
We can change for example "Track name".
-
-
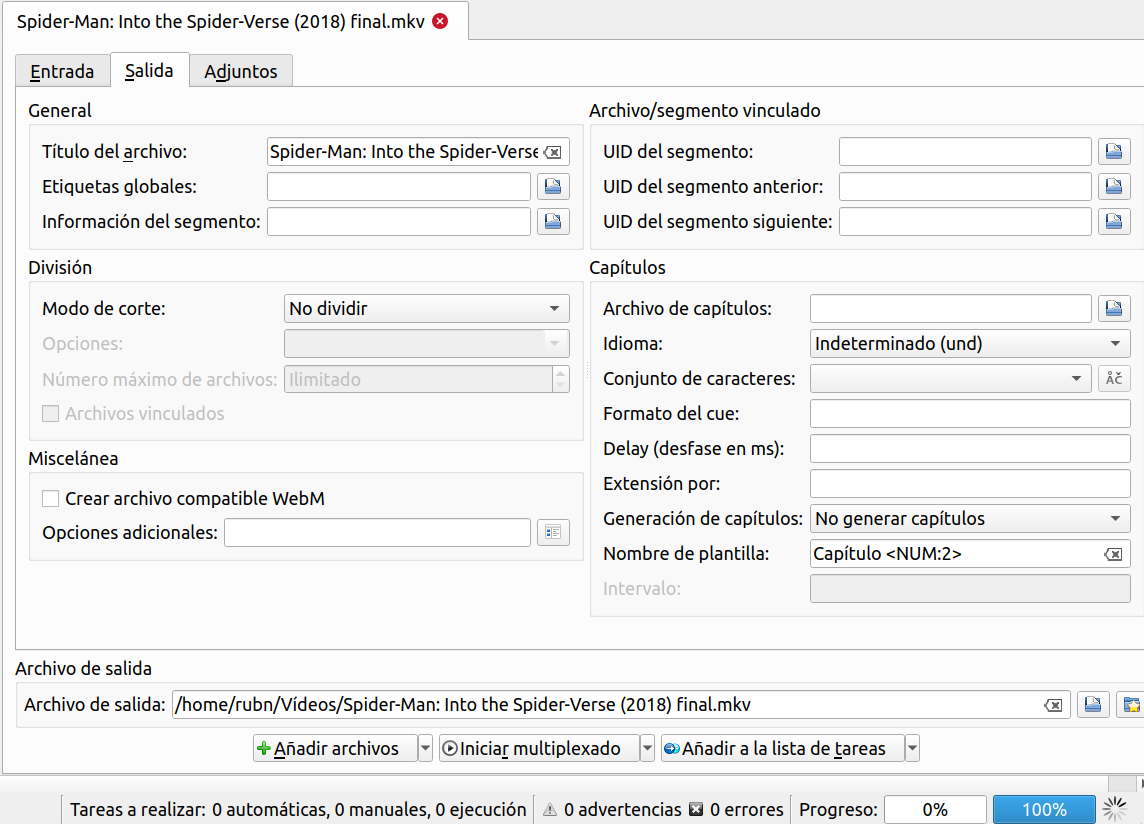
Pestaña/tab Salida
-
General → File title: write the name of the video (or simply delete the original text you don’t want), in some players, this name will be displayed at the beginning of the movie.
-
-
Archivo de salida:
-
This will be the name of the file, in fact it can be any file, it is not a metadata, it can be edited like any other file.
-
-
Iniciar multiplexado
-
Once everything is ready, click this button.
-
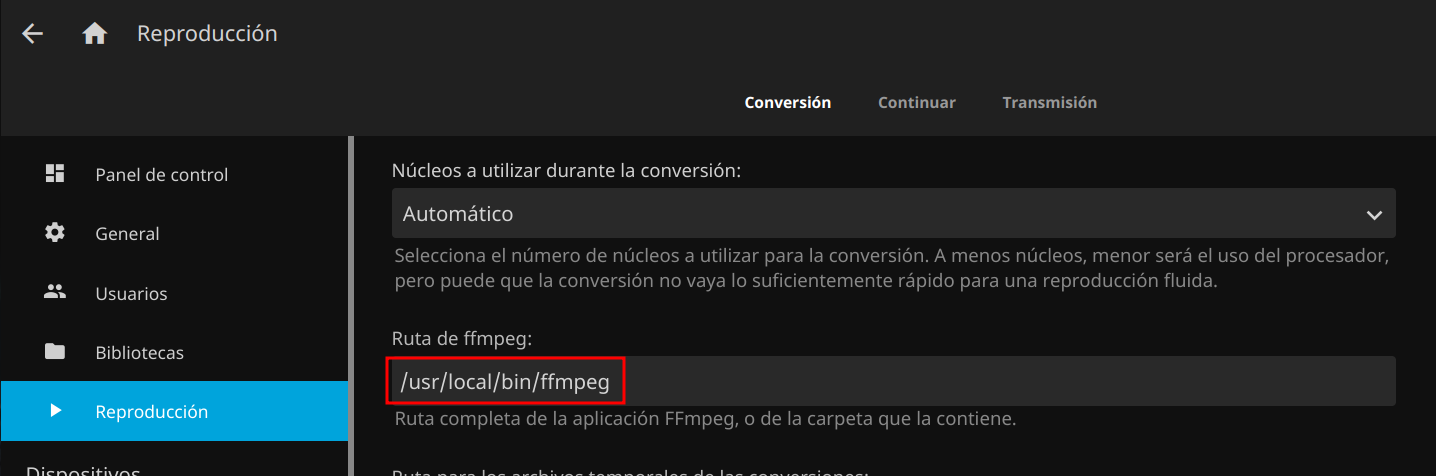
Set path of ffmpeg
| Doing this is mandatory, in order to be able to reproduce. |
Since the release of jellyfin 10.8.13, the ffmeg input was disabled for security, and we must set it ourselves from the console
Inside the jail we have the encoding.xml file right in this path and this is the one we must edit
/root/var/db/jellyfin/configWith the command which ffmpeg we obtain the route usr/local/bin/ffmpeg
Do service jellyfin stop and edit with nano encoding.xml to add the above path.
We edit
<EncoderAppPath>/usr/local/bin/ffmpeg</EncoderAppPath>
<EncoderAppPathDisplay>/usr/local/bin/ffmpeg</EncoderAppPathDisplay>
Again we start the service with service jellyfin start and we would already have the input set correctly as follows
Jellyfin starting problems
Already with jellyfin version 10.10.7 and upgrading to a newer one like 10.11.1 things get a bit complicated, sqlLite, libskiasharp.so etc. problems.
|
Sometimes with new updates we have boot problems and in the server console we see little so with tail we can see a little:
tail -n 50 /var/db/jellyfin/log/log_*.logMicrosoft.Data.Sqlite.SqliteException (0x80004005): SQLite Error 1: 'no such table: ActivityLog'. (1)
at Microsoft.Data.Sqlite.SqliteException.ThrowExceptionForRC(Int32 rc, sqlite3 db)
at Microsoft.Data.Sqlite.SqliteCommand.PrepareAndEnumerateStatements()+MoveNext()
at Microsoft.Data.Sqlite.SqliteCommand.GetStatements()+MoveNext()
at Microsoft.Data.Sqlite.SqliteDataReader.NextResult()
at Microsoft.Data.Sqlite.SqliteCommand.ExecuteReader(CommandBehavior behavior)
at Microsoft.Data.Sqlite.SqliteCommand.ExecuteReader()
at Emby.Server.Implementations.Data.SqliteExtensions.Query(SqliteConnection sqliteConnection, String commandText)+MoveNext()
at Jellyfin.Server.Migrations.Routines.MigrateActivityLogDb.Perform()
at Jellyfin.Server.Migrations.MigrationRunner.PerformMigrations(IMigrationRoutine[] migrations, MigrationOptions migrationOptions, Action`1 saveConfiguration, ILogger logger)
at Jellyfin.Server.Migrations.MigrationRunner.Run(CoreAppHost host, ILoggerFactory loggerFactory)
at Jellyfin.Server.Program.StartServer(IServerApplicationPaths appPaths, StartupOptions options, IConfiguration startupConfig)| 1 | This ActivityLog table error can happen when migrating to a higher version. |
Fichero system.xml
-
/var/db/jellyfin/config/system.xml
<IsStartupWizardCompleted>false</IsStartupWizardCompleted> (1)| 1 | Setting it to false, allows us, apparently, to avoid this migration and to avoid the wizard to establish a new user. |
| The previous solution is a bit inefficient, I think it would be better to make a backup of the database but still a bit cumbersome, and users are lost, you have to recreate them again. |
Error of skia, this, so far if it is a headache, apparently.
System.TypeInitializationException: The type initializer for 'Jellyfin.Drawing.Skia.SkiaEncoder' threw an exception.
 ---> System.TypeInitializationException: The type initializer for 'SkiaSharp.SKObject' threw an exception.
 ---> System.InvalidOperationException: The version of the native libSkiaSharp library (88.1) is incompatible with this version of SkiaSharp. Supported versions of the native libSkiaSharp library are in the range [116.0, 117.0).
   at SkiaSharp.SkiaSharpVersion.CheckNativeLibraryCompatible(Version minSupported, Version current, Boolean throwIfIncompatible)
   at SkiaSharp.SkiaSharpVersion.CheckNativeLibraryCompatible(Boolean throwIfIncompatible)
at SkiaSharp.SKObject..cctor()According to the port maintainer:
graphics/libskiasharp: bump the exact revision used by SkiaSharp 3.116.1

    On linux libskiasharp.so is provided by the SkiaSharp nuget built as a
    submodule, libskiasharp does not really have any release and tags. From
    Now on, use the hash used by the SkiaSharp version used by jellyfin.
    While here bump the bundle libjpeg_turbo version to the version this
    release of libskiasharp has been tested with.
With XigmaNAS 13.3-RELEASE it does give error with libskiasharp.so but upgrading to 14.3-RELEASE, and in a jail with this last release, jellyfin 10.11.3 it is possible to use it.
|
strings /usr/local/jellyfin/libSkiaSharp.so | grep -E "^[0-9]+\.[0-9]+" (1)

1.0 / (%i * 128)
0.00390625
1.6.40
2.2 Transfer with sRGB Gamut
88.1 (2)
001.000
001.001
001.002
001.003
0.5)
1.5)
2.5)
3.5)| 1 | Command to see the version of libSkiaSharp.so in jellyfin. |
| 2 | Still loading the old version. |
(The above happened by previous tests) And it was by not deleting the libSkiaSharp.so from the usrlocaljellyfin directory so by deleting or renaming it, jellyfin will use the libSkiaSharp.so but from the system from the usrlocalliblibSkiaSharp.so.116 path.
|
Amazon fire stick 4k

El Amazon fire stick allows us to install applications on it, based on Android tv, we remove that hassle that happens with certain smart-tv when installing an app, avoiding using the DLNA protocol that is more unstable than it seems.
In it will be installed the client version of jellyfin, very easy and intuitive, which will allow access to the jellyfin installed in the jail, server version of it, with the same ip and port.
It offers HDMI male connector, most smart-tv’s have HDMI female port`s, they are practically a standard nowadays.
Also ideal if we take it to a remote location, connect it and access our NAS either locally, or remotely with certain changes, it would be useful to have a dynamic dns as we will see soon with duckdns for those remote connections."

| Dimensions | 99 x 30 x 14 mm (device only) 108 x 30 x 14 mm (including connector) |
|---|---|
Weight |
53,6 |
Processor |
Quad-Core de 1,7 GHz |
GPU |
IMG GE8300 |
Storage |
8 GB |
Wifi |
Dual-band, dual-antenna (MIMO) Wi-Fi allows for faster data transfer and lower connection loss than standard Wi-Fi. Compatible with wifi networks wifi 802.11a/b/g/n/ac. |
Bluetooth |
Bluetooth 5.0 and LE. It can be paired with speakers, headphones, game controllers and other compatible Bluetooth devices. |
Reverse proxy for remote access

Ian brought me back with an interesting thing, for better management of SSL certificates with a nginx server.
Again we create a Jail to install our nginx server and redirect the http requests that we want to pass through here.
/usr/local/etc/nginx/nginx.conf (1)| 1 | nginx proxy configuration path |
In case of editing the file nginx.conf
service nginx reload (1)| 1 | To restart the nginx server |
Redirection to Https
Apparently if we access with http to our servers with nginx by default is possible to enter normal, and we do not want that, we can make a redirect to https, but we must adjust our nginx.conf
| It was necessary to open port 80 in the router with the ip of the reverse-proxy, because without that it does not work. |
server {
    listen       443 ssl; (1)
    server_name localhost nuestroDominio.duckdns.org;
    ssl_certificate      /usr/local/etc/letsencrypt/live/dominio/fullchain.pem;
    ssl_certificate_key  /usr/local/etc/letsencrypt/live/dominio/privkey.pem;
    ssl_session_cache    shared:SSL:1m;
    ssl_session_timeout  5m;
    ssl_ciphers  HIGH:!aNULL:!MD5;
    ssl_prefer_server_ciphers  on;
    location / {
      proxy_pass http://192.168.1.130:8096; (2)
    }
    # HSTS (ngx_http_headers_module is required) (63072000 seconds)
    add_header Strict-Transport-Security "max-age=63072000 includeSubDomains; preload" always;
    #error_page  404              /404.html;
    # redirect server error pages to the static page /50x.html
    error_page   500 502 503 504  /50x.html;
    location = /50x.html {
        root   /usr/local/www/nginx-dist;
    }
    set $https_redirect 0;
    #if request came from port 80/http
    if ($server_port = 80) {
        set $https_redirect 1;
    }
    # or if the requested host came with www
    if ($host ~ '^www\.') {
        set $https_redirect 1;
    }
    #then it will redirects
    if ($https_redirect = 1) {
        return 301 https://$server_name$request_uri;
    }
}
server { (3)
    listen 80 default_server;
    server_name _;
    return 301 https://$host$request_uri;
}| 1 | Config for https. |
| 2 | Our local jellyfin server. |
| 3 | Necessary http configuration. |
|
Post-install/networking/reverse-proxy/nginx
|
How to renew letsencrypt SSL certificate with certbot?
![]()
We can use certbot with instructions for freeBSD the certificates we have created with letsencrypt expire after 90 days.
root@reverse-proxy:/usr/local/etc/nginx # certbot renew (1)
root@reverse-proxy:/usr/local/etc/nginx # certbot renew --dry-run (2)| 1 | To renew certificates. |
| 2 | It is used to test the automatic renewal, without generating the certificates. |
But we get this error
Saving debug log to /var/log/letsencrypt/letsencrypt.log (1)

- - - - - - - - - - - - - - - - - - - - - - - - - - - - - - - - - - - - - - - -
Processing /usr/local/etc/letsencrypt/renewal/mydomain.bla.conf
- - - - - - - - - - - - - - - - - - - - - - - - - - - - - - - - - - - - - - - -
Renewing an existing certificate for mydomain.bla

Certbot failed to authenticate some domains (authenticator: standalone). The Certificate Authority reported these problems:
  Domain: mydomain.bla
  Type:   unauthorized
  Detail: ip: Invalid response from http://mydomain.bla/.well-known/acme-challenge/e5P1zpHbQUyQ6R28jew3Z9rRxpMPzUdsLE7Gdlp5ZqI: 404
(2)
Hint: The Certificate Authority failed to download the challenge files from the temporary standalone webserver started by Certbot on port 80. Ensure that the listed domains point to this machine and that it can accept inbound connections from the internet.

Failed to renew certificate mydomain.bla with error: Some challenges have failed.

- - - - - - - - - - - - - - - - - - - - - - - - - - - - - - - - - - - - - - - -
All renewals failed. The following certificates could not be renewed:
  /usr/local/etc/letsencrypt/live/mydomain.bla/fullchain.pem (failure)
- - - - - - - - - - - - - - - - - - - - - - - - - - - - - - - - - - - - - - - -
1 renew failure(s), 0 parse failure(s)
Ask for help or search for solutions at https://community.letsencrypt.org. See the logfile /var/log/letsencrypt/letsencrypt.log or re-run Certbot with -v for more details.| 1 | Path of the log generated, and that we must inspect in case of anything unusual. |
| 2 | Apparently it is closely related to our error, and port 80 blocked. |
If we investigate further with the command certbot renew -v we have that the is used:
http-01 challenge for xxx.xxx.net but this one just doesn’t fit us.
|
We need to use another challenge that allows us to do this, our provider blocks port 80. 😡.
Using Dynamic DNS with DuckDNS
![]()
Previously I was fine with no-ip for my dynamic ip, but with this dns-01-challenge I need to write the record TXT in it, and it doesn’t work, because I would have to pay, I prefer to give that money to the poor.
Now with duckdns it gives me everything, for free, and an api-rest to update the TXT record, once I enter the necessary command with certbot:
certbot certonly --manual --preferred-challenges dns -d myDomain.duckdns.org (1)| 1 | My domain |
root@reverse-proxy:/logs-letsencrypt # certbot certonly --manual --preferred-challenges dns -d foo.duckdns.org
Saving debug log to /var/log/letsencrypt/letsencrypt.log
Certificate not yet due for renewal

You have an existing certificate that has exactly the same domains or certificate name you requested and isn't close to expiry.
(ref: /usr/local/etc/letsencrypt/renewal/foo.duckdns.org.conf)

What would you like to do?
- - - - - - - - - - - - - - - - - - - - - - - - - - - - - - - - - - - - - - - -
1: Keep the existing certificate for now (1)
2: Renew & replace the certificate (may be subject to CA rate limits)
- - - - - - - - - - - - - - - - - - - - - - - - - - - - - - - - - - - - - - - -
Select the appropriate number [1-2] then [enter] (press 'c' to cancel):| 1 | Option (1) will work for me since I have a valid certificate. |
In case the certificate needs to be renewed, the steps to update the TXT record are as follows aquí.
root@reverse-proxy:/logs-letsencrypt # certbot certonly --manual --preferred-challenges dns -d mySubName (1)
Saving debug log to /var/log/letsencrypt/letsencrypt.log
Requesting a certificate for bar.duckdns.org

- - - - - - - - - - - - - - - - - - - - - - - - - - - - - - - - - - - - - - - -
Please deploy a DNS TXT record under the name:

_acme-challenge.bar.duckdns.org.

with the following value:

L9-------------------------------------(2)

Before continuing, verify the TXT record has been deployed. Depending on the DNS
provider, this may take some time, from a few seconds to multiple minutes. You can
check if it has finished deploying with aid of online tools, such as the Google
Admin Toolbox: https://toolbox.googleapps.com/apps/dig/#TXT/_acme-challenge.bar.duckdns.org.
Look for one or more bolded line(s) below the line ';ANSWER'. It should show the
value(s) you've just added.

- - - - - - - - - - - - - - - - - - - - - - - - - - - - - - - - - - - - - - - -| 1 | mySubName example bar.duckdns.org |
| 2 | Generated token of 43 characters for our TXT record, to be used in the query-parameters of the endpoint offered by duck dns, is the next step. |
Invoking the endpoint to update certificate
From the console using curl or from the browser, that is, send a GET to consume the URL.

https://www.duckdns.org/update?domains=mySubName&token=myTokenDeDuckDns&txt=tokenGenerado&verbose=true (1)| 1 | We insert our duckdns token (the one generated by the web) in the token parameter, also our token generated in the previous step to use it in the txt parameter. |
When the certificate has been successfully updated
Successfully received certificate.
Certificate is saved at: /usr/local/etc/letsencrypt/live/boo.duckdns.org/fullchain.pem
Key is saved at: /usr/local/etc/letsencrypt/live/foo.duckdns.org/privkey.pem
This certificate expires on 2023-12-06.
These files will be updated when the certificate renews.

NEXT STEPS:

This certificate will not be renewed automatically. Autorenewal of --manual certificates requires the use of an authentication hook script (--manual-auth-hook) but one was not provided. To renew this certificate, repeat this same certbot command before the certificate's expiry date.
If you like Certbot, please consider supporting our work by:

Donating to ISRG / Let's Encrypt: https://letsencrypt.org/donate
Donating to EFF: https://eff.org/donate-le
Once we set the new path of our certificates fullchain.pem and privkey.pem we just need to restart our nginx server.
root@reverse-proxy:/servernginx # service nginx reload (1)
Performing sanity check on nginx configuration:
nginx: the configuration file /usr/local/etc/nginx/nginx.conf syntax is ok
nginx: configuration file /usr/local/etc/nginx/nginx.conf test is successful| 1 | restarting the nginx server. |
Open ports in the router
It is also necessary to open the ports in the router for the 443 of the reverse-proxy and the 8096 of the jellyfin to be able to give access outside our network…
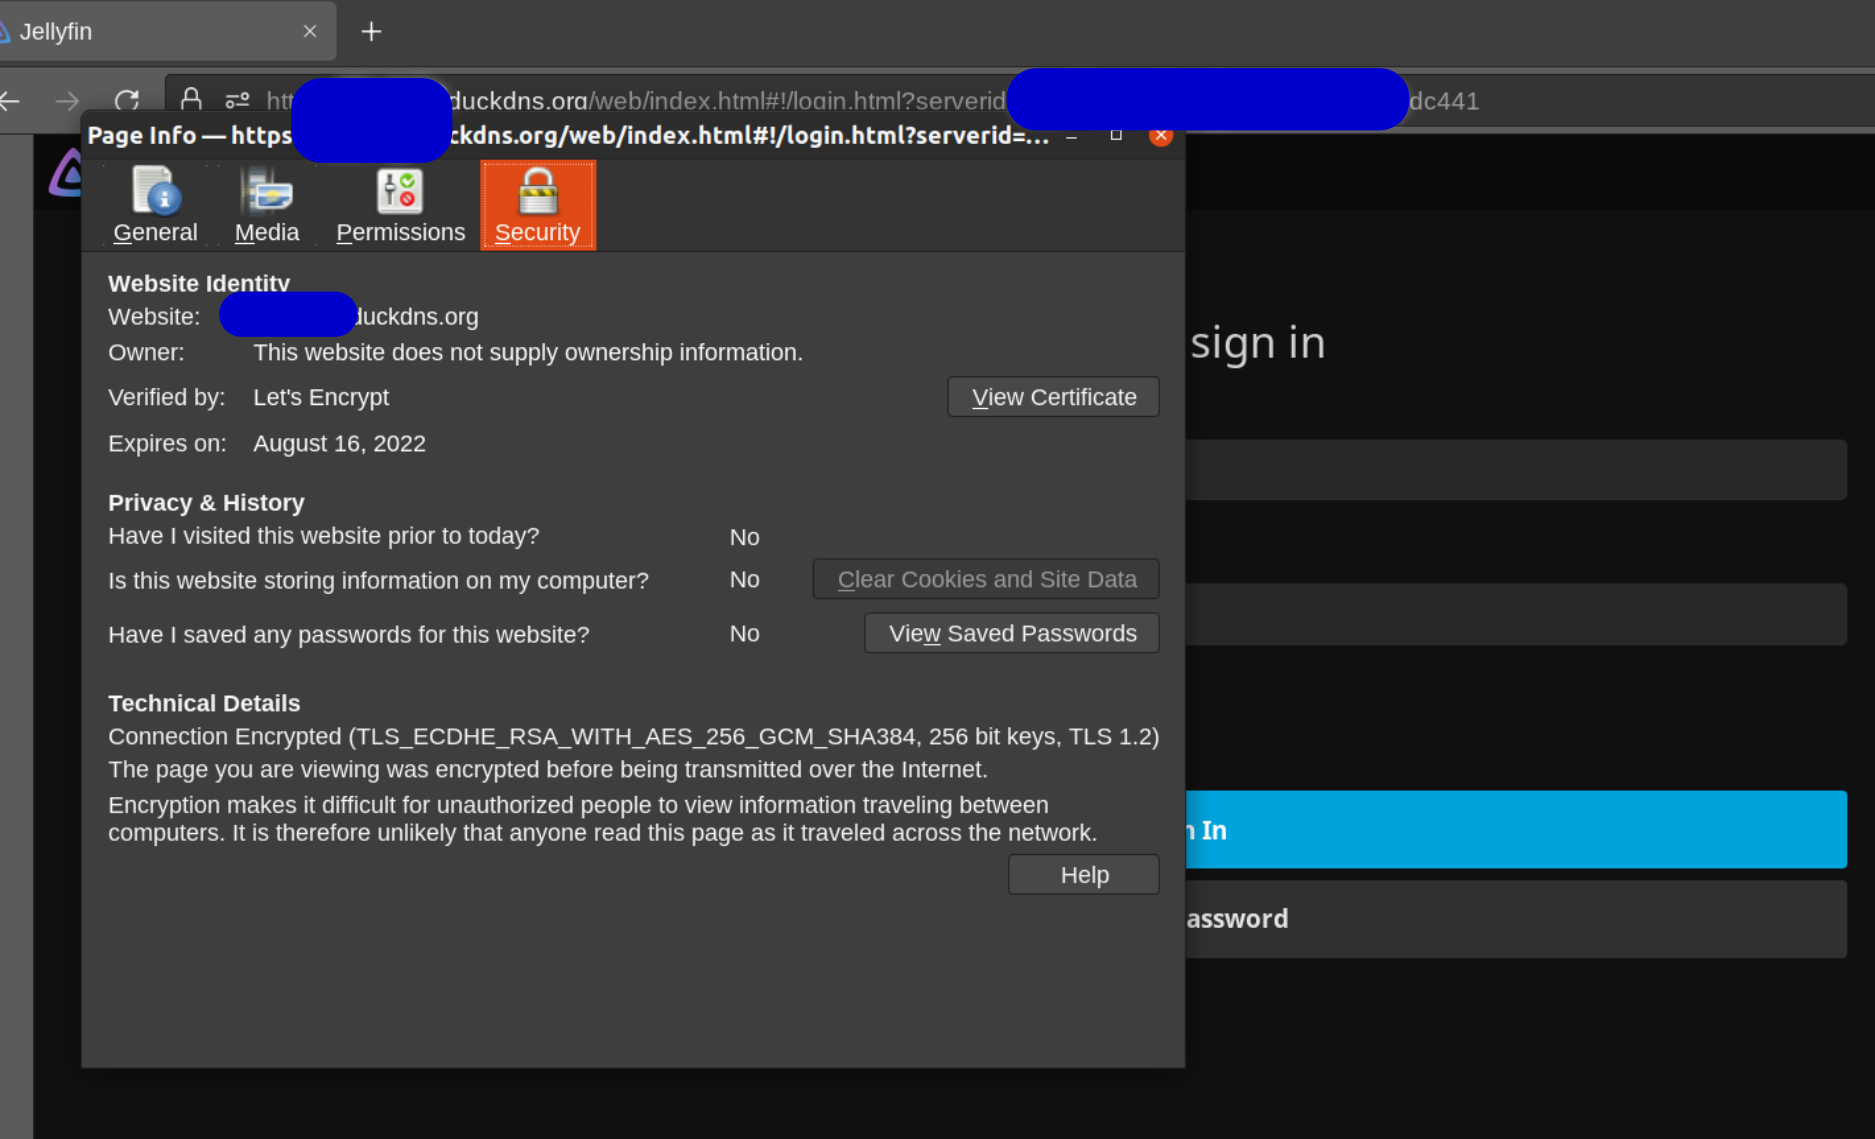
Our active certificate
CGNAT and port
For those who are inside a CGNAT, you should talk to your ISP and tell them to take you out of the CGNAT, so that you can open your ports quietly.
It can happen that our IP changes, and all our ports are closed, and we go crazy.
The idea is to turn off the router for 15 minutes to get an IP outside the CGNAT.
At the beginning without giving a solution, I used ngrok to check that everything was working fine and it was, with that I realized that it was my ISP, besides, I opened the jellyfin with the TOR browser using ngrok at that moment.
Note that the reverse proxy jail was set to dynamic ip with:
-
ifconfig_vnet0="SYNCDHCP"
but, I was with ip-mac binding in the router, because at a certain moment that jail of the reverse-proxy ran out of internet, internal things of my network.
| And finally I updated the ip address of duckdns to the new one, maybe I can automate it better with a script or cron. |