
Installing the vault

Version in this post is: Vault v1.18.3
The steps are from freebsd fundation they are good and work, you just have to make sure that the service starts correctly.
The vault.hcl
root@Hashicorp-Vault:/ # cat /usr/local/etc/vault.hcl
listener "tcp" {
  address = "ip:8200" (1)
  tls_disable = 1
}

storage "file" {
  path = "/var/db/vault"
  node_id = "v"
}

cluster_addr = "ip:8201" (2)
api_addr = "ip:8200"     (3)
ui = true| 1 | It is the ip address of the jail. |
| 2 | same but with different port. |
| 3 | same. |
connection refused
For some reason the connection with the vault fails, in my case it is because the vault.hcl file is not being read correctly, and it can throw this error.
Get "http://ip-address:8200/v1/sys/seal-status": dial tcp ip-address:8200: connect: connection refusedroot@vault-test:~ # vault server -config /usr/local/etc/vault.hcl
Error initializing core: Failed to lock memory: cannot allocate memory
This usually means that the mlock syscall is not available.
Vault uses mlock to prevent memory from being swapped to
disk. This requires root privileges as well as a machine
that supports mlock. Please enable mlock on your system or
disable Vault from using it. To disable Vault from using it,
set the `disable_mlock` configuration option in your configuration
file.
2025-01-27T11:02:28.636Z [INFO] proxy environment: http_proxy="" https_proxy="" no_proxy=""
2025-01-27T11:02:28.717Z [INFO] incrementing seal generation: generation=1Already with the correct start we would have:
✘ 🔐 vault ~ vault server -config=/usr/local/etc/vault.hcl (1)
==> Vault server configuration:
Administrative Namespace:
Api Address: https://ip-address:8200
Cgo: enabled
Cluster Address: https://ip-address:8201
Environment Variables: BLOCKSIZE, HOME, LANG, LESS, LOGNAME, LSCOLORS, LS_COLORS, MAIL, MM_CHARSET, OLDPWD, PAGER, PATH, PATH_SECRET, PWD, SHELL, SHLVL, TERM, USER, VAULT_ADDR, VAULT_CACERT, VAULT_CLIENT_CERT, VAULT_CLIENT_KEY, VAULT_TOKEN, ZSH, _
Go Version: go1.23.5
Listener 1: tcp (addr: "ip-address:8200", cluster address: "ip-address:8201", disable_request_limiter: "false", max_request_duration: "1m30s", max_request_size: "33554432", tls: "enabled")
Log Level:
Mlock: supported: true, enabled: true
Recovery Mode: false
Storage: file
Version: Vault v1.18.3, built 2024-12-20T07:21:28Z
Version Sha: 7ae4eca5403bf574f142cd8f987b8d83bafcd1de
==> Vault server started! Log data will stream in below:
2025-03-31T16:33:02.905Z [INFO] proxy environment: http_proxy="" https_proxy="" no_proxy=""
2025-03-31T16:33:02.905Z [INFO] incrementing seal generation: generation=1
2025-03-31T16:33:03.303Z [INFO] core: Initializing version history cache for core
2025-03-31T16:33:03.303Z [INFO] events: Starting event system
2025-03-31T16:33:41.289Z [INFO] http: TLS handshake error from 192.168.1.26:59736: EOF| 1 | By executing this command we can even close the shell, and still have the PID active. |
Igual que con un vault status
🔐 vault ~ vault status
Key Value
--- -----
Seal Type shamir
Initialized true
Sealed true
Total Shares 5
Threshold 3
Unseal Progress 0/3
Unseal Nonce n/a
Version 1.18.3
Build Date 2024-12-20T07:21:28Z
Storage Type file
HA Enabled falseenv o export
In our case none of them will work, it is because of our shell when starting the jail.
env VAULT_ADDR=http://10.10.0.33:8200 vault operator initIf the VAULT_ADD is not set correctly, we have
WARNING! VAULT_ADDR and -address unset. Defaulting to https://127.0.0.1:8200.Setting environment correctly
In jail if we do a echo SHELL we have bincsh it will work is to use the setenv.
root@vault-test:/etc # setenv VAULT_ADDR ip:8200
root@vault-test:/etc # echo $VAULT_ADDR
ip:8200
root@vault-test:/etc # service vault start
Starting vault.
vault server -config
This is the command required for execution under background, very important for the connection to take place.
vault server -config /usr/local/etc/vault.hclroot@vault-test:/etc # service vault start
Starting vault.
root@vault-test:/etc # vault operator init
Unseal Key 1: token
Unseal Key 2: token
Unseal Key 3: token
Unseal Key 4: token
Unseal Key 5: token
Initial Root Token: token
Vault initialized with 5 key shares and a key threshold of 3. Please securely
distribute the key shares printed above. When the Vault is re-sealed,
restarted, or stopped, you must supply at least 3 of these keys to unseal it
before it can start servicing requests.
Vault does not store the generated root key. Without at least 3 keys to
reconstruct the root key, Vault will remain permanently sealed!
It is possible to generate new unseal keys, provided you have a quorum of
existing unseal keys shares. See "vault operator rekey" for more information.
root@vault-test:/etc # echo $SHELLSaving in the environment
We save the variable in the /etc/csh.cshrc file so that every time we enter the jail the variable is found, and we have no error of connection refused.
root@Hashicorp-Vault:~ # nano /etc/csh.cshrc
# System-wide .cshrc file for csh(1).
setenv VAULT_ADDR http://ip-address:8200
Creating aliases
As easy as
alias vault-server-config="vault server -config /usr/local/etc/vault.hcl"
At the moment, with every jail startup we must execute this vault-server-config.
|
With Bastille using zsh
This easy template can be applied to an active jail
PKG zsh

CMD chsh -s /usr/local/bin/zsh root

PKG ohmyzsh

CMD cp /usr/local/share/ohmyzsh/templates/zshrc.zsh-template ~/.zshrc

#zsh-autosuggestions

PKG powerline-fonts zsh-autosuggestions

CMD echo 'source /usr/local/share/zsh-autosuggestions/zsh-autosuggestions.zsh' >> ~/.zshrc (1)| 1 | For autocompletion. |
You should see this in the console after the process.
➜  ~ echo $SHELL
/usr/local/bin/zsh
Then the following environment variables can be applied
export VAULT_ADDR=ip
export VAULT_TOKEN=token
Same for the alias, edit the file .zshrc
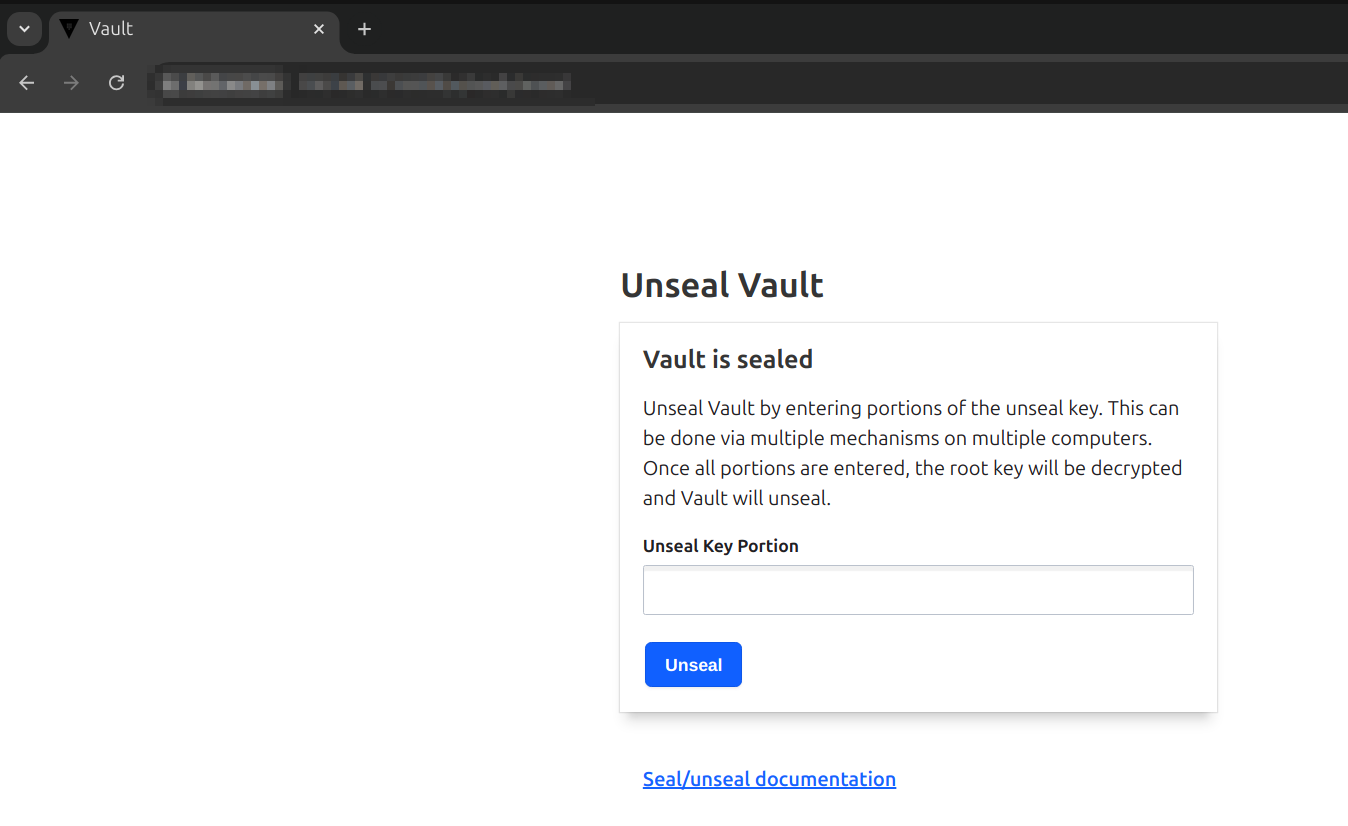
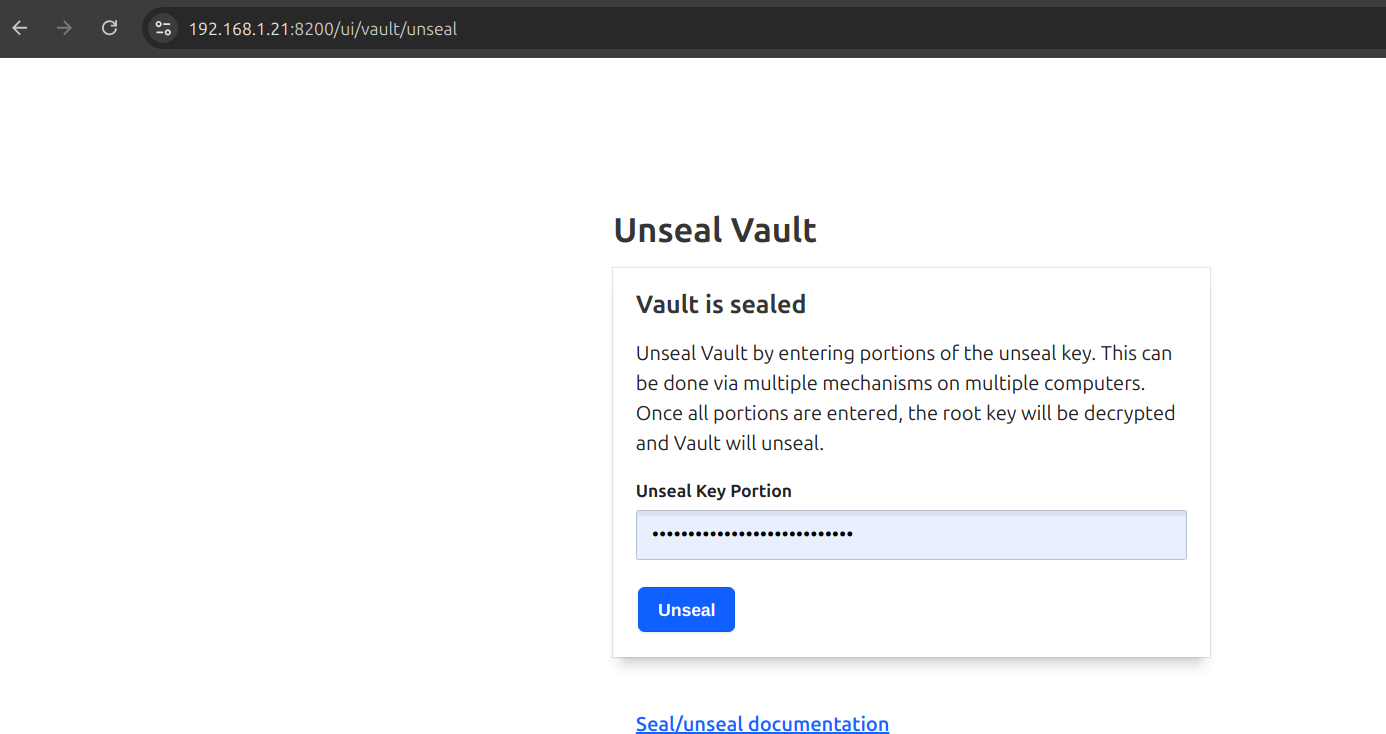
The UI
Unseal process
In the ui enter 3 of the 5 passwords that were generated with the command vault operator init
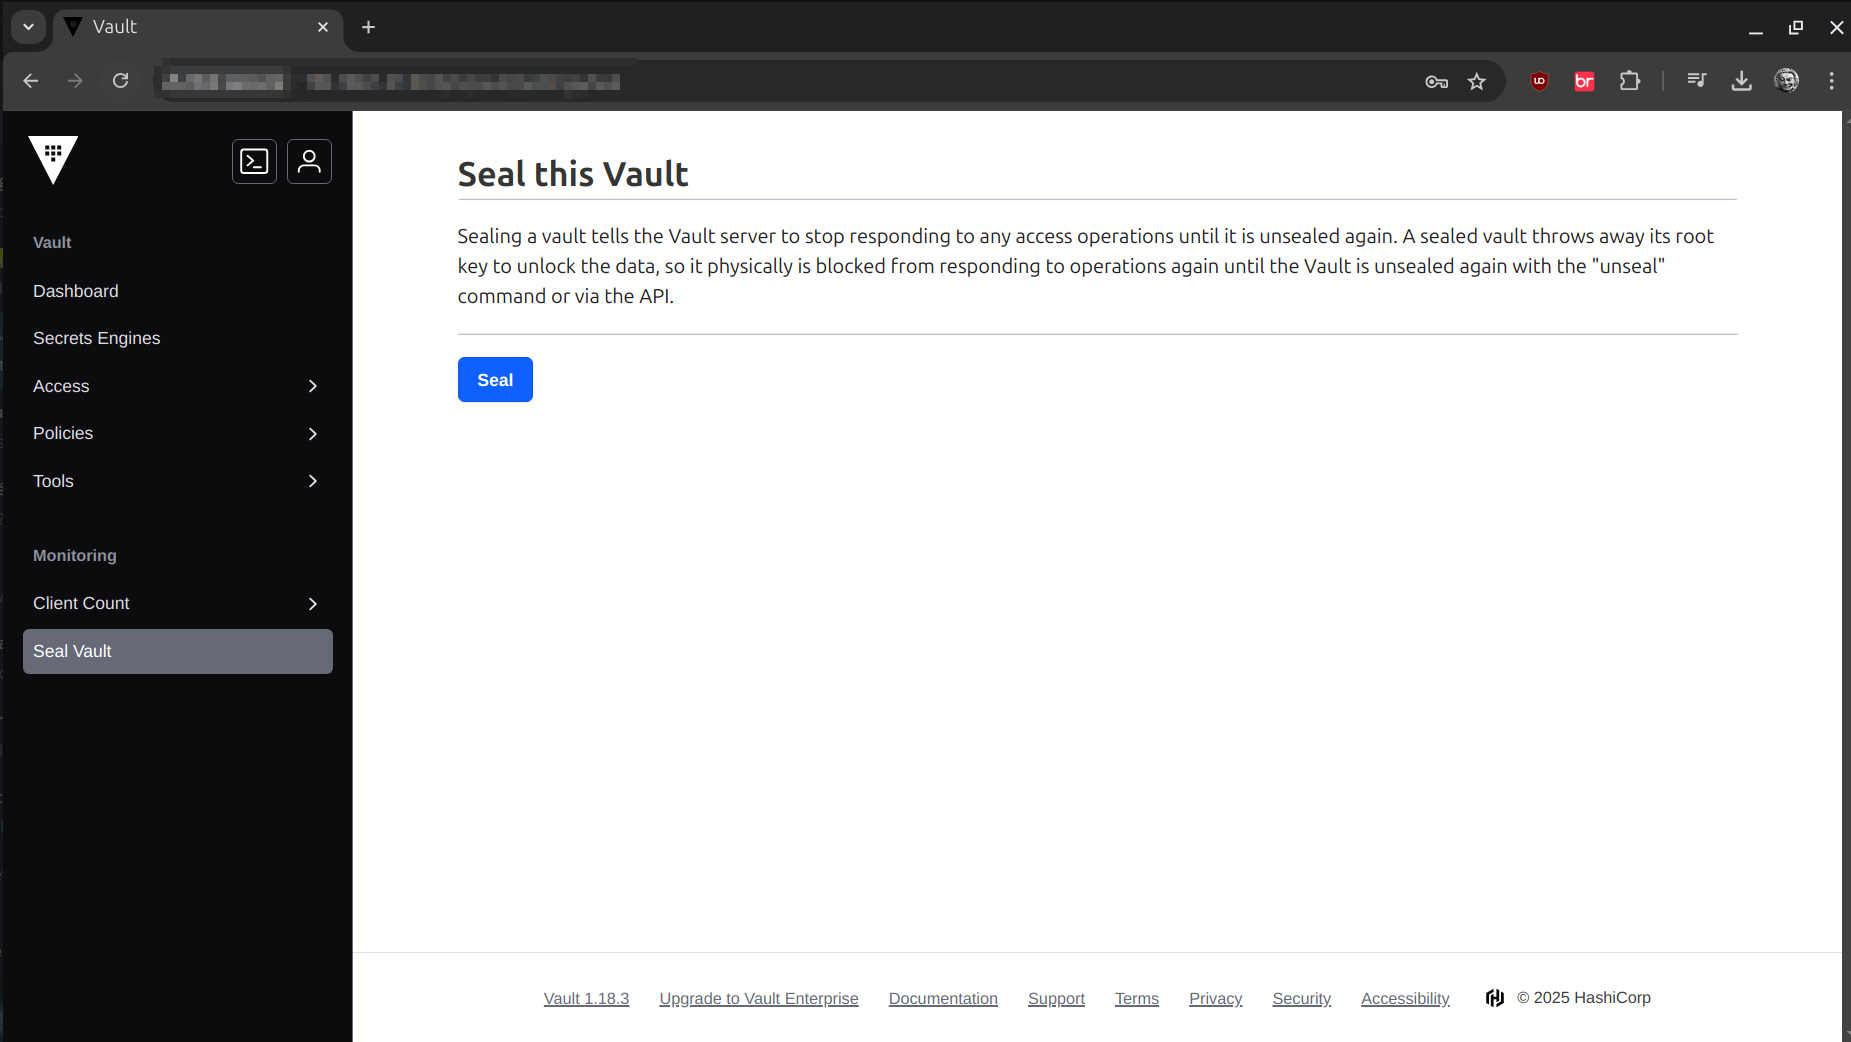
The seal from the UI
From the UI, we can seal the vault again, haha this reminded me of the red trunk of memories. 😂
Secrets Management
Normally when looking for a secret, we will have error, because we need at least Initial Root Token en el environment.
| We can set it up with |
setenv VAULT_TOKEN your-token (1)
nano /etc/csh.cshrc           (2)
source /etc/csh.cshrc (3)| 1 | setting in the environmnet. |
| 2 | looking at it permanent. |
| 3 | we update the .cshrc. |
Per console
| Before without setting the token in the environment, we could not authenticate ourselves as is. |
root@Hashicorp-Vault:/ # vault read cubbyhole/mi.secreto
Error making API request.

URL: GET http://addreess/v1/sys/internal/ui/mounts/secret/my-secret
Code: 403. Errors:

* permission denied| After setting it |
root@Hashicorp-Vault:~ # vault read cubbyhole/mi.secreto
Key     Value
---     -----
test    mi.secreto
Saving a secret by console
vault kv put secret/myapp my.property=mySecretValuevault kv put path \ (1)
/myapp \ (2)
my.property (3)
=mySecretValue (4)| 1 | path |
| 2 | application name |
| 3 | key property name |
| 4 | value |
Http way
The Initial Root Token
|
It will be useful to authenticate us in the web via token, also to consult the api and to obtain secrets, for example with this curl we can obtain a secret.
-
The
X-Vault-Tokenheader is sent when the request is made, with theInitial Root Token
curl --location 'http://ip:8200/v1/cubbyhole/mi.secreto' \
--header 'Accept: */*' \
--header 'Accept-Language: es,en;q=0.9,fr;q=0.8,zh-TW;q=0.7,zh-CN;q=0.6,zh;q=0.5' \
--header 'Connection: keep-alive' \
--header 'DNT: 1' \
--header 'Referer: http://ip:8200/ui/vault/secrets/cubbyhole/list' \
--header 'User-Agent: Mozilla/5.0 (X11; Linux x86_64) AppleWebKit/537.36 (KHTML, like Gecko) Chrome/131.0.0.0 Safari/537.36' \
--header 'X-Vault-Token: YourToken' (1)| 1 | This is actually the Initial Root Token |
Giving an answer like this
{
    "request_id": "8ac9f6c5-9f08-12f3-ed87-70de1ab96842",
    "lease_id": "",
    "renewable": false,
    "lease_duration": 0,
    "data": {
        "test": "mi.secreto" (1)
    },
    "wrap_info": null,
    "warnings": null,
    "auth": null,
    "mount_type": "cubbyhole" (2)
}| 1 | The secret. |
| 2 | Secret assembly point. |
Plugin for PostgreSQL

Installing the postgreSQL plugin
It will allow us to dynamically manage database credentials (users and passwords). Vault can generate temporary credentials in PostgreSQL, which increases security and eliminates the need to manually manage static credentials.
We can configure it through the UI or by console.
From the UI
We must create a new PostgreSQL database secrets engine and using databases is quite intuitive.
The connection chain must meet the requirements e.g.
postgresql://user:password@ip_address:port/database?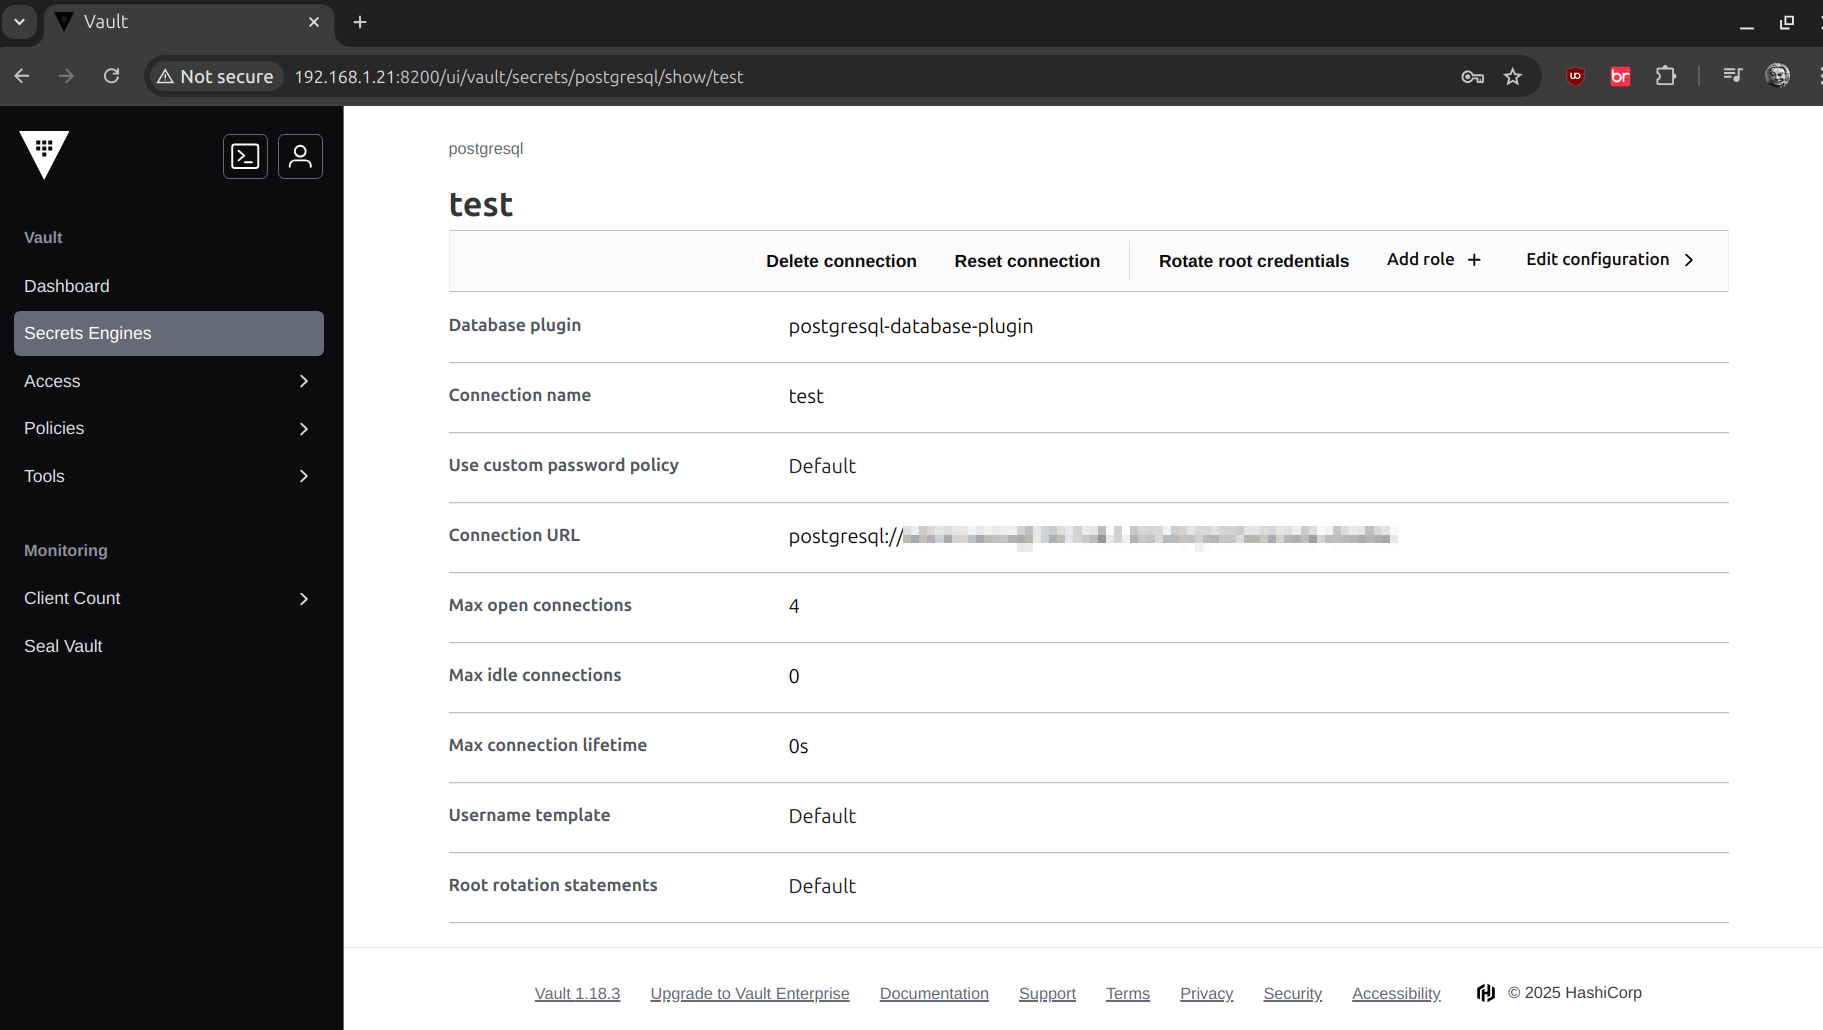
Enabling TLS
| We need to do a couple of things: |
-
Generate CA.
-
Generate server certificate.
-
Generate client certificate.
Creating CA (certificate authority)
The certificate authority will be used to sign other certificates, we will create a configuration called ca.conf (it is a file), openSSL will allow us to create both ca-key.pem and ca-cert.pem, for example:
-
The
ca.conffile
[ req ]
default_bits       = 2048
prompt             = no
default_md         = sha256
distinguished_name = dn
x509_extensions    = v3_ca

[ dn ]
CN = vault.server.local

[ v3_ca ]
subjectKeyIdentifier   = hash
authorityKeyIdentifier = keyid:always,issuer
basicConstraints       = critical, CA:true
keyUsage               = critical, keyCertSign, cRLSign
openssl genpkey -algorithm RSA -out ca-key.pem (1)
openssl req -x509 -new -nodes -key ca-key.pem -out ca-cert.pem -days 3650 -config ca.conf (2)| 1 | Generates the CA private key |
| 2 | Generates the CA certificate (valid for 10 years 🔥) |
Generate server certificate
We create the vault-cert-conf to generate the vault-key.pem and vault-cert.pem
-
The
vault-cert-conffile
[ req ]
default_bits       = 2048
prompt             = no
default_md         = sha256
distinguished_name = dn
x509_extensions    = v3_req

[ dn ]
CN = la-ip (1)

[ v3_req ]
subjectAltName = @alt_names

[ alt_names ]
IP.1 = la-ip
DNS.1 = vault.server.local| 1 | This ip address put here, is related to the vault-cert.pem. |
openssl req -x509 -newkey rsa:2048 -nodes -keyout vault-key.pem -out vault-cert.pem -days 365 -config vault-cert.confThis should come up in the console, with the above command:
Generating a RSA private key
.................+++++
...........................................................................................................................+++++
writing new private key to 'vault-key.pem'
-----
We would now have the following:
-
vault-key.pemServer private key -
vault-cert.pemServer certificate (valid for 'specified ip, local in my case' vault.server.local)
| For both server and client, we will sign the certificates with our CA. |
openssl genpkey -algorithm RSA -out vault-key.pem (1)
openssl req -new -key vault-key.pem -out vault-req.csr -config vault-cert.conf (2)
(3)
openssl x509 -req -in vault-req.csr -CA ca-cert.pem -CAkey ca-key.pem -CAcreateserial -out vault-cert.pem -days 365 -sha256 -extfile vault-cert.conf -extensions v3_req| 1 | Generates the private key, although this step is optional, I had it generated when I ran the here |
| 2 | Generate the CSR. |
| 3 | Signing the CSR with the CA. |
When signing the CSR with the CA we would have this:
Signature ok
subject=CN = ip (1)
Getting CA Private Key| 1 | Ip address we use in the vault-cert.conf |
Generate Customer Certificate
We need to generate a client.conf configuration, because we are lazy hahaha, too:
-
The
client-key.pem -
The CSR (
client-req.csr) -
Then sign the CSR with the CA to get
client-cert.pem. -
The
client.conffile
[ req ]
default_bits       = 2048
prompt             = no
default_md         = sha256
distinguished_name = dn
req_extensions     = v3_req

[ dn ]
CN = vault-client

[ v3_req ]
subjectAltName = @alt_names
basicConstraints = CA:FALSE
keyUsage = digitalSignature, keyEncipherment
extendedKeyUsage = clientAuth

[ alt_names ]
DNS.1 = cliente.local
openssl genpkey -algorithm RSA -out client-key.pem (1)
(2)
openssl req -new -key client-key.pem -out client-req.csr -config client.conf
(3)
openssl x509 -req -in client-req.csr -CA ca-cert.pem -CAkey ca-key.pem -CAcreateserial -out client-cert.pem -days 365 -sha256 -extfile client.conf -extensions v3_req| 1 | Generates the customer’s private key. |
| 2 | Create the Signature Request (CSR) for the client. |
| 3 | Sign the CSR with our CA to obtain the client’s certificate. |
Finishing this part we should have 2 files, Client’s private key and client’s certificate signed by our CA.
-
client-key.pem -
client-cert.pem
Generate Client Certificate PKCS#12
Steps to create and import the customer certificate in the following format PKCS#12
openssl pkcs12 -export -out client-cert.p12 -inkey client-key.pem -in client-cert.pem -certfile ca-cert.pem -name "Vault Client Cert"openssl pkcs12 -export \ (1)
-out client-cert.p12 \ (2)
-inkey client-key.pem \ (3)
-in client-cert.pem \ (4)
-certfile ca-cert.pem \ (5)
-name "Vault Client Cert" (6)| 1 | Exports the certificate in PKCS#12. |
| 2 | Name of the output file, this file will be imported on browser. |
| 3 | Customer’s private key. |
| 4 | Client’s certificate. |
| 5 | It includes the CA so that the browser can validate the trust chain. |
| 6 | Name visible in the browser when selected. |
After this command we will be asked to enter the password for what will become the passphrase
Configuration vault.hcl for TLS
We must reconfigure the listener to allow TLS support.
listener "tcp" {
  address            = "ip-address:8200"
  tls_cert_file      = "/ruta/a/vault-cert.pem" (1)
  tls_key_file       = "/ruta/a/vault-key.pem"  (2)
  tls_client_ca_file = "/ruta/a/ca-cert.pem"    (3)
}

storage "file" {
  path    = "/var/db/vault"
  node_id = "v"
}

api_addr = "https://ip:8200"
ui = true| 1 | Path to server certificate. |
| 2 | Path to server’s private key. |
| 3 | Path to CA certificate (used to verify client certificates) |
Import the certificate to the browser
In mozilla, we can go to the security section and import as in the following picture
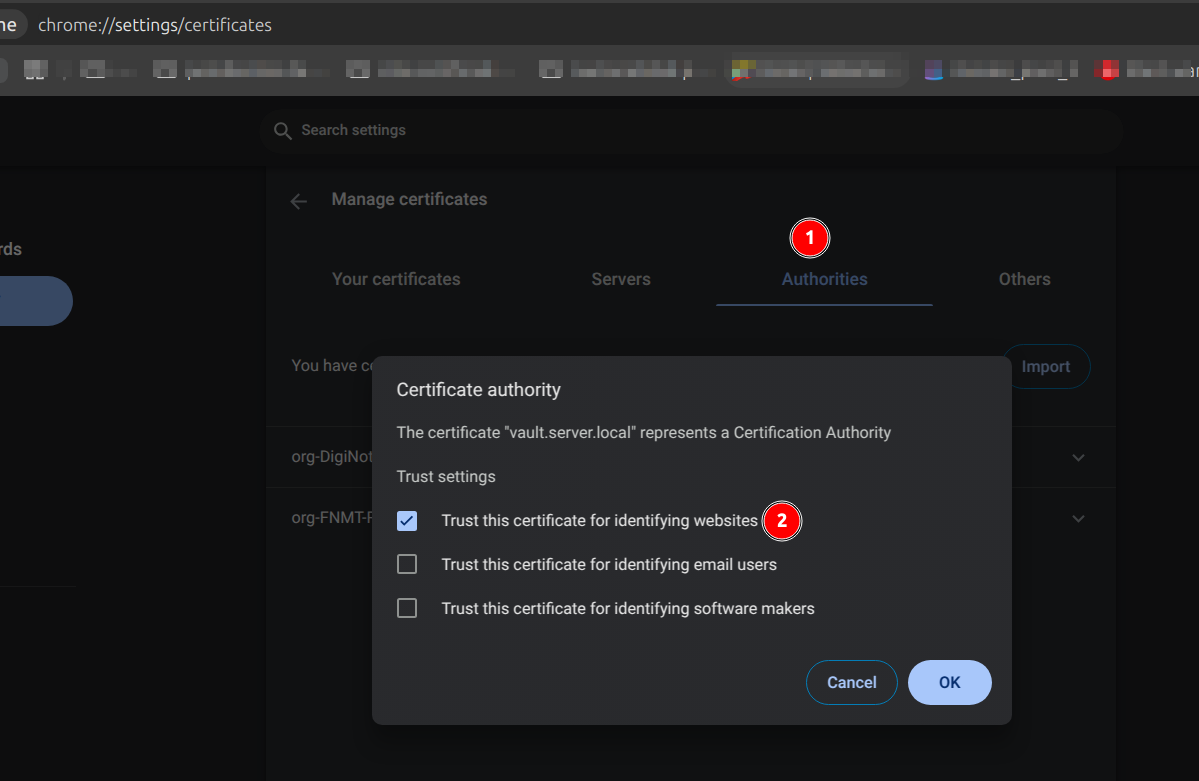
With Chrome for example chrome://settings/certificates
We import the certificate named ca-cert.crt which is of type X.509 and then restart chrome.
|


Import OS certificate
In this case we are on linux, and the vault is on FreeBSD, but for the UI we can access it, although enabling the UI in production is not recommended.
sudo cp vault-cert.crt /usr/local/share/ca-certificates/vault-cert.crt (1)
sudo update-ca-certificates (2)
Updating certificates in /etc/ssl/certs...
rehash: warning: skipping ca-certificates.crt,it does not contain exactly one certificate or CRL
rehash: warning: skipping vault-cert.pem,it does not contain exactly one certificate or CRL
1 added, 0 removed; done.
Running hooks in /etc/ca-certificates/update.d...
done.| 1 | The certificate must be with extension .crt |
| 2 | Updates the system’s certificate database. |
View certificates installed on linux
awk -v cmd='openssl x509 -noout -subject' '/BEGIN/{close(cmd)};{print | cmd}' < /etc/ssl/certs/ca-certificates.crtawk \ (1)
-v cmd='openssl x509 -noout -subject' \ (2)
'/BEGIN/{close(cmd)}; \ (3)
{print | cmd}' \ (4)
< /etc/ssl/certs/ca-certificates.crt (5)| 1 | awk: tool for text processing, text structuring. |
| 2 | -v cmd='openssl x509 -noout -subject'
|
| 3 | /BEGIN/{close(cmd)}:
|
| 4 | {print | cmd}:
|
| 5 | /etc/ssl/certs/ca-certificates.crt:
|
The end result is that the command displays the "subject" line (containing information about the holder) of each CA certificate installed on the system, for example:
subject=C = US, O = Amazon, CN = Amazon Root CA 1
subject=C = BE, O = GlobalSign nv-sa, OU = Root CA, CN = GlobalSign Root CA
Endpoint /sys/health
This endpoint is specifically designed to allow basic server status checks without authentication, even on HTTPS.
curl -k https://ip-address:8200/v1/sys/health

{
  "initialized": true,
  "sealed": true,
  "standby": true,
  "performance_standby": false,
  "replication_performance_mode": "unknown",
  "replication_dr_mode": "unknown",
  "server_time_utc": 1739132639,
  "version": "1.18.3",
  "enterprise": false,
  "echo_duration_ms": 0,
  "clock_skew_ms": 0,
  "replication_primary_canary_age_ms": 0
}
Doing GET via TLS
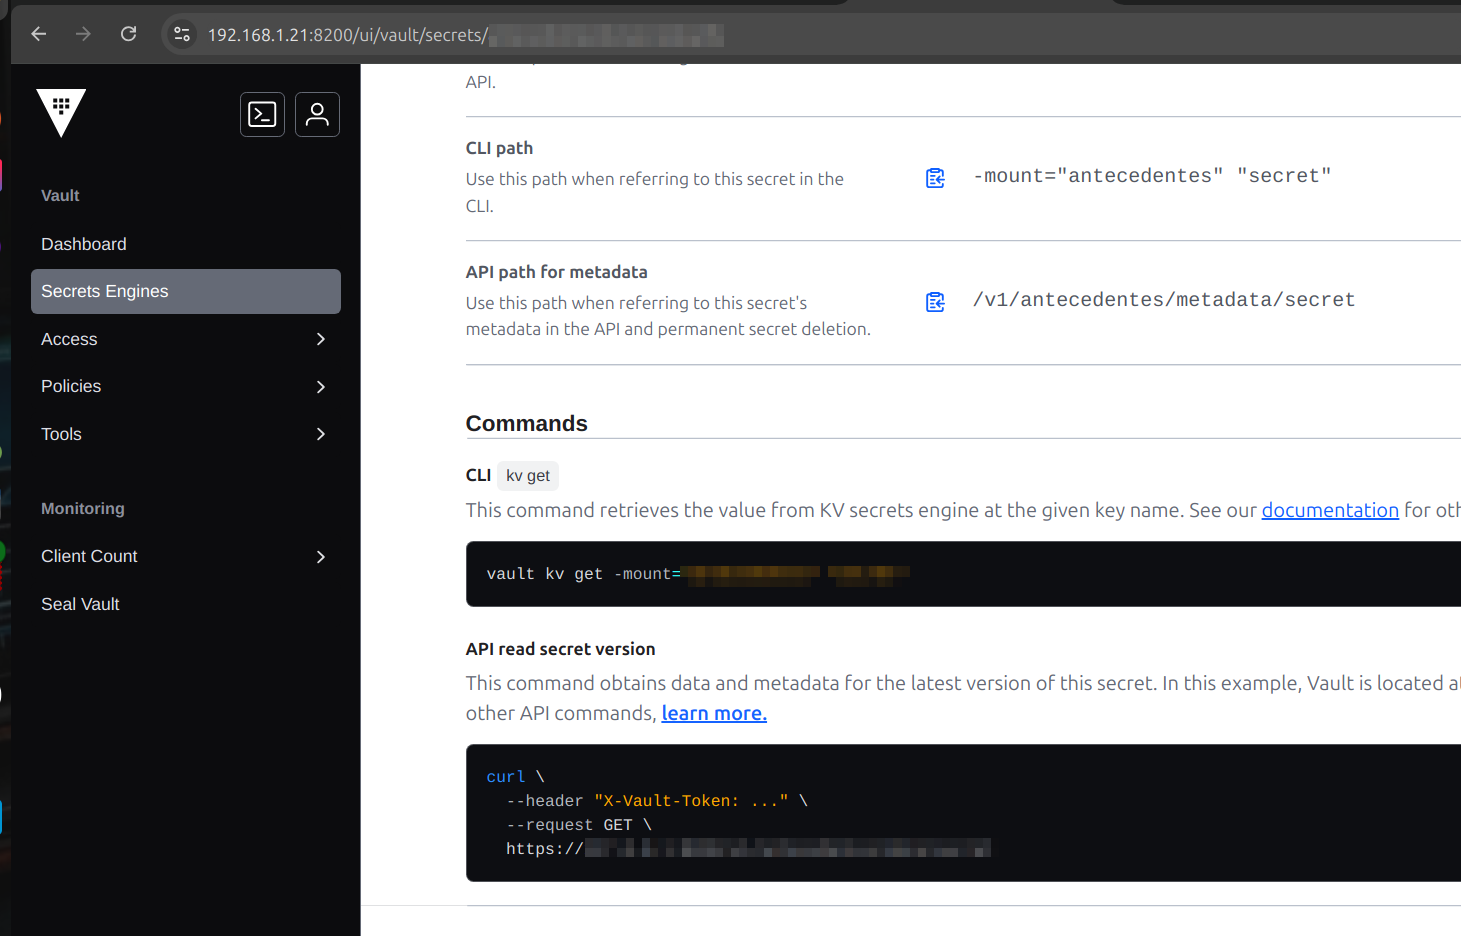
-
Easily to get a curl of a specific secret and fast (as we are newbies), from the UI we can do this.
copy/paste
Now when we try to query a secret via api rest we get this
➜  ~ curl \
  --header "X-Vault-Token: ${VAULT_TOKEN}" \
  --request GET \
  https://ip-address:8200/v1/${API_PATH} (1)
curl: (60) SSL certificate problem: unable to get local issuer certificate
More details here: https://curl.se/docs/sslcerts.html

curl failed to verify the legitimacy of the server and therefore could not
establish a secure connection to it. To learn more about this situation and
how to fix it, please visit the webpage mentioned above.| 1 | This is where we have the mounting point and the secret. |
With our generated certificate here we can now use it to make the request.
➜  ~ curl -k --cert-type P12 --key client-cert.p12 \
  --header "X-Vault-Token: ${VAULT_TOKEN}" \
  --request GET \
  https://vault.server.local:8200/v1/${PATH_SECRET}

===== output

{
  "request_id": "f2a77063-189c-2c29-2df8-8952962f0dc5",
  "lease_id": "",
  "renewable": false,
  "lease_duration": 0,
  "data": {
    "data": {
      "secret.": "value" (1)
    },
    "metadata": {
      "created_time": "2025-01-31T02:05:03.750285314Z",
      "custom_metadata": null,
      "deletion_time": "",
      "destroyed": false,
      "version": 9
    }
  },
  "wrap_info": null,
  "warnings": null,
  "auth": null,
  "mount_type": "kv"
}| 1 | The secret in this array. |
Forcing TLS without nginx
At the moment even with all the steps done, if we enter to the main url of the vault whether we have or not certificate, we can enter and visualize the UI, and it should reject us, then we must add in our listener tcp a line.
listener "tcp" {
  address = "ip-address:8200"
  tls_cert_file = "/root/vault-cert.pem"
  tls_key_file  = "/root/vault-key.pem"
  tls_client_ca_file = "/root/ca-cert.pem"
  tls_disable_client_certs = false  # Force client authentication
  tls_min_version = "tls12"
  tls_require_and_verify_client_cert = "true" (1)
}| 1 | Magic line, will force say mTLS, mutual authentication |
➜  ~ curl --cert client-cert.pem --key client-key.pem --cacert ca-cert.pem \ (1)
  --header "X-Vault-Token: ${VAULT_TOKEN}" \
  --request GET \
  https://vault.server.local:8200/v1/${PATH_SECRET}

===== output

{
  "request_id": "f2a77063-189c-2c29-2df8-8952962f0dc5",
  "lease_id": "",
  "renewable": false,
  "lease_duration": 0,
  "data": {
    "data": {
      "secret.": "value" (2)
    },
    "metadata": {
      "created_time": "2025-01-31T02:05:03.750285314Z",
      "custom_metadata": null,
      "deletion_time": "",
      "destroyed": false,
      "version": 9
    }
  },
  "wrap_info": null,
  "warnings": null,
  "auth": null,
  "mount_type": "kv"
}| 1 | The .pem file format is more compatible with curl apparently, and is the only way curl will work in this test. |
| 2 | The secret |
Transit Secrets Engine with HashicorpVault
"encryption as a service"
Applies symmetric cryptography to our passwords, useful for cases of needing the password in plain text. 🤐…
This method of reversible encryption, can be useful, for example for a request with a username and password to a remote system my case…
Since we now have TLS, we should adjust our environment a bit with
export VAULT_ADDR=https://direccion-ip:8200
export VAULT_CLIENT_CERT=/path/client-cert.pem
export VAULT_CLIENT_KEY=/path/client-key.pem
export VAULT_CACERT=/path/ca-cert.pem
export VAULT_TOKEN=token (1)| 1 | Token, but watch out, it should no longer be the "initial root token" |
Generate token
The initial root token generated when the operator starts is a root token, we already know how this works, so the best thing to do is to create a policy and assign a token to this generated policy.
Anyone with this token can delete/read/create any data in Vault.
How do we do it ? from the UI or by console?
From shell
We create a file called kv-lector.hcl and having still in our enviroment the environment variable VAULT_TOKEN our INITIAL_ROOT_TOKEN with it we are going to create another token…
path "ante--------/data/*" {
  capabilities = ["read", "list"]
}

path "app/data/test" {
  capabilities = ["read", "list"]
}

path "app/metadata/test" {
  capabilities = ["list"]
}
That file must already be in our vault when we do for example
write policy
vault policy write kv-lector kv-lector.hclCreate token
vault token create -policy="kv-lector"vault token create -policy="kv-lector"
Key Value
--- -----
token hvs....................
token_accessor DXoKn2sav...............
token_duration 768h
token_renewable true
token_policies ["kv-lector" "default"]
identity_policies []
policies ["kv-lector" "default"]Path configuration
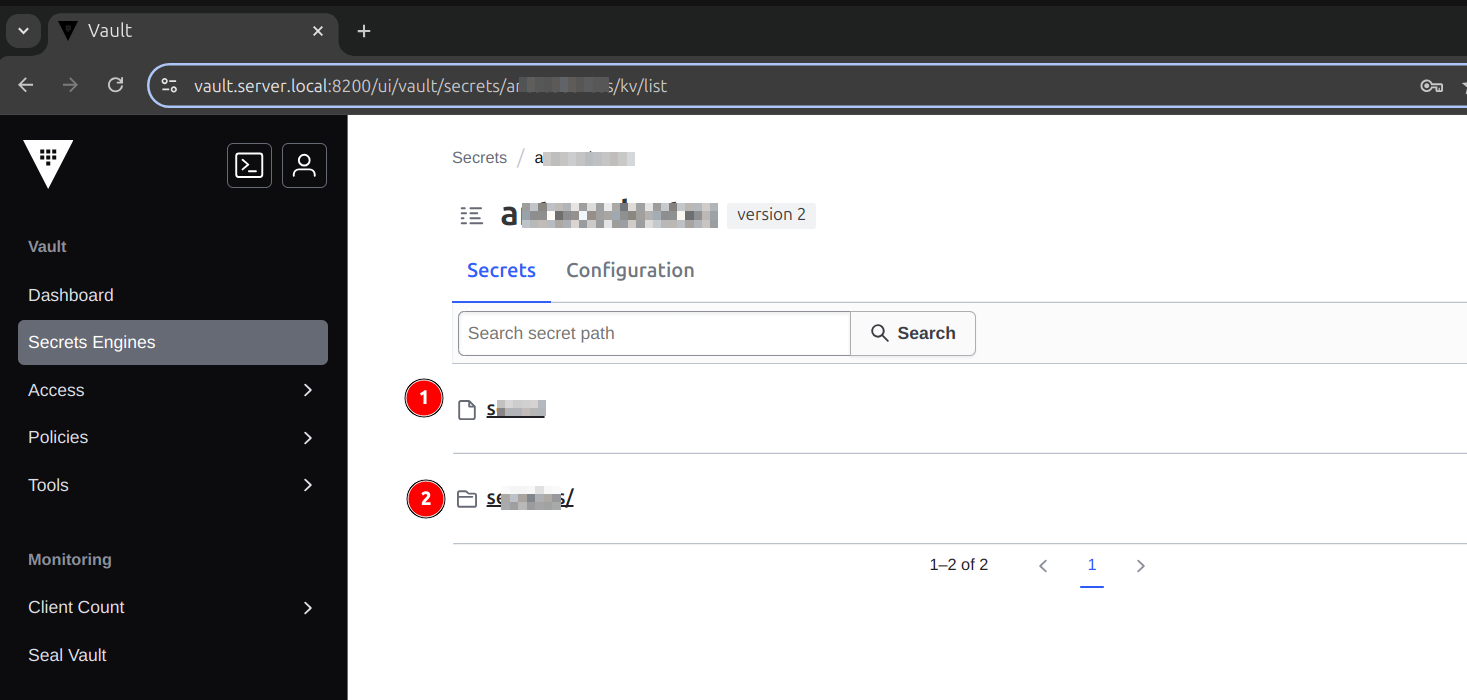
Here the path has neither backslash /, nor anything that follows it.
However here yes, and we can use it with Spring’s VaultTemplate as well.
Token expired, how to recreate it ?
The token may also expire and we will not be able to communicate with the vault, so to recreate it we execute the following:
vault token create -policy="policy-name"Then this token must be updated in the enviroment in the variable VAULT_TOKEN