
Para hacer TDD es muy importante un framework como mockito, JUnit, para probar comportamientos y resultados sin necesidad de probar el código a grandes rasgos.
El TDD se escriben los test primero antes que escribir una línea de código de producción, escribir los test que testean el código de producción, aunque podría resultar difícil hacer si no se tiene código para compilar, entonces se debe de escribir lo mínimo para una compilación feliz. Un team hace TDD y a la misma vez que obtiene los test hechos, también al mismo tiempo se implementa la funcionalidad.
El agile manifiesto dice “value working code over comprehensive documentation”, con TDD tienes que trabajar con código y probar que el código funcione a la misma vez, si usamos el JavaDocs y TDD, podríamos obtener una linda y buena documentación en paralelo con la entrega de las funcionalidades de los test.
Un código simple
CupCake será nuestra clase a testear en ella usaremos la anotación @InjectMocks
/**
 * Simple CupCake class for @InjectMocks
 */
public class CupCake {

    public static final String INGREDIENT_FOR_CUPCAKE = "Ingredient is: ";

    private final Ingredient ingredient;
    private List<String> ingredients;
    private final SpyMePlease spyMePlease;

    public CupCake(final Ingredient ingredient, final List<String> ingredients, final SpyMePlease spyMePlease) {
        this.ingredient = ingredient;
        this.ingredients = ingredients;
        this.spyMePlease = spyMePlease;
    }

    public String getIngredient() {
        return INGREDIENT_FOR_CUPCAKE.concat(ingredient.getFlavor());
    }

    public int getIngredients() {
        return ingredients.size();
    }

    /**
    *
    * Aquí podemos obtener un resultado diferente al usar @Mock o @Spy
    *
    * @return boolean
    */
    public boolean canISpyThere() {
        System.out.println("Can I Spy there ?");
        spyMePlease.hola();
        return true;
    }

}
Nuestro Mock
La clase Ingredient será nuestro Mock dado que esta es una dependencia de CupCake, todas nuestras dependencias la anotaremos con @Mock, también podríamos usar @Spy para ser inyectadas dentro de los bean anotados con @InjectMocks
/**
 * Simple class Ingredient to @Mock
 */
public class Ingredient {

    private String flavor;

    public Ingredient(final String flavor) {
        this.flavor = flavor;
    }

    public String getFlavor() {
        return flavor;
    }
}
/**
* Clase a usar con @Spy para inspeccionar funcionalidad
* interna y externa
*/
public class SpyMePlease {
public void hola() {
System.out.println("Your are Spying this!");
}
}Con la anotación @Spy podemos probar comportamientos internos y externos de los métodos, sin embargo con @Mock solo los comportamientos externos.
/**
 * En este caso las dependencias como Ingredient e Ingredients serán nuestros mocks anotadas con
 * @Mock donde esta creara las implementaciones que necesitemos.
 *
 * Mientras que nuestra clase CupCake sera la que vamos a testear, anotada con @InjectMock sin necesidad
 * de instanciarla, luego esta inyectara todos los mocks que están marcados con @Mock, @Spy etc
 */
@ExtendWith(MockitoExtension.class)
class MockingAndSpyTest {

    private static final String BLACK_BERRY = "BlackBerry";

    @Mock
    private Ingredient ingredient;

    @Mock
    private SpyMePlease spyMePlease;

    @Spy
    private List<String> ingredients = new ArrayList<>();

    @InjectMocks
    private CupCake cupCake;

    @Test
    void mockAndSpy() {
        Mockito.when(ingredient.getFlavor()).thenReturn(BLACK_BERRY);

        ingredients.add("Banana");
        ingredients.add("Orange");
        ingredients.add("BlueBerry");

        final int actualIngredients = 3;
        assertThat(actualIngredients, is(cupCake.getIngredients()));

        final String actualFlavor = CupCake.INGREDIENT_FOR_CUPCAKE.concat(BLACK_BERRY);
        assertThat(actualFlavor, is(cupCake.getIngredient()));

        assertThat(true, is(cupCake.canISpyThere()));
    }
}
Si ejecutarmos el test el resultado sería GREEN y también el siguiente:
Can I Spy there ?


Process finished with exit code 0
Pero que pasa si cambiamos
@Spy
private SpyMePlease spyMePlease;
Can I Spy there ?
Your are Spying this!
Process finished with exit code 0Este warning lo tenemos gracias a la anotación @Spy y la versión de openjdk-11
WARNING: An illegal reflective access operation has occurred
WARNING: Illegal reflective access by org.mockito.internal.util.reflection.ReflectionMemberAccessor (file:/C:/Users/Rubn/.m2/repository/org/mockito/mockito-core/3.6.0/mockito-core-3.6.0.jar) to field java.util.ArrayList.elementData
WARNING: Please consider reporting this to the maintainers of org.mockito.internal.util.reflection.ReflectionMemberAccessor
WARNING: Use --illegal-access=warn to enable warnings of further illegal reflective access operations
WARNING: All illegal access operations will be denied in a future release
Se soluciona con 2 dependencias:
-
mockito-core
-
mockito-inline
<!-- https://mvnrepository.com/artifact/org.mockito/mockito-core -->
<dependency>
   <groupId>org.mockito</groupId>
   <artifactId>mockito-core</artifactId>
   <version>3.6.0</version>
   <scope>test</scope>
</dependency>

<!-- https://mvnrepository.com/artifact/org.mockito/mockito-inline -->
<dependency>
   <groupId>org.mockito</groupId>
   <artifactId>mockito-inline</artifactId>
   <version>3.6.0</version>
   <scope>test</scope>
</dependency>| Esas dependencias de arriba no hacen falta si usamos Springboot |
Refactorizando un poco el test
... imports removidos para la brevedad

@DisplayName("Usamos @InyectMocks y pasamos las dependencias vía constructor")
@ExtendWith(MockitoExtension.class) (1)
class CupCakeTest {

    @InjectMocks
    private CupCake cupCake; (2)

    @Mock
    private Ingredient ingredient; (3)

    @Mock
    private List<Ingredient> ingredientList;

    @Mock
    private SpyMePlease spyMePlease;

    @Test
    @DisplayName("el ingrediente tomate es comprobado aquí y otros ingredientes distintos")
    void getIngredient() {

        when(ingredient.getFlavor()).thenReturn("tomate"); (4)
        when(ingredientList.get(0)).thenReturn(new Ingredient("Banana"));
        when(ingredientList.get(1)).thenReturn(new Ingredient("Fresa"));
        when(ingredientList.get(2)).thenReturn(new Ingredient("Coco"));

        assertThat("Ingredient is: tomate").isEqualTo(cupCake.getIngredient());
        assertThat("Banana").isEqualTo(cupCake.getIngredients().get(0).getFlavor());
        assertThat("Fresa").isEqualTo(cupCake.getIngredients().get(1).getFlavor());
        assertThat("Coco").isEqualTo(cupCake.getIngredients().get(2).getFlavor());

        verify(ingredient).getFlavor();

    }

    @Test
    @DisplayName("la lista de ingrediente tendra un tamaño de 3 ingredientes")
    void getSizeOfAllIngredients() {
        when(ingredientList.size()).thenReturn(3);
        assertThat(3).isEqualTo(cupCake.getSizeOfAllIngredients());
    }

    @Test
    @DisplayName("La lista deberia ser igual a nuestro cupCake, y contener un Ingrediente con sabor Banana")
    void getIngredients() {

        when(this.ingredientList.size()).thenReturn(1);
        when(this.ingredientList.get(0)).thenReturn(new Ingredient("Banana"));

        assertAll( (5)
                () -> assertEquals(this.ingredientList.size(), cupCake.getIngredients().size()),
                () -> assertEquals(this.ingredientList.get(0), this.cupCake.getIngredients().get(0))
        );

        verify(this.ingredientList, times(2)).size(); (6)
        verify(this.ingredientList, times(2)).get(0);

    }

    @Test
    @DisplayName("El método devolvere true estupidamente")
    void canISpyThere() {

        assertThat(cupCake.canISpyThere()).isTrue();
    }

}| 1 | Anotación necesario para JUnit 5 |
| 2 | Nuestra clase a testear CupCake |
| 3 | Todo lo anotado con @Mock debemos simularle, o sea, darle comportamiento |
| 4 | Nos aseguramos de invocar al when en este método para evitar un error tipo UnnecessaryStubbingException. |
| 5 | assertAll de JUnit 5 |
| 6 | Verificamos que size y get se invoquen solo 2 veces. |
|
TIPS @BeforeEach y @InyectMocks invocar a contructor o no
|
Testeo simple de método vacio o void
class SpyMePleaseTest {

    private SpyMePlease spyMePlease = new SpyMePlease();

    @Test
    @DisplayName("Testeando método hola, y no arroja ninguna excepcion")
    void hola() {
        assertThatCode(() -> spyMePlease.hola()).doesNotThrowAnyException();  (1)
    }
}| 1 | Podemos ayudarnos con la clase AssertionsForClassTypes para testear métodos vacíos, que a veces fastidian un poco. |
verify y times de Mockito
Vamos a ver un simple servicio que muestre solo 10 numeros de manera reactiva y en caso de que uno falle nuestro stream dispare un fallback.
Con programación reactiva la parte de testing suele ser muy ruda, pero con StepVerifier una dependencia que nos sirve
para hacer TDD de stream reactivos dado que el método create acepta un publisher como tal, bien sea de project reactor o hasta RxJava o alguna otra implementación de la especificación de los stream reactivos.
Se puede dar el caso con project reactor que nuestro stream reactivo dispare un fallback muchas veces, lo cual se debe evitar.
|
public class MyReactorServiceImpl implements MyReactorService {

    private FallBackService service; (1)

    public Flux<Integer> createTenItem() {
        return Flux.just(1, 2, 3, 4, 5, 6, 7, 8, 9, 10)//Flux.range :D
                .doOnError(error -> log.info("Error with item {}", error))
                .flatMap(item -> this.launchError(item)
                        .onErrorReturn(-1)) (2)
                .doOnNext(onNext -> log.info("onNext {}", onNext));
    }

    public Mono<Integer> launchError(final Integer item) {
        if (item == 6) {
            return Mono.error(new RuntimeException("Error con item " + item));
        }
        return Mono.just(item);
    }

}| 1 | Sin usar el servicio de nuestro fallback aún. |
| 2 | Cuando nuestro item es 6 devolveremos con onErrorReturn( un fallback de ayuda, pero no tan inteligente) un -1, |
@Test
@DisplayName("Cuando es 6 se produce error y retornamos -1")
void createTenItem() {
    StepVerifier.create(myReactorService.createTenItem())
            .expectNext(1, 2, 3, 4, 5, -1, 7, 8, 9 , 10) (1)
            .verifyComplete();
}| 1 | Estamos trabajando con un Flux, o sea, item`s…. y cuando es 6 en realidad es un error que convertiremos en -1 |
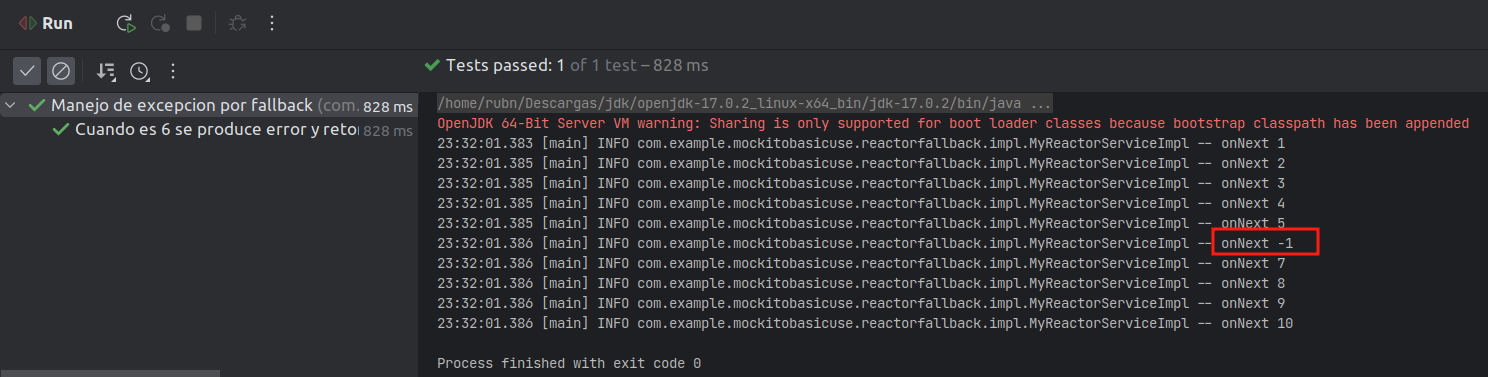
El -1 que retornamos en caso de error con el numero 6, pero la operación del Stream continua normal.
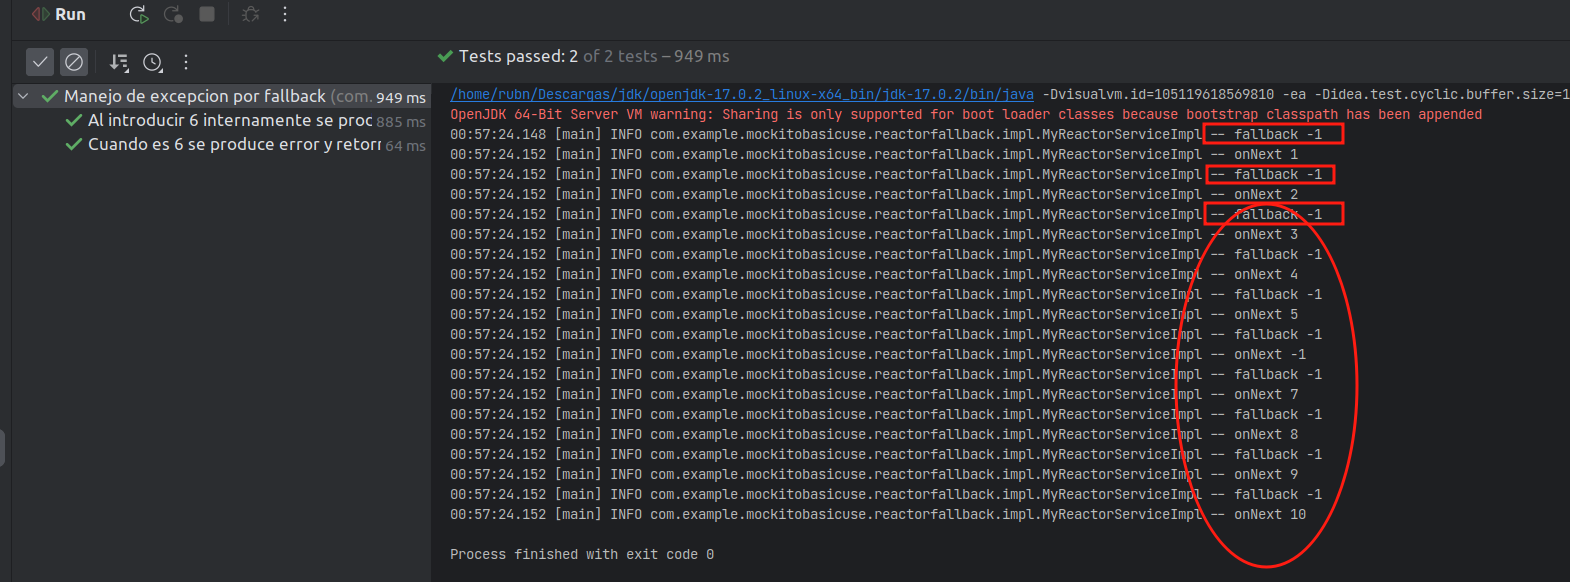
Fallback más potente
public class MyReactorServiceImpl implements MyReactorService {

    private final MyFallbackServiceImpl service;

    public Flux<Integer> createTenItem() {
        return Flux.just(1, 2, 3, 4, 5, 6, 7, 8, 9, 10)// Flux.range :D
                .doOnError(error -> log.info("Error with item {}", error))
                .flatMap(item -> this.launchError(item) (1)
                        .switchIfEmpty(this.fallback())) (3)
                .doOnNext(onNext -> log.info("onNext {}", onNext));
    }

    public Mono<Integer> launchError(final Integer item) {
        if (item == 6) {
            return Mono.empty(); (2)
        }
        return Mono.just(item);
    }

    public Mono<Integer> fallback() {
        log.info("fallback {}", -1);
        return Mono.just(-1); (4)
    }

}| 1 | Disparamos en caso de error cuando sea 6 |
| 2 | Cuando es 6 mandamos un Mono.empty para usarle con el switchIfEmpty en vez de un RuntimeException |
| 3 | Nos vamos por el SwitchIfEmpty |
| 4 | Estamos ya en el fallback y retornamos -1 |
Nuestro fallback se imprime muchas veces, y además de eso esta mal testeado o sea, falta un Mockito.verify y Mockito.times lo ideal sería.
|
Refactorizamos un poco MyReactorServiceImpl para usar nuestro servicio de fallback y poder mockearlo
public Flux<Integer> createTenItem() {
    return Flux.just(1, 2, 3, 4, 5, 6, 7, 8, 9, 10)// Flux.range :D
            .doOnError(error -> log.info("Error with item {}", error))
            .flatMap(item -> this.launchError(item)
                    .switchIfEmpty(this.service.fallback())) (1)
            .doOnNext(onNext -> log.info("onNext {}", onNext));
}

public Mono<Integer> launchError(final Integer item) {
    if (item == 6) {
        return Mono.empty();
    }
    return Mono.just(item);
}| 1 | Usamos nuestro servicio de fallback, es decir nuestra dependencia para luego verificar su comportamiento de manera más inteligente. |
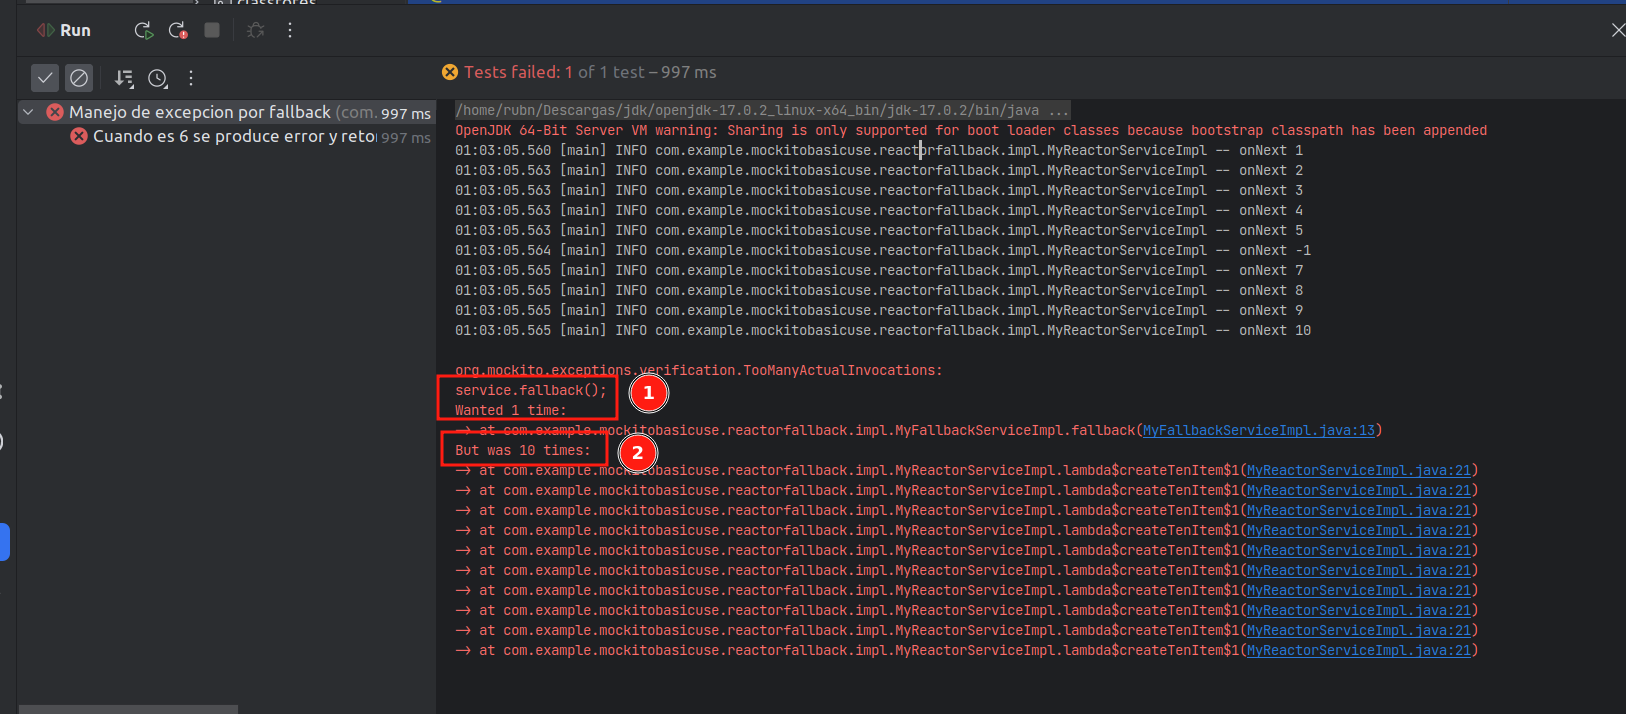
Refactorizamos nuestro test un poco
@Test
@DisplayName("Cuando es 6 se produce error y retornamos -1")
void createTenItem() {

    when(service.fallback()).thenReturn(Mono.just(-1)); (1)

    StepVerifier.create(myReactorService.createTenItem())
            .expectNext(1, 2, 3, 4, 5, -1, 7, 8, 9, 10)
            .verifyComplete();

    Mockito.verify(service, Mockito.times(1)).fallback(); (2)
}| 1 | Un pequeño mock de nuestro servicio fallback |
| 2 | Verificamos que se ejecute una sola vez nuestro fallback que sería lo ideal no? |
Sorpresa, switchIfEmpty peligroso
Se ha invocado 10 malditas veces nuestro fallback que es lo que no queremos, ufff los DevOps me odiaran si sale un incidencia a la 12am porque revento mongo jajaajaj
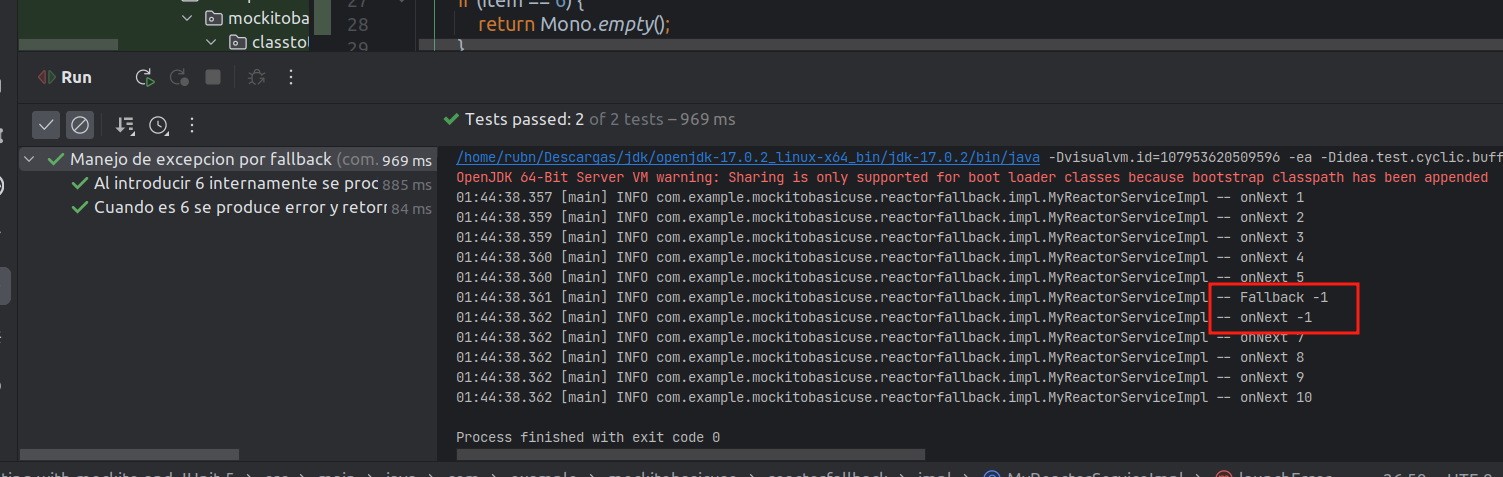
Usando el operador defer nuestro aliado
Para solucionarlo usamos al operador defer, que practicamente hará que el fallback se dispare
cuando tengamos un empty justo con el numero 6 (nuestro error) un poco loco no ? y que el SwitchIfEmpty funcione correctamente.
public Flux<Integer> createTenItem() {
    return Flux.just(1, 2, 3, 4, 5, 6, 7, 8, 9, 10)// Flux.range :D
            .doOnError(error -> log.info("Error with item {}", error))
            .flatMap(item -> this.launchError(item)
                    .switchIfEmpty(Mono.defer(this.service::fallback)
                            .doOnNext(onNext -> log.info("Fallback {}", -1)))) (1)
            .doOnNext(onNext -> log.info("onNext {}", onNext));
}| 1 | Añadido el operador defer y un doOnNext que imprimira una vez Fallback -1 |
Nuestro test pasará traquilamente ahora
package com.example.mockitobasicuse.reactorfallback.impl;

import org.junit.jupiter.api.DisplayName;
import org.junit.jupiter.api.Test;
import org.junit.jupiter.api.extension.ExtendWith;
import org.mockito.InjectMocks;
import org.mockito.Mock;
import org.mockito.Mockito;
import org.mockito.junit.jupiter.MockitoExtension;
import reactor.core.publisher.Mono;
import reactor.test.StepVerifier;

import static org.mockito.Mockito.when;

@DisplayName("Manejo de excepcion por fallback")
@ExtendWith(MockitoExtension.class)
class MyReactorServiceImplTest {

    @InjectMocks
    private MyReactorServiceImpl myReactorService;

    @Mock
    private MyFallbackServiceImpl service;

    @Test
    @DisplayName("Cuando es 6 se produce error y retornamos -1")
    void createTenItem() {

        when(service.fallback()).thenReturn(Mono.just(-1));

        StepVerifier.create(myReactorService.createTenItem())
                .expectNext(1, 2, 3, 4, 5, -1, 7, 8, 9, 10)
                .verifyComplete();

        Mockito.verify(service, Mockito.times(1)).fallback();
    }

    @Test
    @DisplayName("Al introducir 6 internamente se produce un Mono.empty()")
    void launchError() {

        StepVerifier.create(myReactorService.launchError(6))
                .verifyComplete();

    }

}
Usando ArgumentsSource para tests Parametrizados
Con JUnit5 podemos usar una lista parametrizada con datos, muchos más datos, que incluso podemos leer de algún fichero, etc, en este caso los creamos nosotros, por ejemplo
public class CupCakeArgumentsProvider implements ArgumentsProvider { (1)

    @Override
    public Stream<? extends Arguments> provideArguments(ExtensionContext extensionContext) throws Exception {

        final Ingredient pera = new Ingredient("pera");
        final Ingredient manzana = new Ingredient("manzana");
        final Ingredient coco = new Ingredient("coco");
        final List<Ingredient> ingredientList = Arrays.asList(pera, manzana, coco);

        final Ingredient pina = new Ingredient("piña");
        final Ingredient frutaDelDragon = new Ingredient("Fruta del dragon");
        final Ingredient uva = new Ingredient("uva");
        final List<Ingredient> ingredientList1 = Arrays.asList(pina, frutaDelDragon, uva);

        return Stream.of(
                Arguments.of(ingredientList, pera, manzana, coco),
                Arguments.of(ingredientList1, pina, frutaDelDragon, uva)); (2)
    }
}| 1 | Extendemos de la interface ArgumentsProvider |
| 2 | Retornamos un Stream con 2 parametros Arguments.of con ese orden que debemos respetar en la firma de nuestro test |
@ParameterizedTest (1)
@ArgumentsSource(CupCakeArgumentsProvider.class) (2)
@DisplayName("Usando muchos mas ingredientes")
void masFrutas(final List<Ingredient> ingredientsList, Ingredient ingredientExpected, Ingredient ingredient2Expected,
                   Ingredient ingredient3Expected) { (3)

        when(this.ingredientList.get(0)).thenReturn(ingredientsList.get(0));
        when(this.ingredientList.get(1)).thenReturn(ingredientsList.get(1));
        when(this.ingredientList.get(2)).thenReturn(ingredientsList.get(2));

        assertNotNull(ingredientsList);
        assertThat(ingredientExpected).isEqualTo(cupCake.getIngredients().get(0)); (4)
        assertThat(ingredient2Expected).isEqualTo(cupCake.getIngredients().get(1));
        assertThat(ingredient3Expected).isEqualTo(cupCake.getIngredients().get(2));

        assertThat(ingredientList)
                .usingRecursiveComparison()
                .isEqualTo(cupCake.getIngredients());

        verify(ingredientList).get(0);
}| 1 | Anotación necesaria |
| 2 | ArgumentsSource va a nivel de método y se usa con la clase que implementa a la ArgumentsProvider |
| 3 | Esta firma del método debe coincidir con los parametros seteados en el Arguments.of es decir una lista seguida de
3 Ingredientes para que esto coincida, tambien que este método se invocara 2 veces, porque usamos dos Arguments.of |
| 4 | Pasamos un Ingrediente esperado y parametrizado que debe ser el mismo que deberia tener la lista de ingredientes dentro de nuestro cupCake |
Si nuestra firma del método no coincide tendremos un error tipo ParameterResolutionException
|
Test de integración con BlockHound
Aquí vamos cargar el contexto de spring, con la anotacion @ContextConfiguration y aplicamos esteriotipado al
servicio que vamos a necesitar, o sea un servicio real tal cual, que incluso puede invocar a una base de datos si se desea, lo ideal también es que el nombre del test termine en IT(integration).
Según la documentación, BlockHound esta escaneando por defecto al Scheduler parallel y si nosotros en nuestro código o el código interno de alguna dependencia en ese momento tenga una llamada bloqueante, BlockHound se quejará y arrojara excepción. Se puede cambiar ese comportamiento instanciando su Builder tal cual como lo indica la documentación.
@DisplayName("<= Using blockhound to detect blocking calls in parallel thread =>")
@Log4j2
@ContextConfiguration(classes = {ReactiveRandomNumbers.class}) (1)
@ExtendWith(SpringExtension.class) (2)
class UsingBlockHoundIT {

    @Autowired (3)
    private ReactiveRandomNumbers reactiveRandomNumbers;

    @BeforeEach
    void setup() {
        BlockHound.install(); (4)
    }

    @Test
    @DisplayName("Blocking call! in line 37")
    void detectBlockingCall1() {
        StepVerifier.create(Mono.just(1)
                .doOnNext(e -> this.blockMe()) (5)
                .subscribeOn(Schedulers.parallel()))
                .expectErrorMatches(error -> error.getMessage().contains("Blocking call!"))
                .verify();
    }

    @Test
    @DisplayName("Blocking call! in line 46")
    void detectBlockingCall2() {
        StepVerifier.create(this.reactiveRandomNumbers.monoWithBlockingCallInside(500L)
                        .subscribeOn(Schedulers.parallel())) (6)
                .expectErrorMatches(error -> error.getMessage().contains("Blocking call!"))
                .verify();
    }

    @Test
    @DisplayName("Blocking call! in line 57, but using boudendElastic to avoid that")
    void avoidBlockingCall() {

        StepVerifier.create(Mono.just(1)
                        .doOnNext(e -> this.blockMe())
                        .subscribeOn(Schedulers.boundedElastic())) (7)
                .expectNext(1)
                .verifyComplete();
    }

    @RepeatedTest(10)
    @DisplayName("Blocking call! in line 67, but using boudendElastic to avoid that")
    void avoidBlockingCall2() {

        StepVerifier.create(this.reactiveRandomNumbers.monoWithBlockingCallInside(500L)
                        .subscribeOn(Schedulers.boundedElastic())) (8)
                .expectNextMatches(map -> map.size() == 6)
                .verifyComplete();
    }

    @SneakyThrows
    void blockMe() { (9)
        Thread.sleep(1000);
    }
}| 1 | Cargamos nuestro servicio ReactiveRandomNumbers. |
| 2 | habilitamos JUnit 5 con Spring. |
| 3 | Inyectamos nuestro servicio tal cual, para hacer una invocacion real, sin mockear. |
| 4 | La magia, para instalar nuestro agente de BlockHound, y con @BeforeEach para que se active en cada test. |
| 5 | Insertamos una llamada bloqueante para comprobar que nuestro agente la detecta, y si que la detecta. |
| 6 | Usamos el Scheduler parallel, para escanearle y blockHound detecta una llamada interna bloqueante. |
| 7 | Ahora usamos un boundedElastic para evitar esa llamada bloqueante. |
| 8 | Lo mismo en el servicio invocado. |
| 9 | El método bloqueante adicional de prueba con un sleep de 1 segundo. |
Ese servicio ReactiveRandomNumbers internamente al crear numeros pseudo aleatorio revienta aquí, pero ya es cosa interna que no estamos manejando nosotros, y ahi es util blockhound que nos indica que hay contención a tomar en cuenta.
Caused by: reactor.blockhound.BlockingOperationError: Blocking call! java.io.FileInputStream#readBytes