
Intro to Appjail

It is a tool developed by @DtxdF directly from the very homeland 🇻🇪, this tool allows us to manage our jail in FreeBSD, with a wide range of settings, and it was even inspired by docker.
This is a list comparing the other tools to manage jails where we see that Appjail offers its advantages without lagging behind.
Install
With pkg install -y appjail we install it, but if we want to have the most current version we must compile from the github repo
repo as indicated in the documentation.
-
getting-started/ important to do
appjail fetchto extract components for the creation of jails.
All current AppJail images
Enabling column and printenv
In XigmaNAS, we need printenv but for some reason it is not there, it is up to the devs by design.
which printenv
servernas: appjail# which printenv
printenv: shell built-in command.
Listing our jails
servernas: ~# appjail jail list (1)
/usr/local/bin/appjail: column: not found| 1 | When we try to list our jails we get this error |
We solve it with this:
cd /tmp
mkdir -p repair
cd ./repair/
fetch https://download.freebsd.org/releases/amd64/13.2-RELEASE/base.txz
tar -xvf base.txz ./usr/bin/column ./usr/bin/mkfifo ./usr/bin/printenv
cp -i usr/bin/column /usr/bin/column     (1)
cp -i usr/bin/mkfifo /usr/bin/mkfifo     (2)
cp -i usr/bin/printenv /usr/bin/printenv (3)| 1 | Enabling column |
| 2 | Enabling mkfifo |
| 3 | Enabling printenv |
Configuring the Packet Filter
Initially with xigmanas we have this error
servernas: ~# service pf restart
Disabling pf.
Enabling pfpfctl: : No such file or directory
pfctl: cannot open the main config file!: No such file or directory
pfctl: Syntax error in config file: pf rules not loaded
/etc/rc.d/pf: WARNING: Unable to load .
sysrc pf_enable="YES"
sysrc pflog_enable="YES"
cat << "EOF" >> /etc/pf.conf
nat-anchor 'appjail-nat/jail/*'
nat-anchor "appjail-nat/network/*"
rdr-anchor "appjail-rdr/*"
EOF
service pf restart
service pflog restartAnd we solve it with:
sysrc pf_rules=/etc/pf.conf
service pf restart
Disabling pf.
Enabling pf. (1)| 1 | It’s ok. |
This is also important
sysrc gateway_enable="YES"
sysctl net.inet.ip.forwarding=1
Adjusting the resolv.conf
We have in the jail created by appjail a symbolic link to /etc/resolv.conf but incorrect.
Then we delete it and create it again with the correct dns, to get internet on it.
| The best way is to edit directly the file appjail.conf before creating the jail this file is in our host and from here it will be copied to the jail when it is created. |
DEFAULT_RESOLV_CONF=/usr/local/etc/appjail/resolv.conf (1)| 1 | Here in this path we create the file resolv.conf with the necessary dns |
My current file looks like this after configuring it correctly:
servernas: ~# appjail cmd jexec nextcloud cat /etc/resolv.conf
domain local
nameserver 1.1.1.1
nameserver 1.0.0.1
there is a more efficient way to create it with the MakeJail very similar to the dockerfile
|
Configuring the appjail.conf
/usr/local/etc/appjail/appjail.confEXT_IF=lagg0 (1)
ON_IF=$EXT_IF
FREEBSD_VERSION=13.2-RELEASE (2)
FREEBSD_ARCH=amd64
IMAGE_ARCH=amd64
SHORTEN_DOMAIN_NAMES=1
# Uncomment it if you use ZFS and want AppJail to take advantage of it:
ENABLE_ZFS=1
DEFAULT_RESOLV_CONF=/usr/local/etc/appjail/resolv.conf| 1 | Important to set up our network interface here with ifconfig we can see it |
| 2 | Also change the RELEASE to be set at this time. |
(1)
lagg0: flags=8943<UP,BROADCAST,RUNNING,PROMISC,SIMPLEX,MULTICAST> metric 0 mtu 1500
	options=4a520b9<RXCSUM,VLAN_MTU,VLAN_HWTAGGING,JUMBO_MTU,VLAN_HWCSUM,WOL_MAGIC,VLAN_HWFILTER,VLAN_HWTSO,RXCSUM_IPV6,NOMAP>
	ether 00:25:90:2a:fb:52
  inet 192.168.1.250 netmask 0xffffff00 broadcast 192.168.1.255
	laggproto lacp lagghash l2,l3,l4
	laggport: igb0 flags=1c<ACTIVE,COLLECTING,DISTRIBUTING>
	laggport: igb1 flags=1c<ACTIVE,COLLECTING,DISTRIBUTING>
	groups: lagg
	media: Ethernet autoselect
	status: active
nd6 options=29<PERFORMNUD,IFDISABLED,AUTO_LINKLOCAL>| 1 | This network interface is the one I have lagg0 with LAG that allows me to join two network interfaces. |
Deleting Jails with AppJail
If we want to delete the jails we do the following
-
Stop all Jails
-
chflags -R 0 /usr/local/appjail in the past we had a problem with this when deleting an immutable directory.
-
rm -rf /usr/local/appjail.
We can also delete a specific jail with
appjail jail destroy <jaula>MakeJail with Nextcloud
![]()
Initially we tried to use SQLite, but we could not, it gave strange errors and did not allow to login, very strange indeed.
To make things easier we can automate and create a directory with 5 files, example:
-
template.conf -
create-volumes.shallows you to create directories on the host to persist, and they will be shared in the jail by the fstab. -
Makejail -
mariadb.shthis is the first one that we are going to execute -
Nextcloud.shwill be the other script to run after we have mariadb ready.
The template.conf
exec.start: "/bin/sh /etc/rc"
exec.stop: "/bin/sh /etc/rc.shutdown jail"
sysvshm: new
sysvsem: new
sysvmsg: new
mount.devfs
The create.volumes.sh
#!/bin/sh

VOLUMEDIR=".volumes" (1)
NEXTCLOUD_VOLUME="${VOLUMEDIR}/nextcloud"
MARIADB_VOLUME="${VOLUMEDIR}/mariadb"

#
# nextcloud
#
mkdir -p "${NEXTCLOUD_VOLUME}/apps"
mkdir -p "${NEXTCLOUD_VOLUME}/config"
mkdir -p "${NEXTCLOUD_VOLUME}/data" (2)
mkdir -p "${NEXTCLOUD_VOLUME}/themes"
mkdir -p "${NEXTCLOUD_VOLUME}/done"
mkdir -p "${NEXTCLOUD_VOLUME}/log"

#
# mariadb
#
mkdir -p "${MARIADB_VOLUME}/db"
mkdir -p "${MARIADB_VOLUME}/done"| 1 | This line does the magic, it allows us to create a .volumes directory in the same path where this script is executed allowing us to separate persistent data from non-persistent data. |
| 2 | This is a directory with data that we want to keep and take out of the webroot directory of nextcloud, it is always the most advisable, if our nextcloud jail is deleted, it doesn’t matter, we will have data here. |
The Makejail
The Makejail with a similarity to the Dockerfile but, they work for build and runtime.
INCLUDE gh+AppJail-makejails/nextcloud
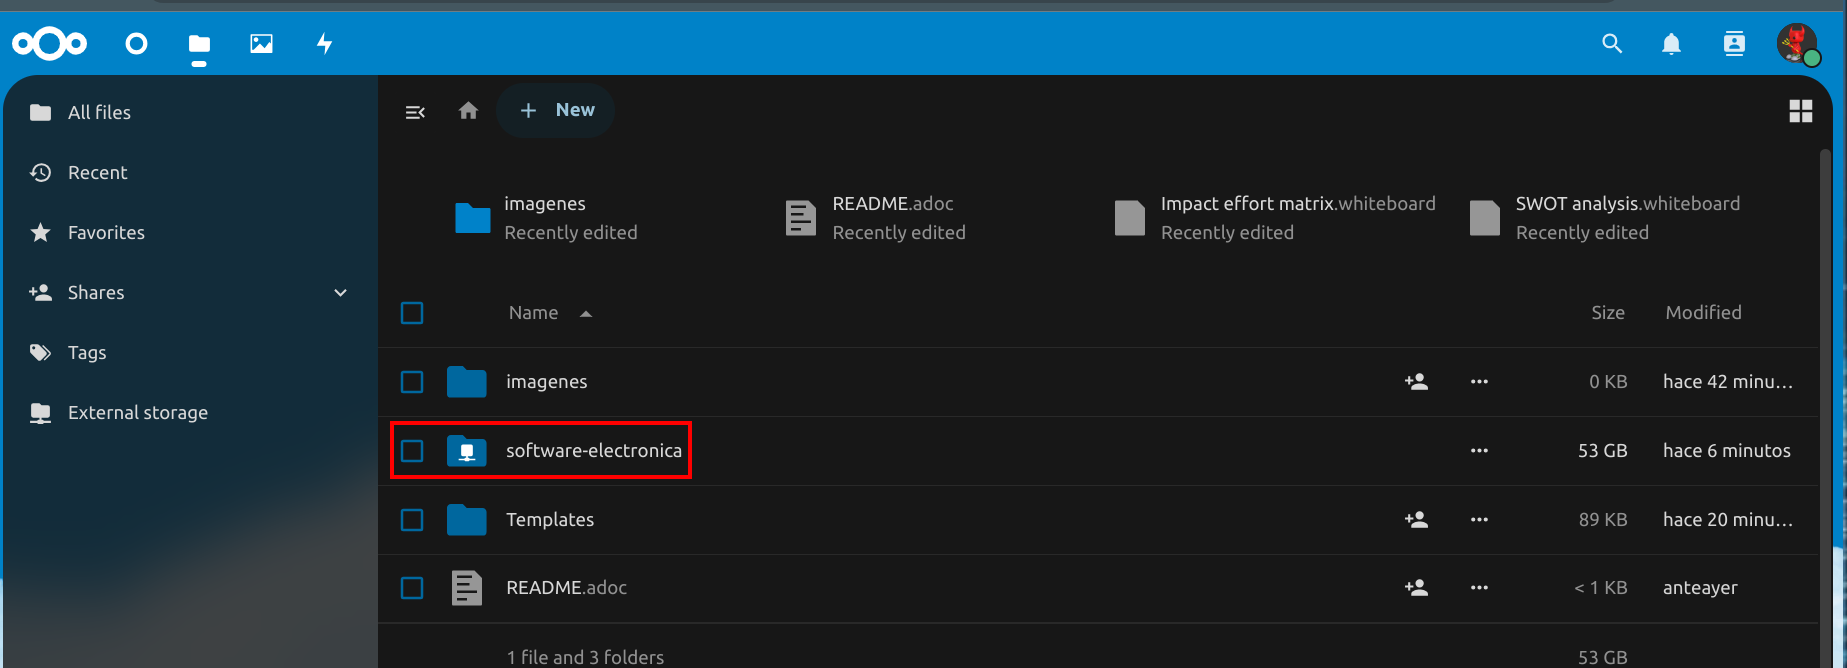
CMD mkdir /media/software-electronica (1)
CMD mkdir /media/public
CMD chown -R www:www /media/software-electronica
CMD chown -R www:www /media/public
CMD chmod 775 /media/software-electronica /media/public
SERVICE apache24 restart| 1 | We create the directory called software-electronica inside the media, pointing to the host dataset via fstab. this media directory will be in the userland of the jail, not in the host. |
The MariaDB script
#!/bin/sh

VOLUMEDIR="$PWD/.volumes"
MARIADB_VOLUME="${VOLUMEDIR}/mariadb"

mkdir -p files/usr/local/etc/mysql/conf.d

cat << EOF > files/usr/local/etc/mysql/conf.d/nextcloud.cnf
[mysqld]
transaction_isolation = READ-COMMITTED
binlog_format = ROW
EOF

./create-volumes.sh

appjail makejail \
	-j nextcloud-mariadb \
        -f gh+AppJail-makejails/mariadb \
        -o virtualnet=":<random> address:10.0.0.51 default" \
        -o nat \
        -o copydir="$PWD/files" \
        -o file=/usr/local/etc/mysql/conf.d/nextcloud.cnf \
	-o fstab="${MARIADB_VOLUME}/db mariadb-db <volumefs>" \
	-o fstab="${MARIADB_VOLUME}/done mariadb-done <volumefs>" \
        -- \
        --mariadb_tag "13.2-106" \
        --mariadb_user "xxx" \
        --mariadb_password "xxx" \
        --mariadb_database "xxx" \
        --mariadb_root_password "xxx"
The nextcloud script
#!/bin/sh

VOLUMEDIR="$PWD/.volumes"
NEXTCLOUD_VOLUME="${VOLUMEDIR}/nextcloud"

./create-volumes.sh (1)

appjail makejail \
    -j nextcloud \
    -o virtualnet=":<random> default" \
    -o nat \
    -o expose=8082:80 \ (2)
    -o fstab="${NEXTCLOUD_VOLUME}/apps nextcloud-apps <volumefs>" \
    -o fstab="${NEXTCLOUD_VOLUME}/config nextcloud-config <volumefs>" \
    -o fstab="${NEXTCLOUD_VOLUME}/data nextcloud-data <volumefs>" \ (3)
    -o fstab="${NEXTCLOUD_VOLUME}/themes nextcloud-themes <volumefs>" \
    -o fstab="${NEXTCLOUD_VOLUME}/done nextcloud-done <volumefs>" \
    -o fstab="${NEXTCLOUD_VOLUME}/log nextcloud-log <volumefs>" \
    -o template="$PWD/template.conf" \
    -V NEXTCLOUD_TRUSTED_DOMAINS=192.168.1.250 \ (4)
    -V MYSQL_DATABASE=xxxx \
    -V MYSQL_USER=xxxx \
    -V MYSQL_PASSWORD=xxxx \
    -V MYSQL_HOST=10.0.0.51 \ (5)
    -V NEXTCLOUD_ADMIN_USER=xxxx \
    -V NEXTCLOUD_ADMIN_PASSWORD=xxxx

appjail fstab jail nextcloud set -d /mnt/pool/software-electronica -m /media/software-electronica (6)
appjail fstab jail nextcloud set -d /mnt/pool/public -m /media/public
appjail fstab jail nextcloud set -d /mnt/pool/extensions/bastille/jails/jdownloader/root/media/downloads -m /media/movies-jdownloader
appjail fstab jail nextcloud set -d /mnt/pool/movies -m /media/movies
appjail fstab jail nextcloud compile
appjail fstab jail nextcloud mount -a| 1 | Important to create the volumes in the current directory. |
| 2 | The host port will be 8082 and the jail port will be 80, e.g. http://ip_nas:8082 |
| 3 | With the fstab allows the data directory to be used while on the host through the create-volumes.sh |
| 4 | ip address to access the nextcloud. |
| 5 | ip address of the mariadb database. |
| 6 | With the appjail fstab we mount the dataset inside the jail at once. |
Environment variables, comparison with docker
Appjail allows setting environment variables like docker, things that @DtxdF knew for its design.
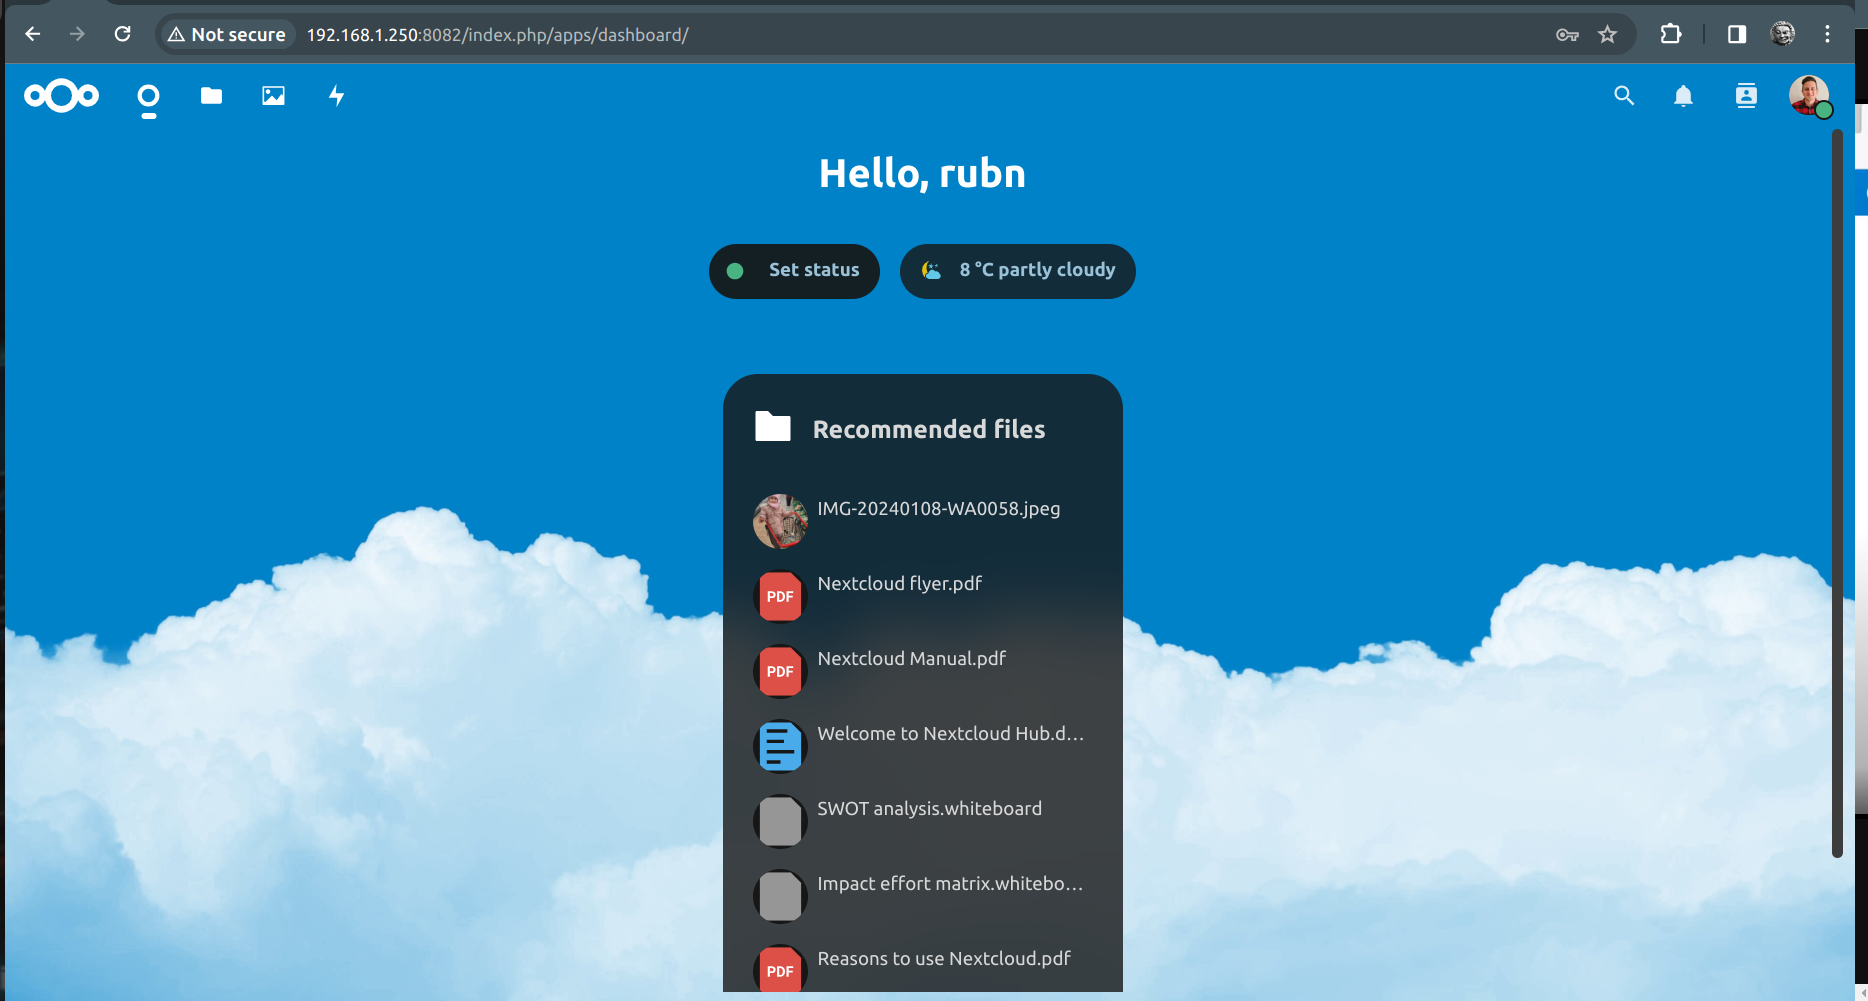
We deploy first MariaDB and then Nextcloud everything should be fine and access the UI.
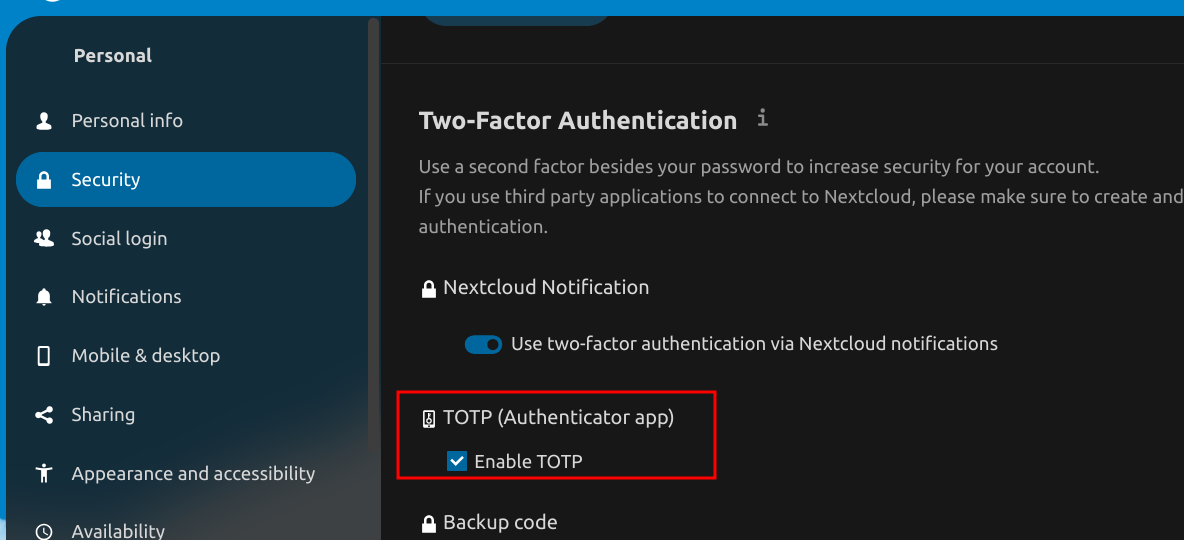
Enabling Server NTP for the 2FA
If, without the correct time, it will ultimately result in the TOTP (Authenticator app) not working correctly, then the initial code generation by entering it in the nextcloud input would not work.
| The following error notification is not helpful at all, and in the logs, it does not say what is happening. |
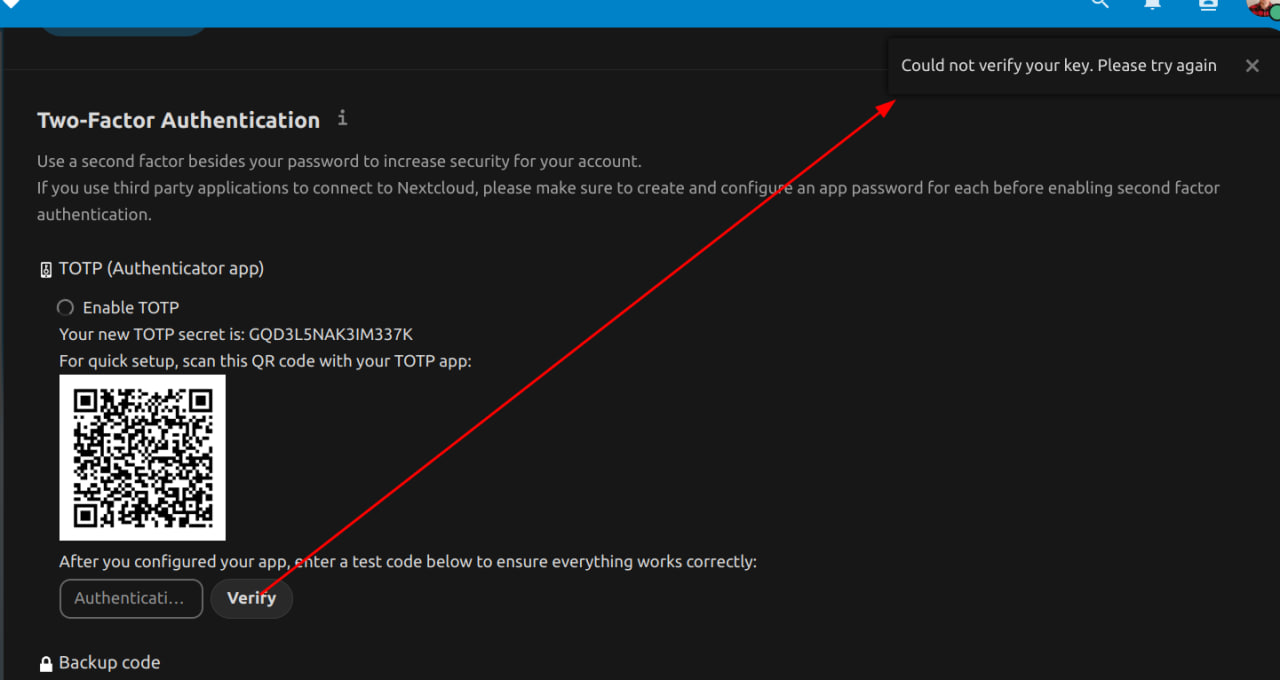
| When we correctly configure the NTP server on our server, the time will be correctly synchronized and the 2FA will be ready. |
| Info |
Tunning in config.php
This file is in the path of
/usr/local/appjail/jails/nextcloud/jail/usr/local/www/nextcloud/config 'default_phone_region' => 'ES', (1)
'opcache.enable' => 1,
'opcache.enable_cli' => 1,
'opcache.memory_consumption' => 512,
'opcache.interned_strings_buffer' => 10, (2)
'opcache.max_accelerated_files' => 10000,
'opcache.revalidate_freq' => 1,
'opcache.save_comments' => 1,| 1 | This is a suggestion from nextcloud in the Overview Security & setup warnings section. |
| 2 | This is another suggestion from that section. |
Redis cache
To enable the redis cache, we add this config, it can be optional but I prefer to do it at once, for sure the performance will be seen when there is a high amount of files.
'memcache.local' => '\\OC\\Memcache\\Redis',
  'memcache.locking' => '\\OC\\Memcache\\Redis',
  'filelocking.enabled' => 'true',
  'redis' =>
  array (
    'host' => '/var/run/redis/redis.sock',
    'port' => 0,
    'timeout' => 0.0,
),| It is important to have redis cache installed correctly, because otherwise it can affect the display of documents in the nextcloud for example. |
Nextcloud Logs
appjail cmd jexec nextcloud cat /var/log/nextcloud/nextcloud.logOr from the web interface is also useful
Using the occ
“ownCloud Console”
This command is quite useful to run on FreeBSD, as a test let’s remove the index.php from the URL’s
'htaccess.RewriteBase' => '/', (1)| 1 | We add this in the config.php file |
And we run this:
appjail cmd jexec nextcloud occ maintenance:update:htaccess (1)| 1 | This will update the .htaccess./ |
Before and after index.php removal
| We write the url in the browser, regardless of whether we clear cache in it. |

| It would be the same if we access it remotely. |
Remote access
For remote access we must do things like having a dynamic DNS with any provider we like.
In the config.php it is important to have this.
|
'trusted_domains' =>
array (
    0 => 'localhost',
    1 => '192.168.1.250',
    2 => 'subdomain.domain.com', (1)
),
'overwrite.cli.url' => 'https://subdomain.domain.com', (2)
'overwriteprotocol' => 'https', (3)| 1 | Important for remote access. |
| 2 | This will also be an important line. |
| 3 | This allows access from the Android nextcloud client, and without the client generating an error, but the local connection will not be possible. |
To simulate that we are outside our network and access an internal service of ours ( nextcloud for example ), we need a proxy and TOR is comfortable for me.
When decompressing I simply use
./start-tor-browser.desktop --register-app (1)| 1 | I created an icon to use it in Ubuntu and that’s it, nothing complicated. |
Social login
The authentication that we all know, with different types of apps, is usually quite comfortable, clearly we must adjust it a little bit.
Also with the previous step to have remote access, our nginx server and config.php must be set correctly to allow these apps to work well.
With Google
To enable the Google sign in you must go to google cloud to make the configuration, we must not pay anything.
| The OAuth consent screen if we do not have it, we must do it and it is nothing complicated, but it does have fields with a little strange terms, here we will define the name of our app. |
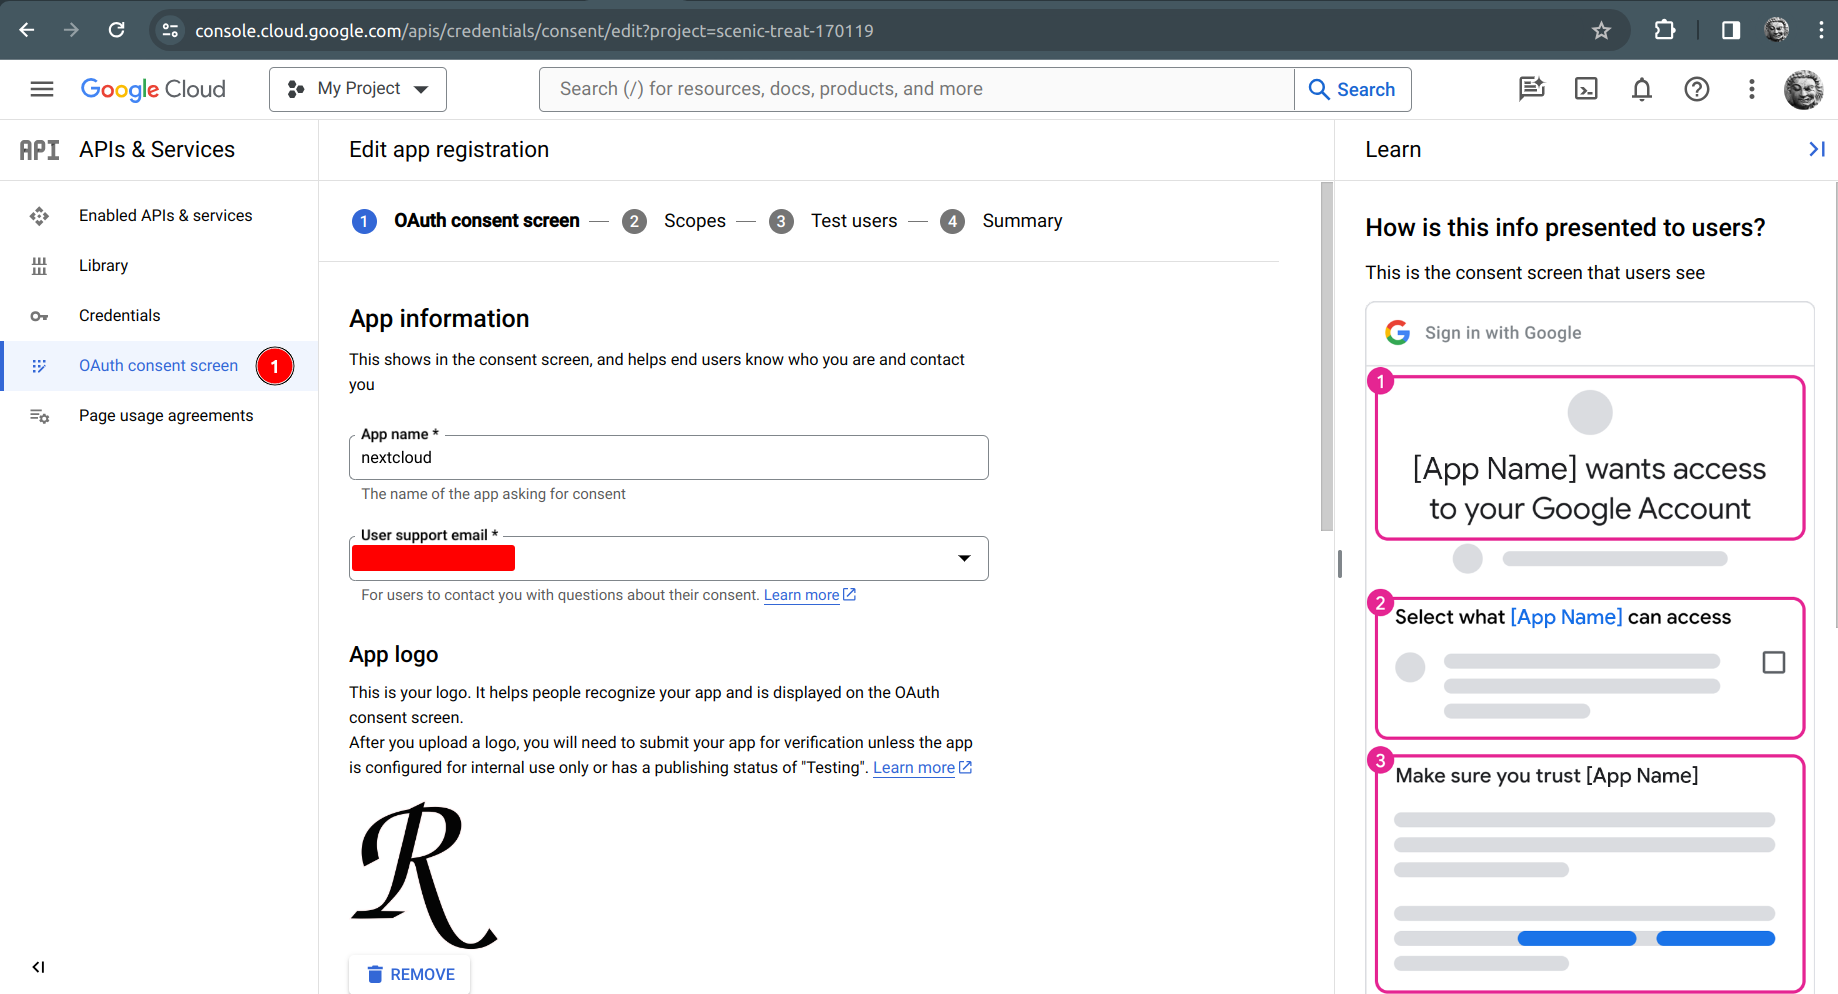
| To get to this view, it is assumed that we have the application created, and we can visualize this: |
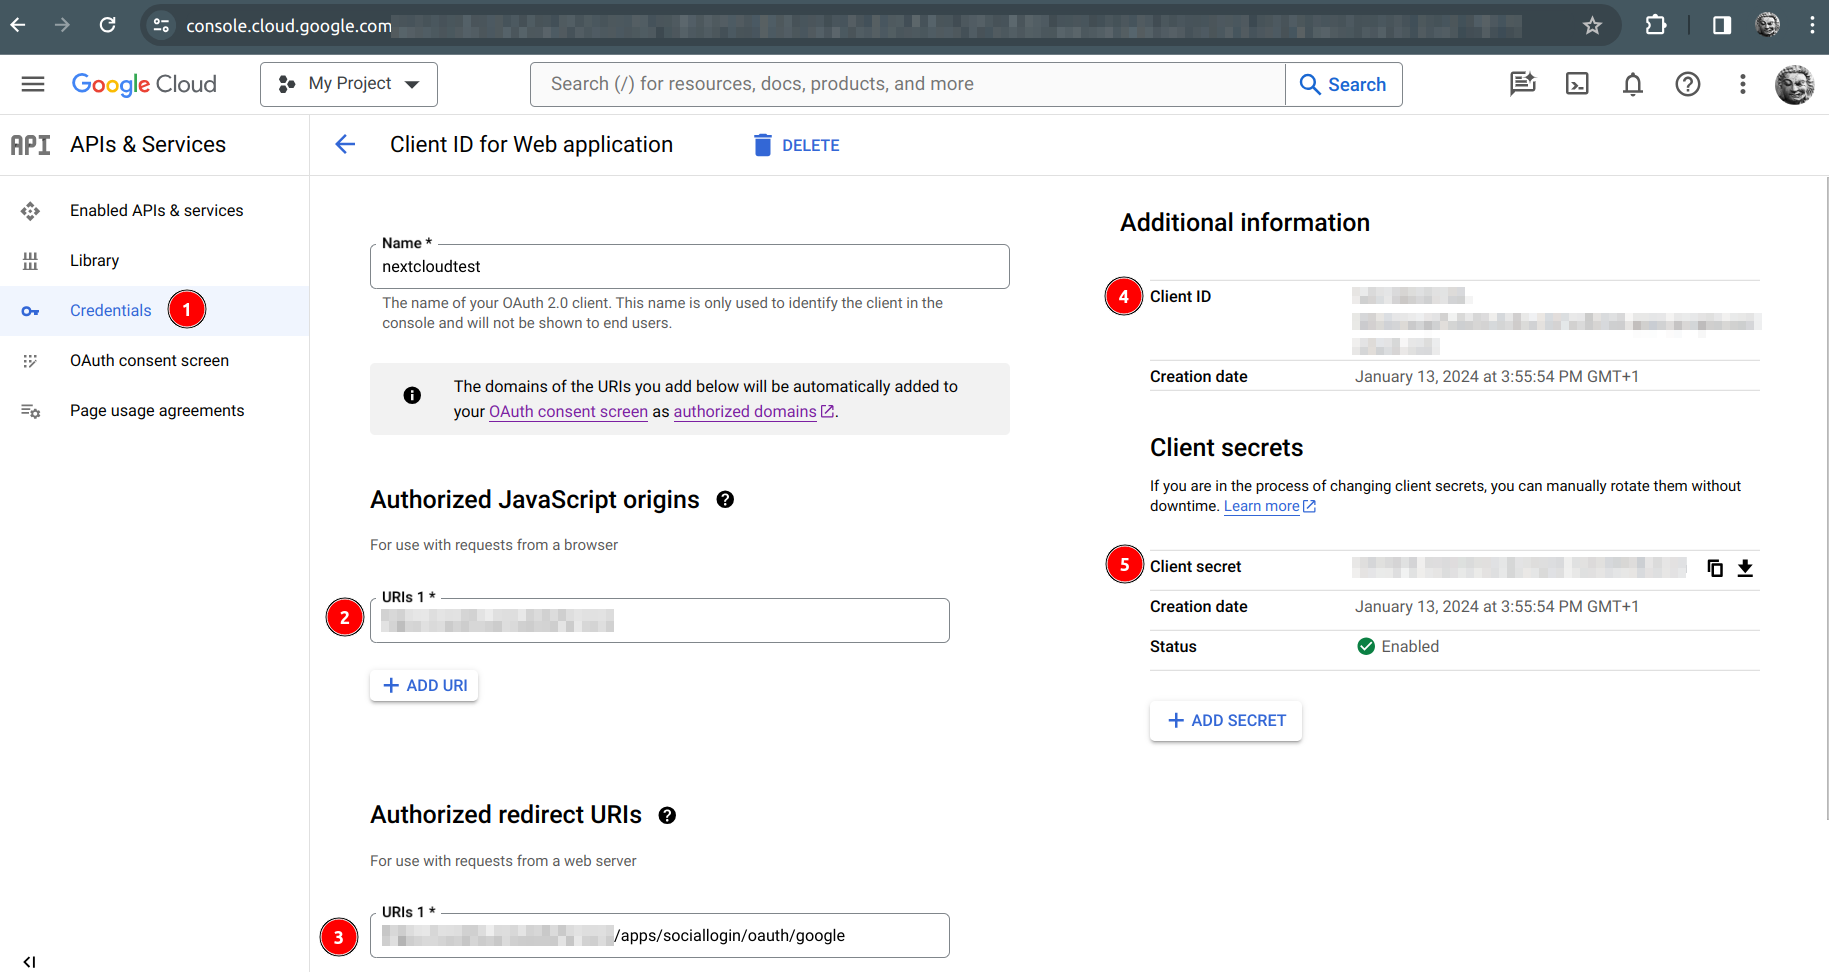
-
Client ID -
Client secret
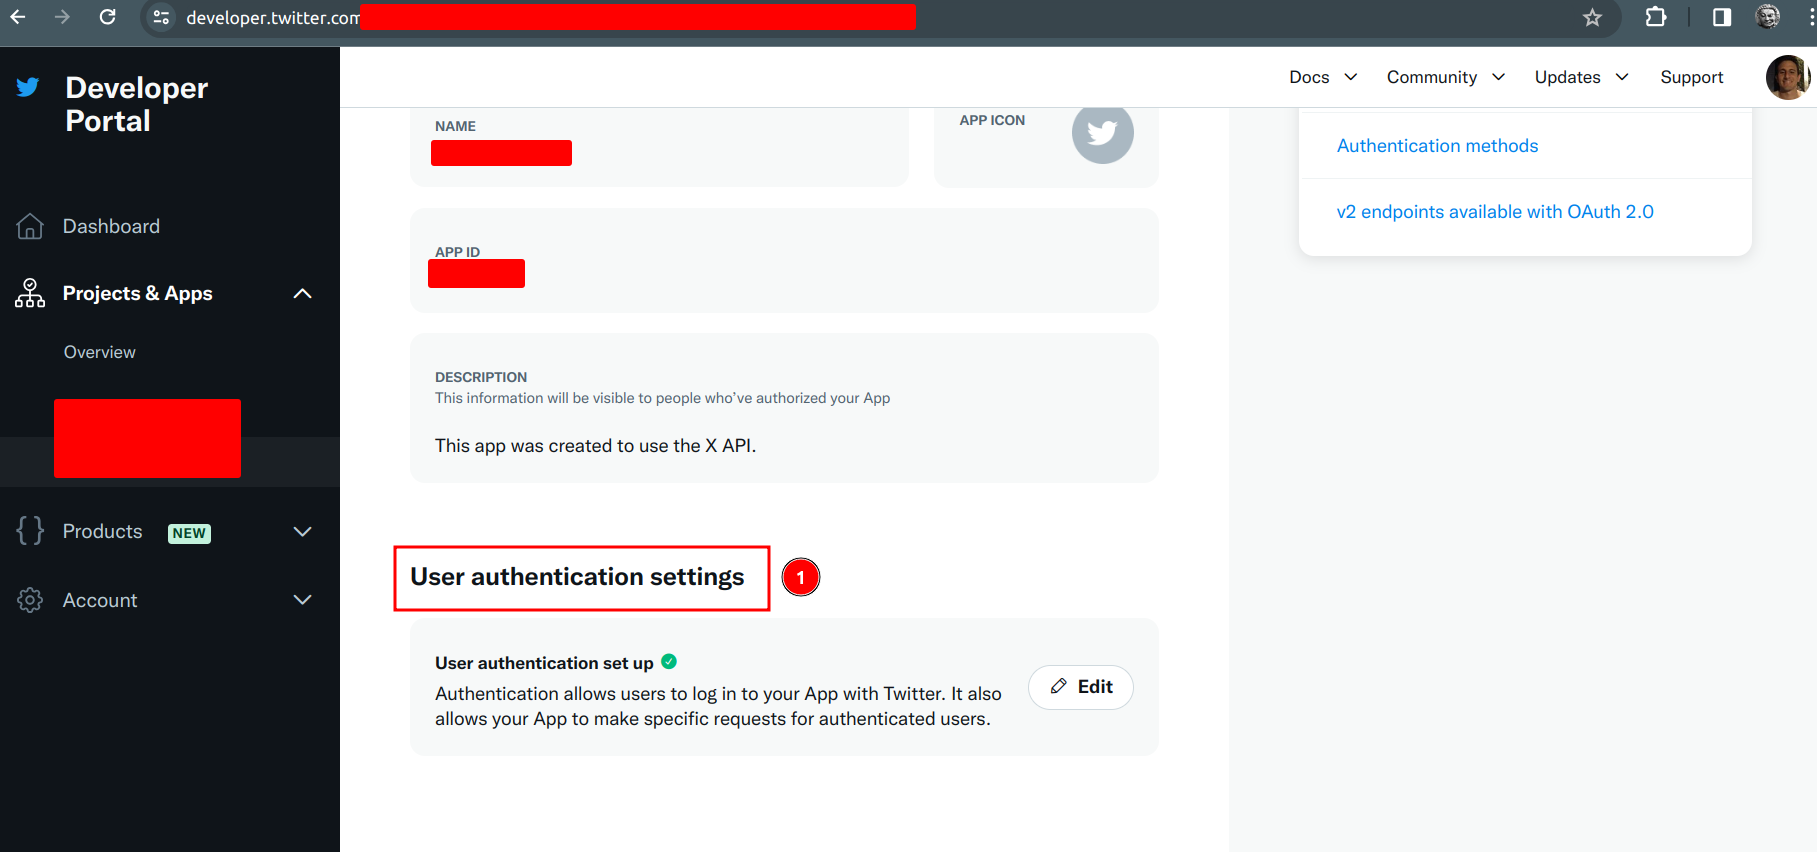
With Twitter
With the Twitter instructions we must go to Developer portal, they are still using the Twitter name, weird that it doesn’t have the name and logo yet 😂
With Twitter we need to enable Oauth 1.0 which will allow us to authenticate with it.
| Then create our app with the necessary requirements, go to User authentication settings |
Following section number 3, we use the redirection URL, very similar to google, we fill those two fields yes or yes.
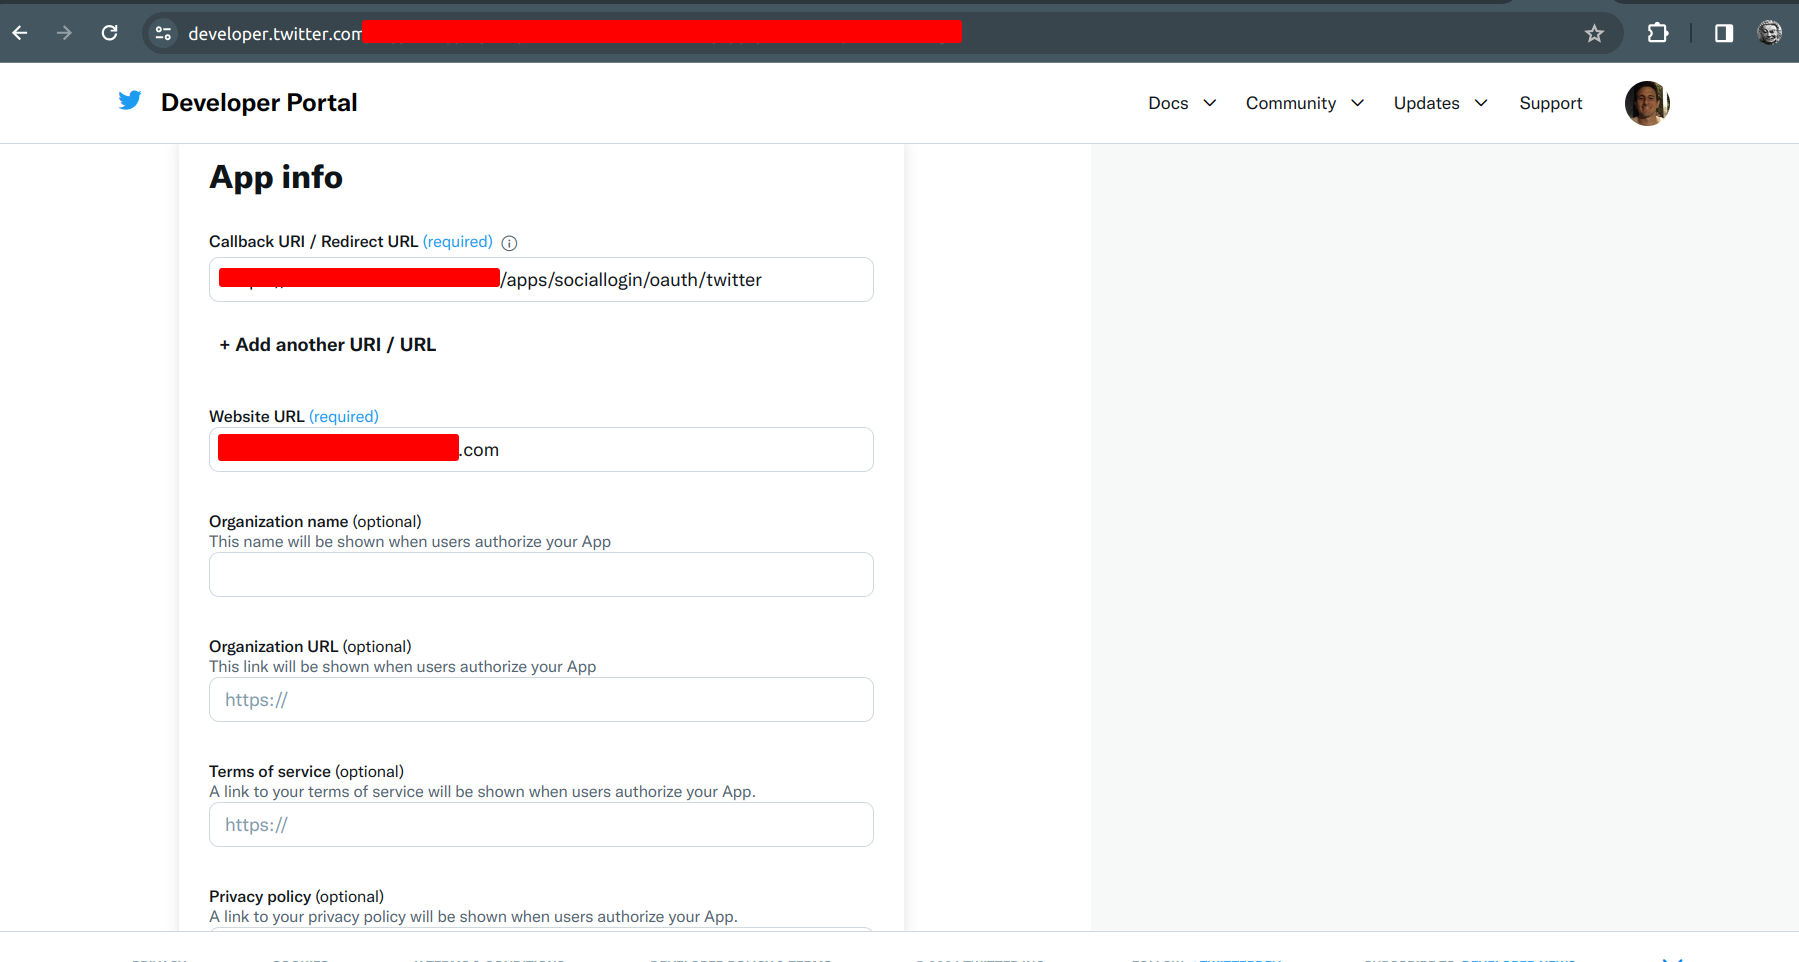
Right in this part, we have what is the consumer api key to authenticate us with a twitter account, this data will be used in the nextcloud.
-
API key -
Secret
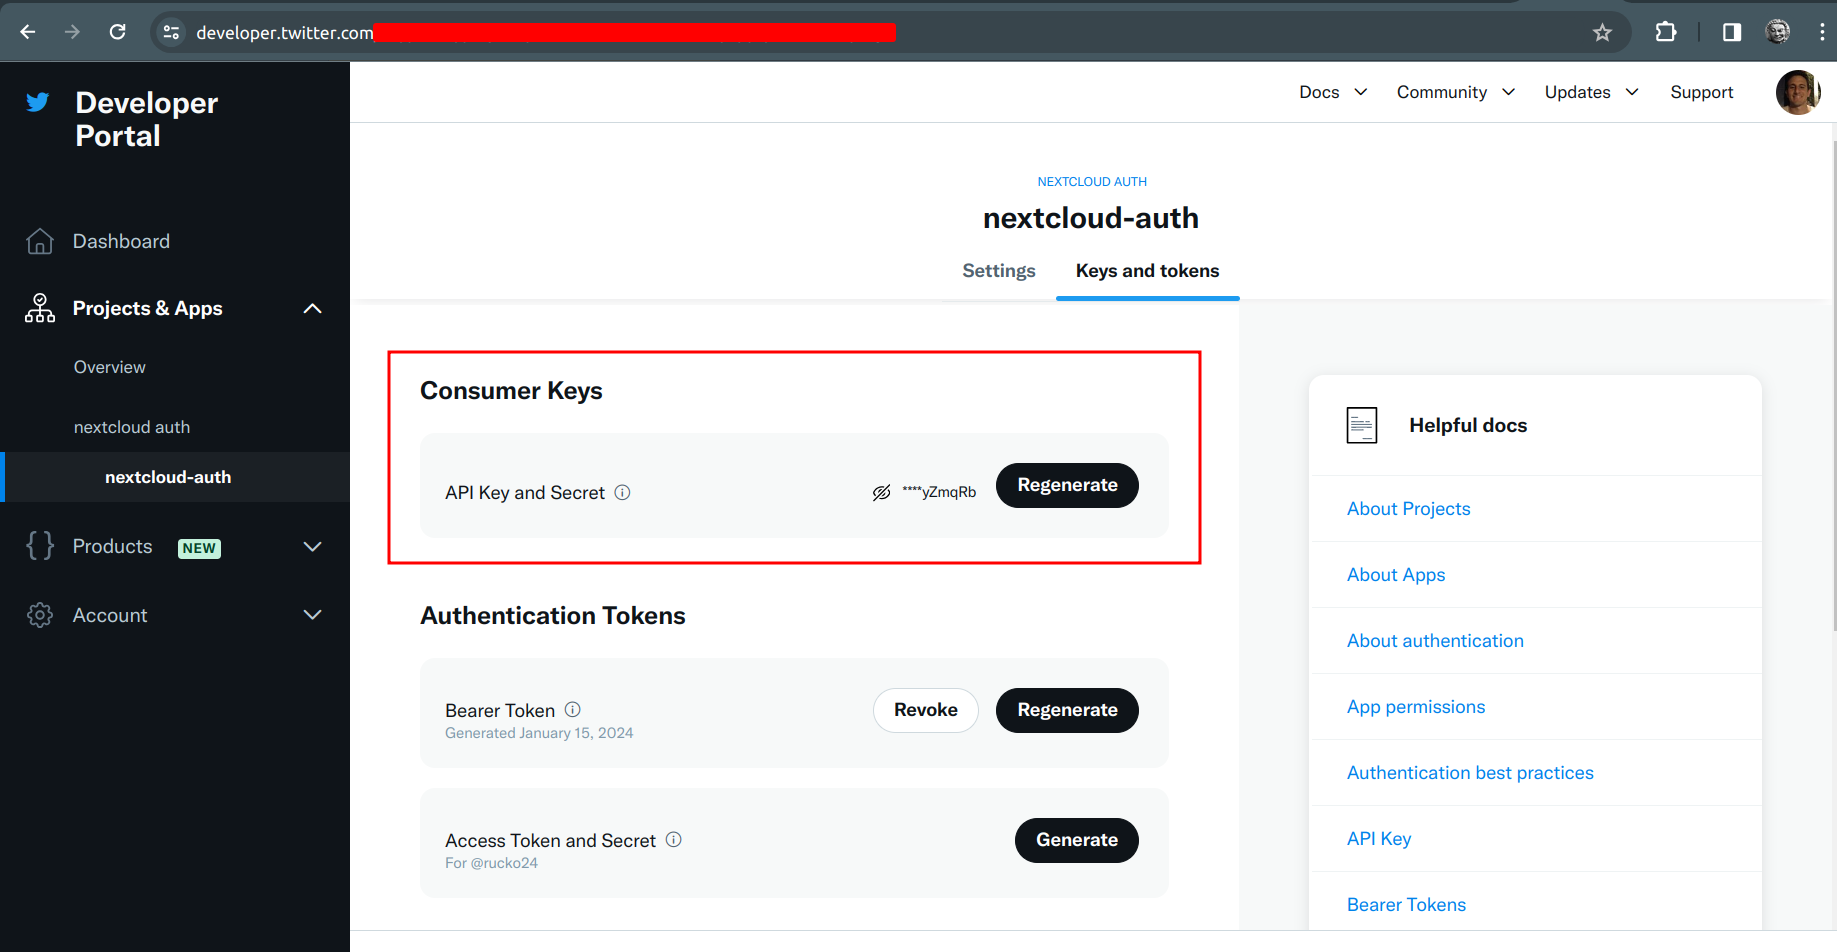
| At first I thought I should use OAuth 2.0 Client ID and Client Secret but no, that’s not it. |
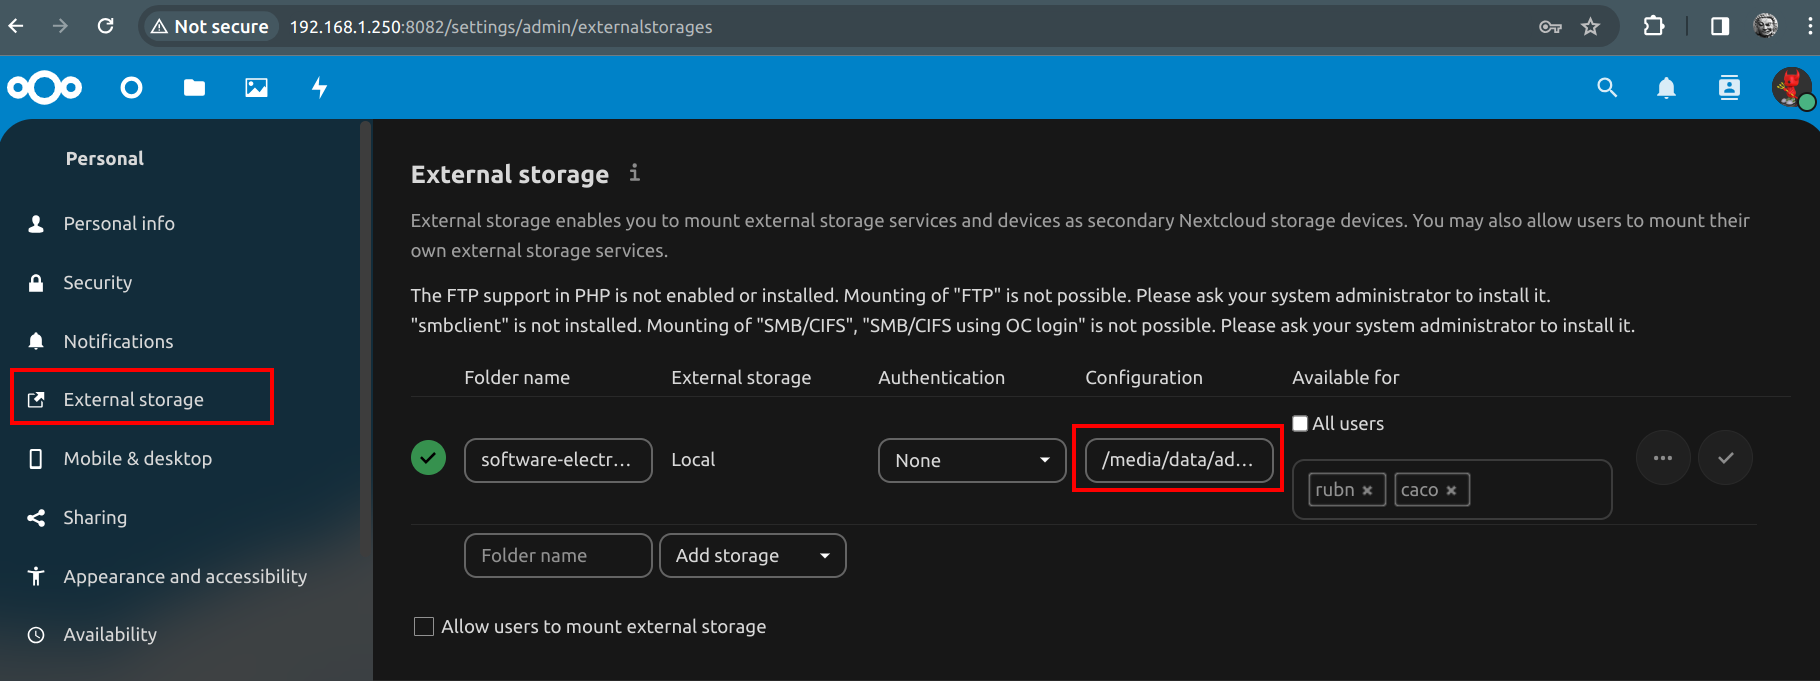
fstab with AppJail
We reach a point where we need to add an existing directory in our jail.
With appjail we can adjust the fstab in a different way than normally, but it should be noted that depending on whether we have the jail active or not, it is better to be cautious.
With the jail stopped
We can make
appjail cmd jexec nextcloud chown -R www:www /media/data/admin/software-electronica (1)| 1 | We create the directory software-electronica |
appjail fstab jail nextcloud set -d /mnt/pool/software-electronica -m /media/data/admin/software-electronicaWith jail active
appjail fstab jail nextcloud set -d /mnt/pool/software-electronica -m /media/data/admin/software-electronica
appjail fstab jail nextcloud compile
[00:00:00] [ debug ] Compiling fstab #0: /mnt/pool/dir /path/new-data-dir-for-nextcloud nullfs rw 0 0
appjail fstab jail nextcloud mount -a
That is to allow more characters that a normal fstab could not.
At the end we have this, the green check indicates that everything is ok with the new path and directory inside the jail.
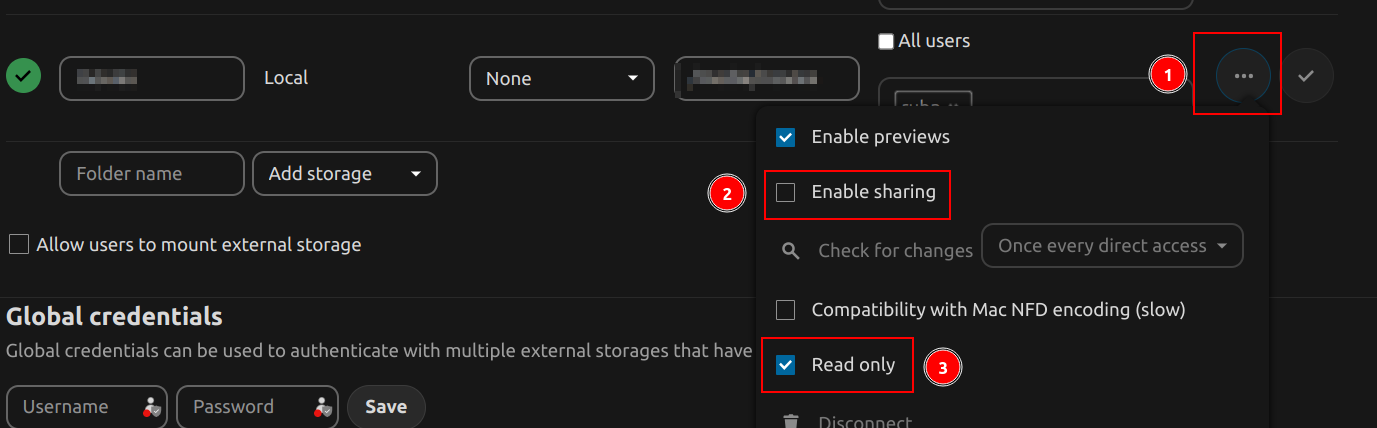
Mark directory as readonly
-
On these 3 points, there are options.
-
If we enable this, it allows us to share from this path, it is optional.
-
To mark the directory as read-only, very useful for not deleting anything, although there is a recycle garbage can.
External storage permissions update
If we have a directory that uses the external storage and for some reason the permissions have been changed, in order to reflect them in the UI correctly, you have to execute a command with occ files:scan --all
-
occ files:scan --all --home-onlythis allows you to avoid scanning the external storage paths.
| occ files:scan --all -help |
Then we would have this output for example:
root@nextcloud:~ # occ files:scan --all
Starting scan for user 1 out of 4 (admin)
... removed for brevity
+---------+-------+-----+---------+---------+--------+--------------+
| Folders | Files | New | Updated | Removed | Errors | Elapsed time |
+---------+-------+-----+---------+---------+--------+--------------+
| 2545    | 11646 | 0   | 533     | 0       | 7      | 00:05:06     |  (1)
+---------+-------+-----+---------+---------+--------+--------------+| 1 | This indicates that the scan is finished. |
Dismount directory with fstab
If we want to dismount a unit
appjail fstab jail nextcloud umount \
path/directory-to-dismount (1)| 1 | Specifying the directory name without the initial / slash. |
Tips nextcloud backups
It’s always the same story so we see how to reuse a dump, and have the root password around.
| Actually when I build the mariadb jail, I do a dump restore, and then continue with the nextcloud installation. |
Inside the container we do the dump like this:
root@mariadb:~ # mariadb-dump -u root -p --all-databases > dump-nextcloud.sql
Enter password:
root@mariadb:~ # ls
.cshrc			.k5login		.mysql_history		.shrc
.history .login .profile dump-nextcloud.sql (1)| 1 | The dump created and named dump-nextcloud.sql |
DROP from the database we created at the beginning, that is nextcloud.
root@mariadb:~ # mariadb -h 127.0.0.1 -u root -p nextcloud -e "DROP DATABASE nextcloud"CREATE
root@mariadb:~ # mariadb -h 127.0.0.1 -u root -p -e "CREATE DATABASE nextcloud"RESTORE
root@mariadb:~ # mariadb -u root -p nextcloud < dump-nextcloud.sqlnextcloud@127.0.0.1 [(none)]> SELECT VERSION()
-> ;
+-----------------+
| VERSION() |
+-----------------+
| 10.6.16-MariaDB | (1)
+-----------------+
1 row in set (0.000 sec)| 1 | Seeing the version we have, just in case in the future, but not in this case. |
Error with TOPT after backup
If we have error with the 2FA of TOTP at the moment I imagine creating a new user as admin could restore the QR, otherwise delete it and start again.